Quantcast
Channel: SeriousTek
Viewing all 48 articles
Browse latest View live

Demo NetScaler Datastream with SQL AlwaysOn

$
0
0

Is your database application not performing as well as it should? Is your SQL Server running low on resources? Is your application not written to take advantage of SQL AlwaysOn Availability Groups or database sharding? If you answered yes to any of those questions, then NetScaler Datastream to the rescue! Or, maybe you are looking to demo NetScaler Datastream to get a better idea of what capabilities it has in your SQL environment. If that is the case, look no further – in this post I’ll cover the basics of how to setup NetScaler Datastream to work with a SQL AlwaysOn cluster.

If you are not familiar with what NetScaler Datastream technology is, take a look at this blog post. It allows you to improve SQL Server performance in the same way that the NetScaler improves performance for web servers – SQL connection multiplexing is similar to TCP multiplexing.

How Datastream works with AlwaysOn

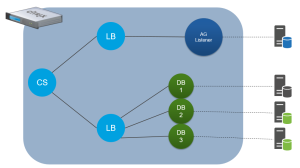
Let me explain. No – there is too much -let me sum up: the NetScaler speaks SQL. A content switching virtual server will be the target for clients connecting to the availability group. This allows the NetScaler to see all of the incoming requests and determine on the fly if they are read requests – meaning the query contains a ‘select’ statement (and not an update, delete, or insert). Once identified, these queries are forwarded to any available replica.

If the query is determined to be a write (it contains an update, delete or insert etc) query, meaning it modifies the database, it is sent to the AlwaysOn listener which is always running on the primary (read\write) replica.

This provides numerous benefits:

  • The client connection string does not need to be configured for read-only intent
  • All of the benefits of Datastream apply to all connections
  • Database scaling is vastly simpler

What you will need

I will be setting up this demo using 3 SQL nodes in an AlwaysOn availability group. I am not going to go over this procedure as it is fairly straight forward and is covered here and here and numerous other places on the internets. In my example, I’m using SQL Server 2012 running on Windows Server 2012R2.

You will be creating a cluster with non-shared storage as well as a listener, so you will need 5 IP addresses: 1 for each node, plus 1 for the cluster and 1 for the listener.

For the database itself, I am using AdventureWorks2012 available to download from here.

The NetScaler configuration includes Content Switching, Load Balancing, Datastream policies, and Integrated Caching – while IC is not required, it makes for vast improvements for any resource intensive read-only queries used more than once. IC is available with Platinum or as an add-on to Enterprise edition.

The Content Switch is the only required IP address on the NetScaler – all of the backing load balancers can be non-addressable.

For further reference, be familiar with the following:

datastream


Step 1: Get the SQL environment configured

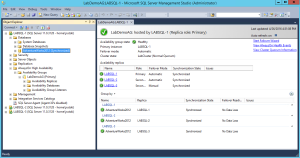
I’m not going to spend much time here, as the links above should provide more than enough guidance on how to setup the nodes and the cluster. In the end, you should have the Availability group dashboard show as follows:

SQL_SSMS

Note that the secondary replicas will need to be set as read\only.

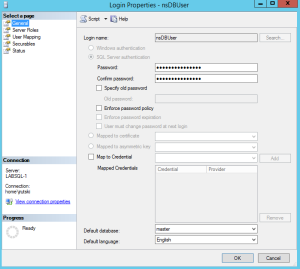
We also need to configure a database user on the NetScaler for it to use for backend connections. This user will need access to the AdventureWorks database as well as server rights as the SQL monitors will use this account as well – in this example, the user is nsDBUser.

DBUser

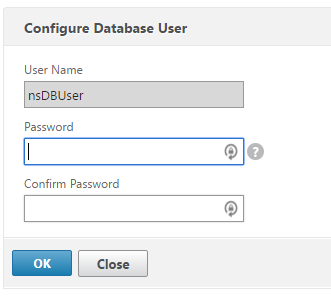
On the NetScaler, configure the user (System > User Administration > Database Users)

dbUser2

Step 2: Configure the servers and services on the NetScaler

We’ll start with defining each of the servers on the NetScaler – do this how ever you are most comfortable, but you will need four in this example: 3 nodes and 1 listener

servers

Then bind the services to these servers – stick with the default TCP monitors for now, we’ll build the custom SQL monitors shortly.

services

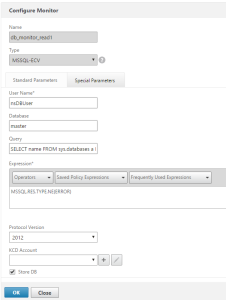
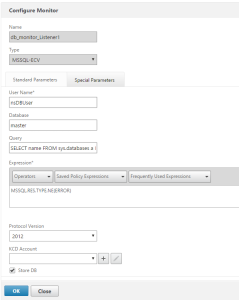
Next, we need to build the custom SQL monitors – there will be two in this case, one for read queries and one for write queries.

Read DB Monitor

Type: MSSQL-ECV

SELECT name FROM sys.databases a INNER JOIN sys.dm_hadr_availability_replica_states b ON a.replica_id=b.replica_id WHERE b.role=2

Here is what it looks like configured:

mon_read

Write DB Monitor

Type: MSSQL-ECV

SELECT name FROM sys.databases a INNER JOIN sys.dm_hadr_availability_replica_states b ON a.replica_id=b.replica_id INNER JOIN sys.availability_group_listeners c ON b.group_id=c.group_id INNER JOIN sys.availability_group_listener_ip_addresses d ON c.listener_id=d.listener_id WHERE b.role=1 and d.ip_address like '10.1.1.120'

**NOTE: change the IP address in the query to match your listener IP address

Configured:

mon_write

Bind the write monitor to the listener service and the read monitor to the 3 nodes.

Step 3: Configure the load balancing vServers

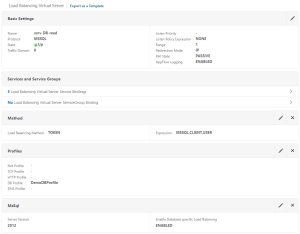
For the LB vServers in this demo, we will need 2:

  • Read only LB vServer
    • Consists of all nodes of the AG cluster (including both the primary and read\only secondaries)
    • non-addressable
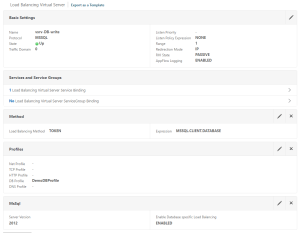
    • load balancing method: Token; Expression: MSSQL.CLIENT.USER

LBRead

LBReadSVC

  • Writable LB vServer
    • Consists of the AG listener service only
    • non-addressable
    • load balancing method: Token; Expression: MSSQL.CLIENT.DATABASE

LBWrite

LBWriteSVC

Notes:

  • The Token load balancing method implies persistence, therefore, do NOT configure a persistence method when using token load balancing
  • The expression used should match your scenario

Step 4: Configure the content switching vServer

First, we will create the content switching policies – we need two in this case, one for read and one for write.

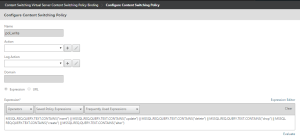
The write policy contains expressions to match queries that modify the database, so there are several SQL commands at play here:

MSSQL.REQ.QUERY.TEXT.CONTAINS("insert") || MSSQL.REQ.QUERY.TEXT.CONTAINS("update") || MSSQL.REQ.QUERY.TEXT.CONTAINS("delete") || MSSQL.REQ.QUERY.TEXT.CONTAINS("drop") || MSSQL.REQ.QUERY.TEXT.CONTAINS("create") || MSSQL.REQ.QUERY.TEXT.CONTAINS("alter")

writePol

Next, the read policy needs to look for a query containing the select keyword.

MSSQL.REQ.QUERY.TEXT.CONTAINS("select")

Now we create the CS vServer – this will be an IP address vServer of type MSSQL on port 1433. The two previously created policies are bound – with target LB vServer set accordingly.

CS_pol

CSVserver


Step 5: Deploy a demo web application

I could not find any demo applications for the AdventureWorks database – I’m sure there are some out there, but I also wanted the ability to make a few changes and configure the app to my liking. That being said, I took some time to create a simple .NET web app that allows you to test and demonstrate the capabilities of the NetScaler Datastream configuration. My goals were:

  • A simple, effective web app
  • Allowed for a few query types (simple select, insert, and long running queries)
  • Needed to be edit-able

So that said, here’s the web app in action – see below for the source code:

DSDemo3

DSDemo1

DSDemo2

If you are interested in the source code for this, it can be found here: DemoApp1.zip

You will need to modify the two connection strings in the web.config to point to the CS vServer as well as the SQL Listener IP address

BONUS Step 6: Configure integrated caching

As an added bonus, you should also configure the integrated caching feature on the NetScaler to allow for frequently used read queries to have their results cached so that the backend SQL servers do not have to use additional resources on duplicate requests. You’re probably thinking that the data in a database changes from time to time – that’s OK, because the NetScaler is constantly watching the queries being issued such that when a write (insert, update, delete, etc) is made to the database, the contents of the cache are flushed. Don’t forget to enable the Integrated Caching feature if you have not done so already – we will also need to tune the memory available to the SQL DB content group once everything is configured.

First, configure the two cache selectors (Optimization > Integrated Caching > Cache Selectors)

invalidator_db1:

MSSQL.REQ.QUERY.TEXT.AFTER_STR("from").BEFORE_STR(";") ALT MSSQL.REQ.QUERY.TEXT.AFTER_STR("into").BEFORE_STR(" ")

selector_db1

MSSQL.REQ.QUERY.TEXT

selectors

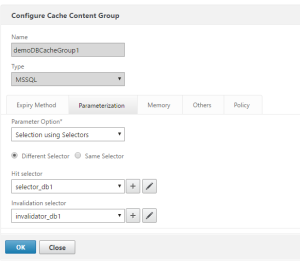
Next, configure content group for MSSQL:

ContentGroup1

Add the selectors we created previously:

ContentGroup2

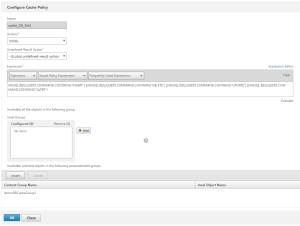
Save the content group for now. We need to create the cache and invalidate policies (Optimization > Integrated Caching > Policies) – we’ll start with the write cache policy that will invalidate the contents when a modification is made to the database. The expression will be:

MSSQL.REQ.QUERY.COMMAND.CONTAINS("INSERT") || MSSQL.REQ.QUERY.COMMAND.CONTAINS("DELETE") || MSSQL.REQ.QUERY.COMMAND.CONTAINS("UPDATE") || MSSQL.REQ.QUERY.COMMAND.CONTAINS("ALTER")

cachePolWrite

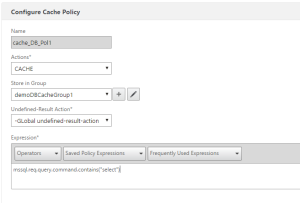
Next the read, or ‘cachable’ policy. Expression:

MSSQL.REQ.QUERY.COMMAND.CONTAINS("select")

cachePolRead

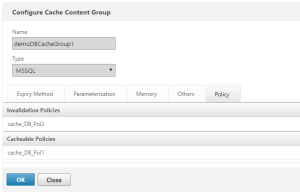
With these policies created, we will add them to the content group.

ContentGroup3

Finally, bind the cache policies to the previously created content switching vServer – ensuring that the invalidating policy has a lower priority.

cachePolBind

Note: if caching was not previously enabled on the NetScaler, you will need to tune the amount of memory available to be used for cache objects – this will require a reboot of the appliance. Please follow this article if you are not familiar with the procedure: http://support.citrix.com/article/CTX124553

Once you start sending queries to the CS vServer, you should see policy hits as well as cache objects start showing up.

cacheObjects

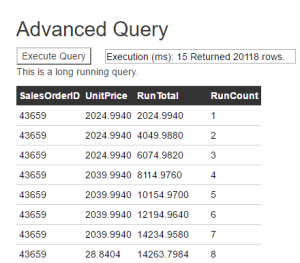
Oh, and that query that previously took 29 seconds, now took 15ms as it was served up from cache.

advQuery2

Summary

NetScaler Datastream can help scale and optimize the performance of your SQL database applications in the same ways that it improves web server performance.


The post Demo NetScaler Datastream with SQL AlwaysOn appeared first on SeriousTek.


Citrix Secure Gateway is EOL…Now What?

$
0
0

Is Citrix Secure Gateway really End of Life?

Not really…it’s tied to the lifecycle of the latest product that it was released with which would be XenApp 6.5 – which is incidentally the last product that it works with. Secure Gateway also does not work with any version of StoreFront, so you’re stuck with Web Interface. What does secure gateway do? It allows for an SSL connection to XenApp and XenDesktop resources to be proxied from the outside world. That’s it – more on that later.

I’ve been on several calls lately talking about upgrades and moving on from Citrix Secure Gateway – upgrading to NetScaler Gateway or even full NetScaler. Why does this keep coming up? I thought we were done with this. I get it – it was a free companion product that worked fairly well for what it was and SMBs used it quite extensively. So now that those same customers are looking to make the move from WI to StoreFront or from XenApp 6.5 to the 7.x line – this is becoming an issue. Let’s talk about why CSG had such wide adoption.

It’s free.

My response to this was that you get what you pay for. Yes it worked, but post 2013 Snowden leaks, cryptography and security have become more important than ever. If you want to argue about security, the fact that CSG is a Windows box in your DMZ will pretty much lose any argument.

So that’s really the only point I can come up with that is valid – if the environment is too small to warrant the need for a paid solution, then how about a full NetScaler Standard VPX express license. Yes that’s right – not only do you get CSG functionality replacement, but you also get all of the NetScaler standard features – albeit limited by 5 Mbps of throughput. But again, it’s free. And it is FAR more secure than the CSG ever was. NetScaler VPX express info is available here.

What’s wrong with Secure Gateway

Or, why you should look forward to upgrading – yes, upgrading – your CSG deployment. OK, so a lot of this is exactly what Dan said in his post here, but I’m going to re-write it…because again, it’s apparently a hot topic (5 years later).

It requires a Windows box in your DMZ

As I alluded to earlier, CSG runs on a Windows system that likely needs to go in your DMZ. Any security conscious person will tell you that this is a bad idea. The NetScaler is a hardened security appliance that meets the requirements to be used in even the most secure federal networks.

High Availability

I commonly see Windows NLB in place to load balance CSG servers – so now not only do you have multiple Windows systems in your DMZ, but Windows NLB is severely limited in functionality. The NetScaler has advanced high availability built in and is also able to intelligently load balance other services – StoreFront, XML servers, for example.

Access Controls

The NetScaler gateway allows customers to intelligently allow access based on numerous factors such as A\V software, domain membership, etc (see http://citrix.opswat.com/ for a full list). To explain that, lets consider the following example chart showing how CSG and NetScaler Gateway would perform with different remote access requests:

Citrix Secure Gateway NetScaler Gateway
Company Laptop Full access granted Full access granted
Company Laptop without A\V Full access granted Custom access to XenApp\XenDesktop: clipboard and printing allowed, but no local drive mappings
Personal Laptop without A\V Full access granted Minimal access to XenApp\XenDesktop; No clipboard, local drive mappings, or printing allowed
Company Laptop requesting VPN N/A Full VPN access granted
Company Laptop without A\V requesting VPN N/A Full VPN access denied; Clientless VPN and XenApp\XenDesktop minimal access granted

As you can see, SmartAccess and SmartControl offer more granular controls over remote access connections – neither of these technologies exist in CSG.

Authentication

All authentication happens at the Web Interface when using CSG – with a NetScaler Gateway, this can be done at the gateway (in the DMZ) before the end user ever gets to the web interface or StoreFront server. And yes, NetScaler Gateway supports two factor authentication (and many other types of authentication – smart card, SAML…)

Where do you go from here

I’m sorry to say that you just might have to purchase something – but realize that it is for the better…more features, better security and more scalability. Here are your options:

  1. NetScaler Standard VPX Express
    1. $0.00
    2. Full NetScaler Standard featureset, including NetScaler Gateway
    3. Limited to 5Mbps throughput
  2. NetScaler Gateway Enterprise On-premises VPX
    1. $Very Reasonable (Visit the Citrix Store – they’re cheap (seriously))
    2. NetScaler Gateway functionality only
  3. Full NetScaler Standard\Enterprise\Platinum
    1. $Wide range of cost based on numerous different platforms
    2. Full NetScaler featureset

The best part? If you end up starting with the VPX express, then need to upgrade – it’s just a license file. The underlying code and configuration stay the same. Need to upgrade to a full NetScaler MPX physical appliance? Not a problem.

Questions? Feel free to ask in the comment section.


The post Citrix Secure Gateway is EOL…Now What? appeared first on SeriousTek.

The blog has migrated!

$
0
0

I’ve been very happy with WordPress – it’s easy to use, has a TON of support behind it and can do just about anything you need it to do. After being self-hosted for a while, I realized that it was not a very good model for keeping the site up since my ISP is not super-reliable, and as much as I’d like it to be, the home lab is not an actual datacenter. So I needed to find a solution that was flexible and pretty cheap.

Last year I purchased a simple shared hosting plan with a common provider – I’ll call them “a blue hosting company”. Initially I was happy – configuration was simple, the WordPress install had several things pre-configured which was nice, and overall performance wasn’t bad – not great, but more on that later. It ran like this for a while, giving me an opportunity to find plugins for all of the functionality that I was missing from the recent move away from BlogEngine.NET.

Then the issues started. Admittedly, the issues were very sporatic and not very long-lived, but I have never seen the variety of error codes from the same provider\product. It started with just a 404 here and there for the root of the site. Then,errors 502, 503, and 504 showed up. A lot. And “Blue Hosting company” support was only sort-of helpful on one occasion when my instance was on a “bad host and will be migrated” – all other times, and I quote, “The site appears up on our end…”

Time to find a better WordPress Hosting Provider

I asked around for some good, cheap alternatives and found DigitalOcean – for the same price, I was going to have a full instance rather than a shared site. This has several benefits:

  • Much easier administration and troubleshooting since you have access to the underlying system
  • Ability to add an SSL certificate
  • Simplified backups
  • Potential to use this instance for more than just WordPress hosting in the future

Two of the above things were possible with the previous provider (SSL and backups), just at an additional cost. Plus, I was able to get some credits for about 2 months free.

The Migration

The migration was made easier thanks to having access to a full Linux system as well as the UpDraft backup plugin – it was a simple backup and restore (they also have a migration option, but that seemed like overkill for what I was doing).

My notes from the migration:

  • Make sure to tell your Google tools that you’re going from HTTP > HTTPS
  • PHP7 broke a few plugins that needed to be manually removed – fortunately they were either not in use, or I could live without them
  • For some reason, PHP-XML didn’t get installed during initial install, so that prevented JetPack and the WP app from working (xmlrpc.php was returning error 500)
  • Apache didn’t like the intermediate certificate I was using – had to go grab the .pem version

A word on Performance

The DigitalOcean instance is beyond faster than the previous shared instance ever was – hopefully it is noticeable to you! Administration of the site is also vastly improved – editing, photo management, updates – all are SOO much snappier.

I’m a happy DigitalOcean customer.


The post The blog has migrated! appeared first on SeriousTek.

NetScaler Authentication Error – /cgi/selfauth

$
0
0

While I was rebuilding my lab, I ran into an issue when building out my demo Exchange OWA front-ended by NetScaler – the error was pretty generic, I would attempt to access the OWA page, was then prompted for authentication by the NetScaler AAA engine running as a part of Unified Gateway, then I was dumped to the following error page:

Http/1.1 Service Unavailable – /cgi/selfauth/xxxxx

OWA_CSW3

This error page is being presented by the NetScaler, and is nothing new – it usually means that a backend connection has failed or there are no policy matches on a Content Switching vServer and a default vServer is not configured – that is the case here as this is a CSW vServer for Exchange.

The Fix

We need to create a SelfAuth CSW policy and bind it to the OWA vServer. Here is the Content Switching policy that handles this error:

OWA_CSW1

The expression is:

HTTP.REQ.URL.PATH.SET_TEXT_MODE(IGNORECASE).STARTSWITH("/cgi/selfauth")

Then we need to bind the policy to the CSW vServer – in this case, you can see the other Exchange policies in place, with the new policy at the bottom:

OWA_CSW2

Once done, the OWA page comes up as expected after authentication. Fixed!

The post NetScaler Authentication Error – /cgi/selfauth appeared first on SeriousTek.

Adding an e1000 NIC in XenServer 7

$
0
0

*Note: This is not officially supported – do this at your own risk.*

Sometimes, virtual appliances or other random VMs in your lab need a simple, widely supported NIC and just wont boot (or install) without one. XenServer uses a Realtek RTL8139 10/100 card when you don’t have integration services installed. This is usually not an issue…but it certainly can be.

In older versions of XenServer, there was a patch available as mentioned in this thread that allowed you to use a custom field to apply the e1000 NIC to individual VMs rather than every single VM – the patch is available here. (read the thread first for instructions)

Now that XenServer 7 is publicly available, the patch above no longer works and throws the following error:

So, it looks like it can’t find the qemu-dm-wrapper file – because it is in a different location in XS7. That being said, I have not re-written the patch to look in the correct location (my python-fu is not what it should be) but I will tell you how to get it working, and you will still need the code from the patch.

We are going to manually modify the qemu-dm-wrapper file – if you don’t feel comfortable doing that, DON’T. I’m not responsible for you hosing up your Dom0…you’ve been warned. 🙂

in XS7, the file is located here:

/usr/libexec/xenopsd/qemu-dm-wrapper

So SSH into your XenServer and fire up your favorite text editor on the above file. We need to add two things:

  1. The e1000_enabled_os function
  2. The if statement in the main function

You can type these in by hand, but you will be using the source from the original patch – you should end up with this:

Capture

Then you will need to add the ‘NicEmulation’ custom field into the VMs and populate it with the string ‘e1000’ to get an e1000 NIC on your virtual machine.


Original Patch Code (Thanks to WANSec)

>>>PATCH START<<<

--- /opt/xensource/libexec/qemu-dm-wrapper-orig 2014-01-08 00:39:55.000000000 -0600
+++ /opt/xensource/libexec/qemu-dm-wrapper      2014-01-08 00:41:59.000000000 -0600
@@ -75,9 +75,31 @@
        setrlimit(RLIMIT_CORE, (limit, oldlimits[1]))
        return limit

+def e1000_enabled_os(argv):
+        import re
+        import os
+
+        res = re.search('((?:[A-Fa-f\d]{1,2}(?:[-:])?){6})', ' '.join(argv))
+        my_mac = res.group()
+
+        #print 'vif_uuid = xe vif-list MAC=' + my_mac + ' --minimal'
+        vif_uuid = os.popen('xe vif-list MAC=' + my_mac + ' --minimal').read().rstrip()
+
+        #print 'vm_uuid = xe vif-param-get uuid=' + vif_uuid + ' param-name=vm-uuid'
+        vm_uuid = os.popen('xe vif-param-get uuid=' + vif_uuid + ' param-name=vm-uuid').read().rstrip()
+
+        #print 'result = xe vm-param-get param-name=other-config param-key=XenCenter.CustomFields.NicEmulation uuid=' + vm_uuid
+        result = os.popen('xe vm-param-get param-name=other-config param-key=XenCenter.CustomFields.NicEmulation uuid=' + vm_uuid).read().rstrip()
+        if (result == 'e1000'):
+                return True
+        return False
+
 def main(argv):
        import os

+       if e1000_enabled_os(argv):
+               argv = [arg.replace('rtl8139','e1000') for arg in argv]
+
        qemu_env = os.environ
        qemu_dm = '/usr/lib/xen/bin/qemu-dm'
        domid = int(argv[1])

>>>PATCH END<<<

Once you have patched the file in Dom0, you need to add a Custom Field to the VM and enter the string ‘e1000’ to emulate an e1000 NIC, otherwise the Realtek NIC will be used.

Capture


The post Adding an e1000 NIC in XenServer 7 appeared first on SeriousTek.

Windows BitLocker text missing

$
0
0

I ran into an issue recently on my Dell XPS 15 running Windows 10 where the BitLocker PIN entry text was missing. I have BitLocker TPM+PIN enabled so at boot or wakeup from hibernation, I am prompted to enter a PIN to unlock the drive. The screen was still the same blue color but the problem was that all of the text was missing – it was a blank blue screen.

A workaround I found was to blindly enter the unlock PIN…but this is not optimal as I would have no idea if I typed it in wrong, etc. I also noticed with this workaround that the secure boot Dell logo was gone during boot and replaced with the stock Windows logo.

The Fix

The following procedure should fix the issue:

  • Boot into Windows using the above workaround
  • Suspend BitLocker protection
  • Open an elevated command prompt (run as administrator)
  • Type the following: bfsvc.exe %windir%\boot /v
  • Reboot the system
  • The PIN prompt will likely not show on the first reboot
  • Reboot again

The post Windows BitLocker text missing appeared first on SeriousTek.

Getting Started with NetScaler IP Reputation

$
0
0

Ever wish that you could just block all network traffic from known bad IP addresses? When you start to think about the logistics of this, it would be nice if you didn’t have to manage it either. If you have NetScaler Platinum, you’ve got both of your wishes – and as an added bonus, it’s free!

That’s right, if you have a NetScaler Platinum appliance and you are running build 11.0 or later, you have an IP reputation subscription at no additional cost. And you don’t have to manage the database, or honeypots, or anything associated with it – all of that is done by the provider: Webroot Brightcloud. Getting it setup on the NetScaler is easy, too.

Getting Started

First, the requirements:

  • A NetScaler appliance with a Platinum license
  • The NetScaler needs to be running 11.0 or later code
  • Either direct or proxied web access to: api.bcss.brightcloud.com over port 443
  • DNS must be configured and able to resolve the above FQDN
  • *Note: each node in an HA pair or cluster will download the IP Reputation database from the above FQDN, not via HA communication

Once the above is met, you can begin the configuration.

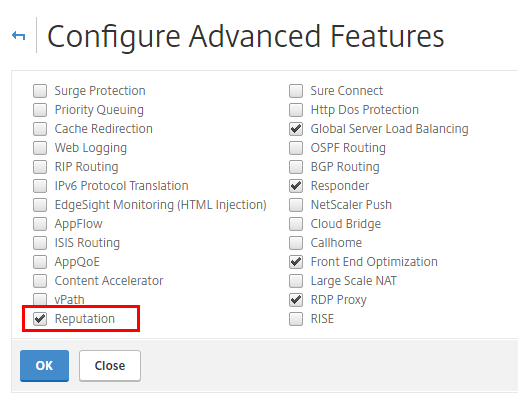
  1. Enable Reputation

GUI: System > Settings > Configure Advanced Features

iprep

CLI:

enable feature [ rep | reputation ]

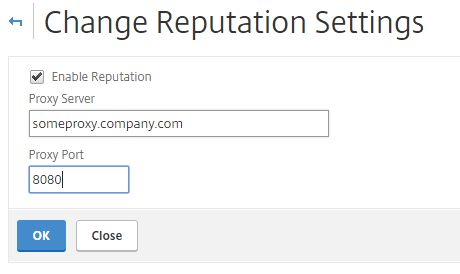
2. (optional) Configure proxy settings if needed – *Note: the Proxy Server can be an IP address or FQDN

GUI: Security > Reputation > Change Reputation Settings

iprep2

CLI:

set reputation settings -proxyServer <proxy server ip> -proxyPort <proxy server port>

3. Create and bind policies (see below)

Managing IP Repuatation Policies

IP Reputation (IPRep) can be configured using NetScaler default PI expressions in policies bound to supported modules – for example, Application Firewall, Rewrite and Responder. The expressions that can be used are as follows:

  • CLIENT.IP.SRC.IPREP_IS_MALICIOUS – this will evaluate to TRUE if the client is included in the malicious IP database
  • CLIENT.IP.SRC.IPREP_THREAT_CATEGORY(Category) – this will evaluate to TRUE if the client IP is found in the malicious IP database and is in the specified threat category

The available threat categories are:

  • SPAM_SOURCES
  • WINDOWS_EXPLOITS
  • WEB_ATTACKS
  • BOTNETS
  • SCANNERS
  • DOS
  • REPUTATION
  • PHISHING
  • PROXY
  • NETWORK
  • CLOUD_PROVIDERS
  • MOBILE_THREATS

Policy Examples

This command will create an AppFirewall policy that identifies a malicious IP address and blocks the request

add appfw policy ipr-pol1 CLIENT.IP.SRC.IPREP_IS_MALICIOUS APPFW_BLOCK

This example creates a policy that uses reputation to check the client IP address in a specific header (X-Forwarded-For) and resets the connection if a match is triggered

add appfw policy ipr-pol2 "HTTP.REQ.HEADER(\"X-Forwarded-For\").TYPECAST_IP_ADDRESS_AT.IPREP_IS_MALICIOUS" APPFW_RESET

Note that the above policy examples both use the Application Firewall feature of the NetScaler – if you are unfamiliar with the configuration of AppFW, a basic guide is available here.

Notes and Troubleshooting

If you need to manually whitelist an IP address, this can be done by binding the IPs to a Data Set (AppExpert > Data Sets) then binding to the IPRep policy; further examples are listed in the edocs page listed below.

  • The IP Reputation database is is fully downloaded initially when the feature is enabled; after that, a delta is downloaded every 5 minutes
  • The database iprep.db is located in the /var/nslog/iprep directory – it is not deleted even if the feature is disabled
  • The IPRep data is shared across admin partitions configured on an appliance

Additional information can be found here: https://docs.citrix.com/en-us/netscaler/11/security/reputation/ip-reputation.html

Troubleshooting:

  • Logs are located here: /var/log/iprep.log 
  • Watch for the following messages:
    • ns iprep: Not able to connect/resolve WebRoot – this indicates that the appliance may not have internet access or have DNS configured
    • ns iprep_curl_download:88 curl_easy_perform failed. Error code: 5 Err msg: couldn’t resolve proxy name – this indicates that the proxy configuration for IPRep may be incorrect
  • The IPRep feature takes approximately 5 minutes to begin functioning after initially enabling the feature

The post Getting Started with NetScaler IP Reputation appeared first on SeriousTek.

NetScaler SAML and Okta

$
0
0

These days, SAML authentication is mainstream and web services are expected to support it in some fashion or another; the SAML 2.0 standard is over 10 years old at this point! One of the key areas of focus for NetScaler is Authentication and Authorization and as such you would expect full support of SAML – and you’d be right. But if you’ve never worked with the SAML protocol, it can seem very daunting at first!

The basic idea behind why you need or want SAML is that you want to have some other ‘party’ be authoritative for authentication – other than what 99.99% of enterprises use for authentication, you know…Microsoft Active Directory. The problem with AD is that it only understands username\password and certificate based authentication – if you try to talk federation, it just won’t work natively.

There are three basic concepts with SAML: the Service Provider (SP), Identity Provider (IdP), and the Assertion. The SP provides something that the user needs – an application or service for example. The IdP is the thing that authenticates, or validates the identity of the user. The assertion is a means of communication between the two – SAML is based on XML, so the assertion is mostly human readable. In it’s current build, the NetScaler supports acting as an IdP, an SP, or even both.

NetScaler and SAML

The NetScaler has supported SAML as a Service Provider since the 10.1 build, but there are a ton of different features and functionality that you need to be aware of. If you are looking to do a SAML project with NetScaler, I would recommend at least NetScaler 11.0 build 64.34 to get the most supported features.

NetScaler as Service Provider NetScaler as Identity Provider
NetScaler 10.1 •Signing & Digest: SHA1 only

•Single attribute only

•Signature enforcement

•POST binding only

•NO: Encryption, single logout, AuthnContext, Holder of Key, Certificate Thumbprint

NOT SUPPORTED
NetScaler 10.5 •REDIRECT binding •POST binding only
NetScaler 11.0 •Attribute Names up to 127 bytes

•Timed Assertion Validity \ Clock skew

•Added ARTIFACT Binding

•Client Certificate Logon

•SAML Session Cookies

•HTTP 401 Authentication

•Multiple Attribute Configuration

•Redirect binding added

•Timed Assertion Validity \ Clock skew

•Pre-configured Trusted SP

NetScaler 11.1 •FIPS offload support with signing support now available using SAML bindings: REDIRECT & POST

•FIPS – Only SHA1 supported

•SAML IdP Complete message signing

•RSA 1.5 encryption support

•FIPS offload support with signing support now available using SAML bindings: REDIRECT & POST

•FIPS – Only SHA1 supported

Why Okta?

Because they give stuff away for free!!! If you have never worked with SAML before, if you’re trying to brush up on your SAML skills, or just want a publicly available SAML provider for your lab or testing, go check out Okta Developer – it’s completely free, and gives you everything you need to test, troubleshoot, and understand the SAML protocol. You get a dedicated SP or IdP with a public URL, 3 application definitions, and 100 users – FREE! Plus, you can integrate your Active Directory as well.

adint

A Few Notes

There is a LOT to understand about SAML, which I’m not going to cover in this post, instead, I’ll point you to this post here. But there are a few things you need to be aware of:

  • Configuring SAML is not very difficult – essentially, you are configuring two services to talk to each other, and the configuration must be identical on both sides
  • Some providers have different names for the same things, so be careful
  • The most common binding methods HTTP REDIRECT and HTTP POST do not require a direct connection between the IdP and SP – the assertion is carried by the user client, most commonly a web browser
  • SAML relies on timestamps, just like Kerberos does, so NTP must be healthy on your NetScaler (and across your entire network)
  • SAML supports both signing of the assertion to prevent tampering as well as encrypting the assertion with a certificate
  • The SAML endpoint on the NetScaler is always: https://gateway.fqdn.com/cgi/samlauth
  • I recommend configuring the IdP first – there are several things you will need for the SP that are only available after you configure the IdP
  • IdP initiated flow
    • User logs on to identity provider and is presented with a list of applications; once an application is selected, the assertion is sent to the client then passed to the SP configured for that application
    • Users will see the IdP application list
  • SP initiated flow
    • User opens URL to SP, but is redirected to IdP for authentication; once successfully authenticated, the assertion is passed back to the client then sent to the SP
    • Users will see the SP application list

Single Sign-On Considerations

Single Sign-On is great for users because it allows them to only have to remember one set of credentials and enter those credentials one time. The problem with SSO is that it is becoming more complex – especially when you start using different authentication protocols and have on-premesis resources mixed in with cloud\SaaS applications. But don’t give up hope! Just understand what you can do with what you have.

When we are talking about SAML, it is important to understand that the password is NEVER sent in the assertion. This is a problem because it limits what we can do with SSO – and this is not a NetScaler limitation, but a limit of authentication in general. When we have a users password, we can do all sorts of authentication: Forms, HTTP Basic, NTLM, Kerberos – note that’s Kerberos Impersonation – aka: “easy Kerberos”.

If I’m using SAML and I don’t have the users password, the only options for single sign-on are: SAML or Kerberos Constrained Delegation (KCD). If KCD or SAML to the backend is not an option, you can use step-up authentication to gather the users password, but this will obviously be another prompt for password, so it’s not optimal.

Configuration Example

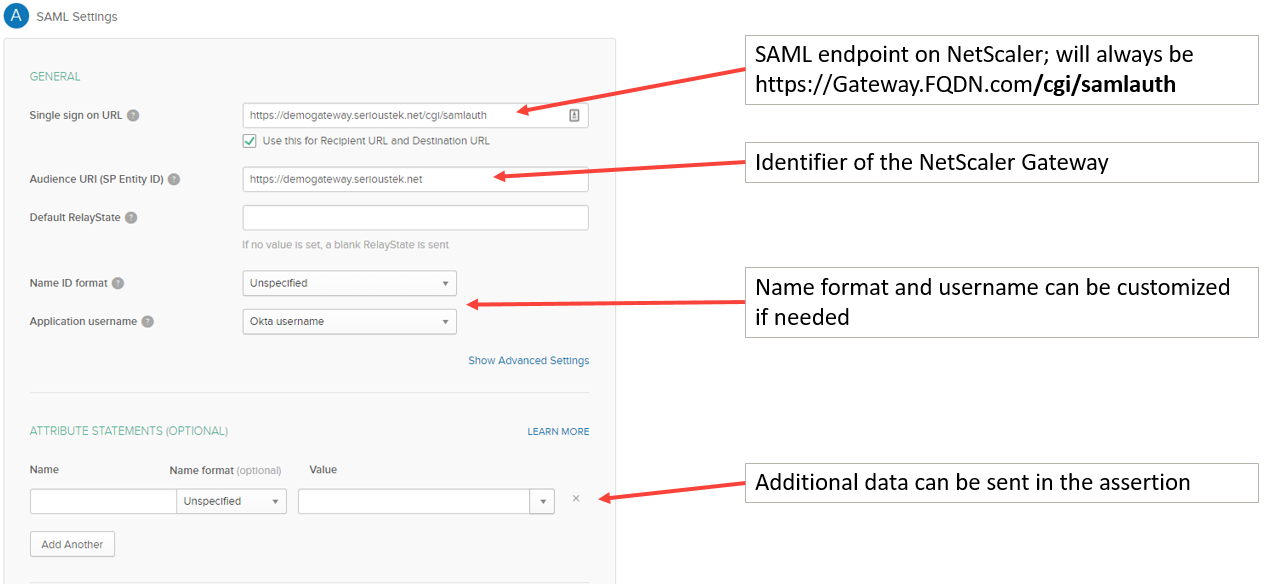
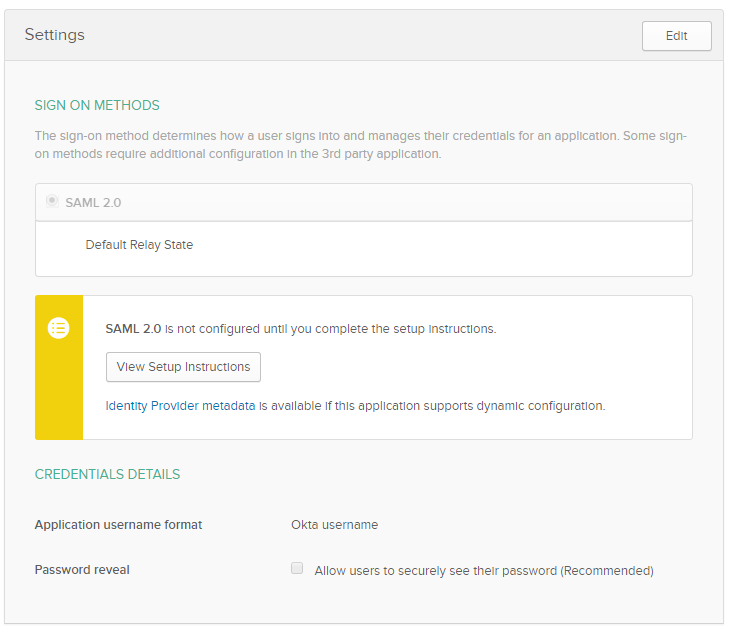
Here are the screenshots of a basic configuration example – this is for the NetScaler as SP and Okta as IdP, using an SP-initiated flow (remember, configure the IdP first) – first, create a basic SAML application in Okta.

okta1

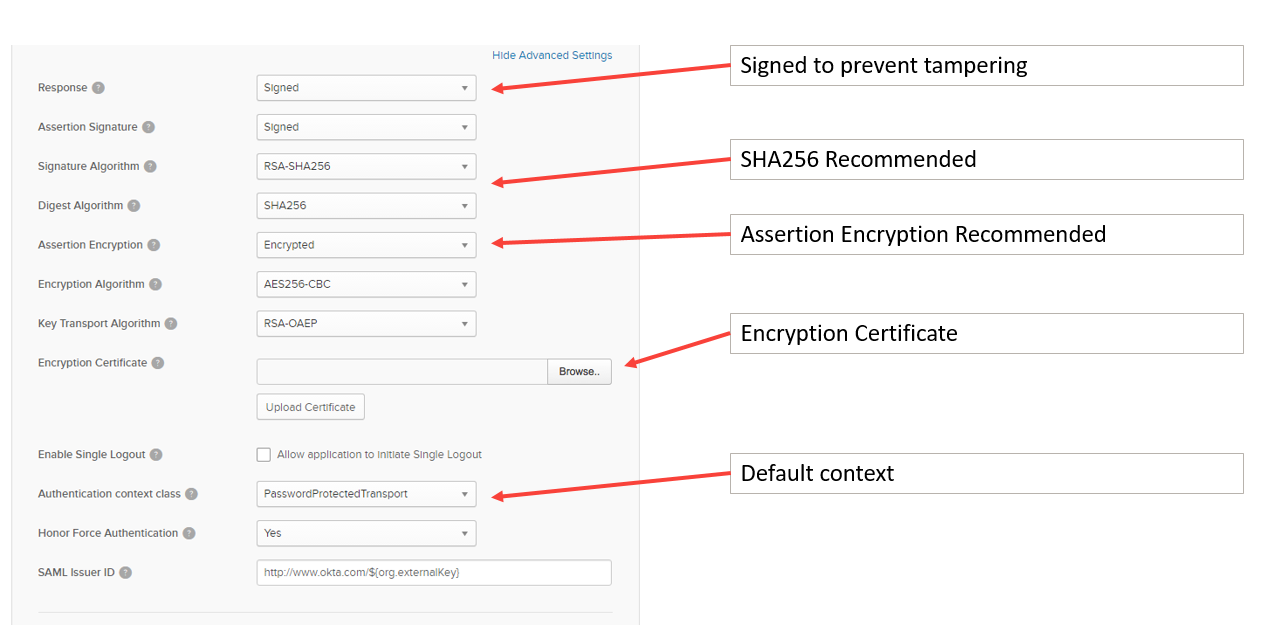
Then configure the ‘Advanced Settings’:

okta2

Once you are done, Okta will present you with a few things that you will need to configure the NetScaler as SP – click the ‘View Setup Instructions’ to get the certificate, redirect URL, and other fields needed:

oktaapp3

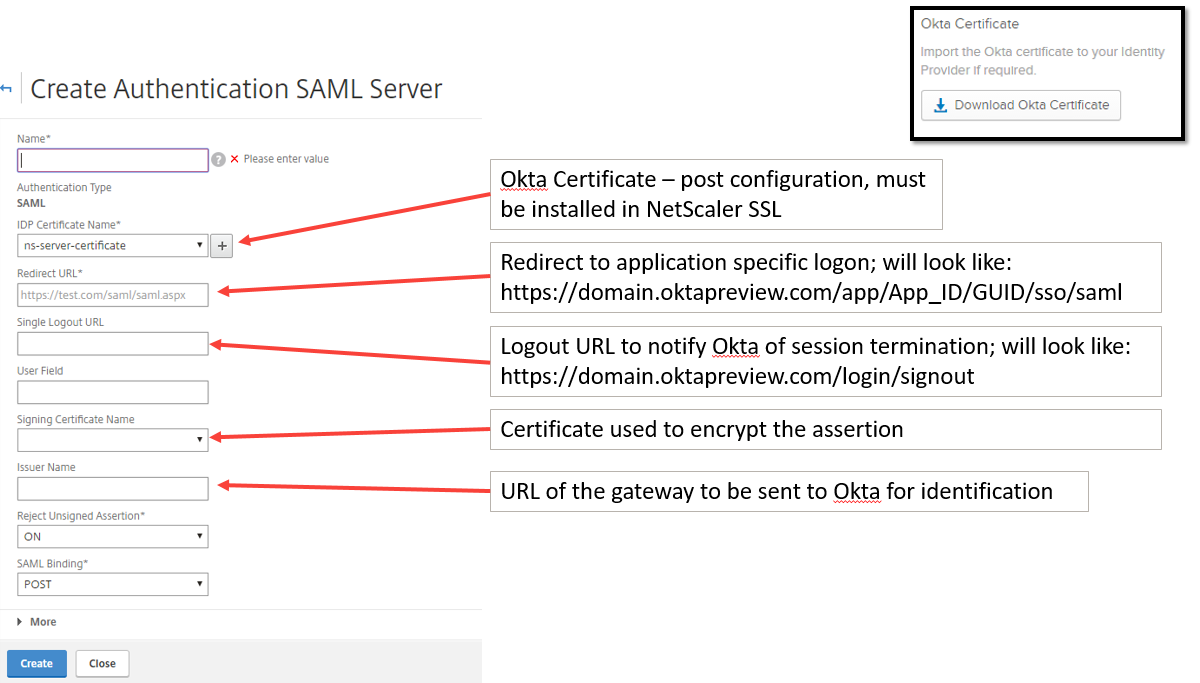
Now you can move on to configure a SAML authentication profile on the NetScaler:

ns1

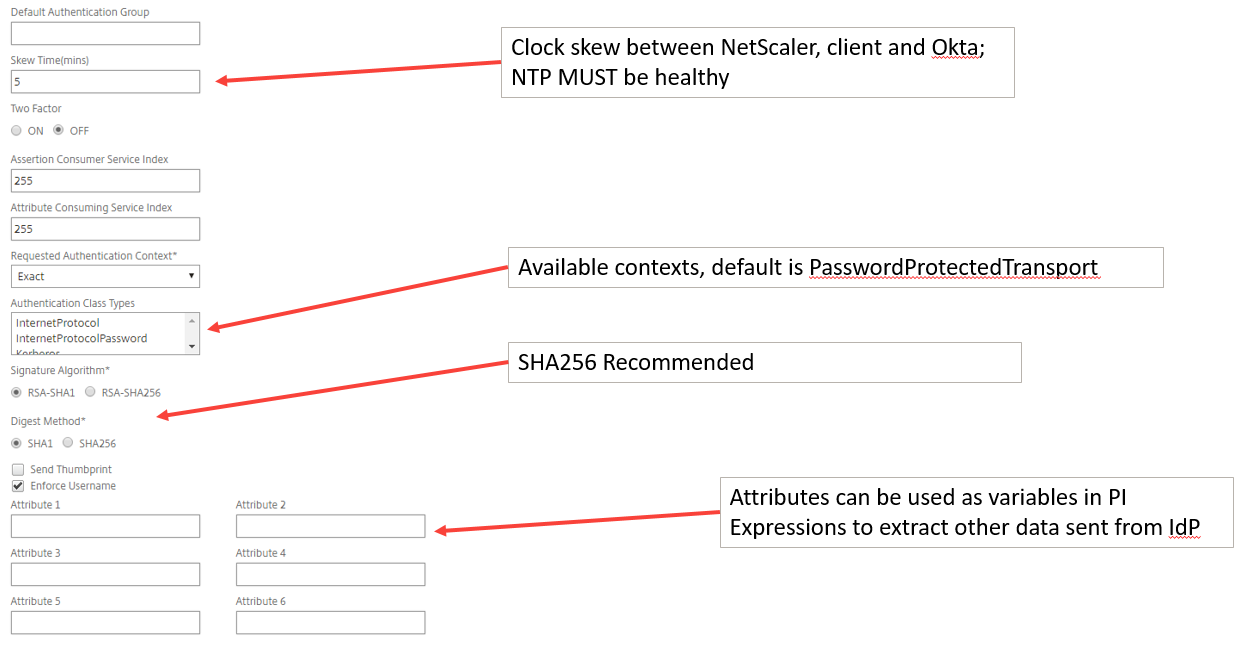
Don’t forget the advanced settings in the ‘More’ section:

ns2

That’s it!

There are numerous different configurations available – this post just covers one of them. Note that XenApp and XenDesktop don’t natively understand SAML authentication, they need the Federated Authentication Service introduced in XenDesktop 7.9. If you would like to see all of this in action, check out the October 2016 NetScaler Master class – available On-Demand here.


The post NetScaler SAML and Okta appeared first on SeriousTek.


Getting Started with NetScaler SD-WAN

$
0
0

I’ve been talking and working a LOT with NetScaler SD-WAN lately – and I noticed that my first post (here) still has the name of Cloudbridge VWAN. If you don’t know what it is, the best way to explain it is with a short video.

It’s cutting edge technology for your WAN!! So to make things right, and add to the previous post – I’ll be covering how to build a simple, initial SD-WAN configuration for a PoC or demo environment. Much of the network layout is the same as in the previous post, so I recommend reviewing it; alternatively, feel free to adapt the configuration to suit your needs – there are a lot of options here: network layout, routing configuration, mode of deployment, etc. In this example, I am keeping with ‘Gateway Deployment Mode’ at the branch office site to keep it simple, but feel free to throw in another router and configure the SDWAN appliance in ‘Inline Mode’.

The Environment

This will be using a very similar environment to the previous post – that said, I’m going to use the same diagram for basic reference:

All systems will be virtual machines – the NetScaler SD-WAN boxes will be VPX appliances and WANEm virtual machines will be used for simulating conditions of a wide area network. There will be 2 simulated WAN networks: in this example they will both be bulk internet for simplicity, though you can configure MPLS if you would like. Here’s what you need to get started:

  • 8 different VLANs and IP spaces on your switching and hypervisor infrastructures (3 of these are optional – noted below as re-used)
    • 1 for each client subnet = 2 (datacenter and branch office – note that I re-used my lab subnet as the datacenter here)
    • 1 for each simulated WAN network segment = 4
    • 1 for management of the SDWAN appliances = 2 (I re-used the both the lab subnet and branch office subnet for management)
  • 2 NetScaler SD-WAN Standard Edition VPX appliances
  • 2 NetScaler SD-WAN evaluation licenses
  • 2 WANEm VMs (note that I used v2.3 in this example)

IP Space and VLANs in this demo:

  • 10.1.2.0/24 VLAN2 = Datacenter (Lab subnet as well; MCN management)
  • 192.168.20.0/24 VLAN21 = Datacenter side of bulk internet; VLAN22 = Remote side of bulk internet
  • 192.168.30.0/24 VLAN31 = Datacenter side of MPLS internet; VLAN32 = Remote side of MPLS internet
  • 172.16.10.0/24 VLAN172 = Remote site (Remote SDWAN management)

Getting Started

First, let’s get the WAN environment configured – use the WANEm 2.3 ISO from here to build 2 VMs. It will boot into LiveCD mode, but to make things easier we are going to install it to the HDD. That said, make sure that you have an HDD allocated to the VMs; for the networks, I’ll be using the bulk internet VLANs for one VM and the MPLS internet VLANs for the other. Remember to use the two different pairs of network segments as well as two different IP addresses for the bridge interface on the WANEm VMs – this will be the IP used to manage the WAN emulator.

To get WANEm deployed to HDD rather than always booting to LiveCD, use the following post: https://www.citrix.com/blogs/2015/07/06/ingmarverheij-setting-up-a-persistent-wan-emulator/

Next, we need to get the bridge configured on each of these VMs such that they will be auto configured at boot. Add the following lines to /etc/network/interfaces (note: use your IP address netmask and gateway):

auto br0
iface br0 inet static
     address 192.168.20.2
     netmask 255.255.255.0
     gateway 192.168.20.1
     bridge_ports all
     bridge_fd 0
     bridge_stp off

Once completed, reboot the WANEm VM and double-check that the bridge interface br0 comes up – browse to http://192.168.20.2/WANEm from a system on the network.

Next, we need to deploy the NetScaler SD-WAN appliances – these will be deployed in the Datacenter subnet and remote office subnet with additional links for management and WAN connectivity. The latest GA build at the time of this writing is 9.1.2 and can be downloaded from www.citrix.com. A few notes on getting these VMs deployed:

  • Network interface binding order is important as it is reflected in the site configuration
    • Interface 0 is always management and must be bound to a network even if it is not connected or utilized such that interface slot 0 is populated
    • I am using the datacenter and remote office subnets as management as well
  • Once deployed, hop into the console to do the initial network configuration

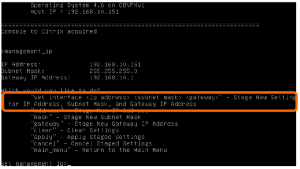
To set the management IP address, do the following:

  1. You may have to press ‘Enter’ for the console to appear
  2. Login using the default credentials of ‘admin’ and ‘password’
  3. Issue the following commands to set the IP (substituting your IP address details):
    1. management_ip
    2. set interface <ip address> <netmask> <gateway> (set interface 10.1.2.70 255.255.255.0 10.1.2.1)
    3. Once the above is entered, the new IP address will be staged
    4. To apply the staged configuration, enter: apply
    5. Enter y to confirm
  4. You should now be able to login to the web console: http://10.1.2.70 using the same credentials

Complete this process on both the SD-WAN appliance in the datacenter as well as the remote office.

Take this time to also make sure that any additional routes are in place – for example, you will likely need a route for the branch office by way of the SD-WAN interface in the datacenter:

172.16.10.0/24 via 10.1.2.71

There are additional route settings needed, but these will be covered in the configuration section.

Basic NetScaler SD-WAN Configuration

To get started, we need to set a few basic things prior to building our first SD-WAN configuration file. When logging in to the web console for the first time, you may be prompted for a quick start deployment – this can be used on the branch office appliance once you have built a valid configuration. Alternatively, complete the below process on both the datacenter and remote SD-WAN appliances. Log in to the appliance in the datacenter and do the following:

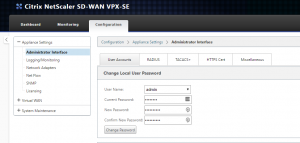
  • Go to the Configuration tab under Appliance Settings > Administrator Interface
    • User Accounts tab: change the default admin password
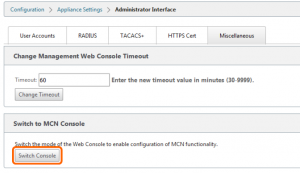
    • Miscellaneous tab: change the console timeout to a larger value, 600 minutes for example
    • Miscellaneous tab: Switch Console to the MCN console to allow configuration changes
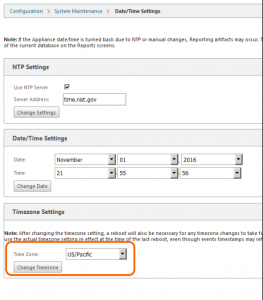
  • Go to the Configuration tab under System Maintenance > Date/Time Settings
    • Set an appropriate NTP server, ensure the current timezone is set, and ensure the time is set correctly

After making the changes above, you will be redirected to log back in to the web console. After logging back in, proceed to install the license file – it is based on the system MAC address. 

  • Go to the Configuration tab under Appliance Settings > Licensing
    • Upload the license file that matches the MAC address of the system.

Building the Initial SD-WAN Configuration File

You may have noticed that the Citrix Virtual WAN service has been disabled – this is due to the lack of configuration (an invalid, or missing license file can also cause the service to be disabled) – we will build the configuration now.

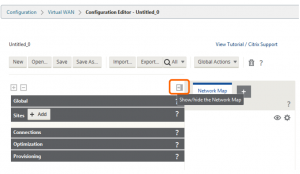
The remainder of the configuration will be done on the MCN SD-WAN appliance in the Configuration Editor located in the Configuration tab under Virtual WAN > Configuration Editor. Once you have started building the configuration, make sure to use the ‘Save As’ button to save the configuration file with a meaningful name – also make sure to frequently save the configuration using the ‘Save’ button. To give yourself more room to build the configuration, you can hide the Network Map area by using the ‘Show/hide the network map’ button depicted by a right arrow icon. Once you have built out a larger deployment, the Network Map area is a useful tool to quickly access areas of the configuration based on the location in the graphical map.

Familiarize yourself with the navigation of the configuration editor – there are a set of icons you will be working with:

  • Each object is in a section, and sections can be expanded by using the +/- icons inside a square
  • The (+) icon will add rows to the current configuration object
  • The pencil icon will allow an object to be edited; *note: if you are in edit mode on an object, you will need to press the ‘apply’ or ‘revert’ buttons to exit from edit mode.
  • The ? icon displays help for an object
  • The trashcan icon deletes a row or object
  • You can edit the name of some objects by clicking on the name text – this cannot be done if you are in edit mode on that object

Also, understand that while you are building the configuration, it is always being audited for errors – during the first go through, there will likely be errors until you finish the configuration and that is expected. For example, you will get an error when you initially configure the first site because there are no endpoints for those connections – this will be resolved when you create the remote site and add the WAN links for that site. The audit will NOT, however, pick up on incorrect IP addressing or netmasks, for example. Audit errors can be seen as red ‘!’ icons on the section with a configuration issue – hovering over them will give you a description of the error.

First, create a new configuration by selecting the ‘New’ button in the Configuration Editor. We then need to define each site in our network – we will start with the datacenter site.

Sites

Under Sites, press the ‘Add’ button. For the site you need to define a site name, appliance name, the model of the appliance, and the mode of the appliance. The appliance model is used to provide context for the menu options in the configuration – how many ports are available for example.

You can create the additional remote site now, but it is recommended to build one site at a time – once the site configuration is complete and without audit errors, then create another site.

Interface Groups and Virtual Interfaces

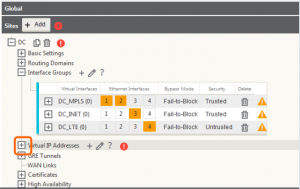
Within the site we created, we need to configure the interface groups on the appliance – this is essentially where you configure the interfaces as bridge pairs or otherwise and define the bypass and security settings for them. To get started, click the (+) icon in the Interface Groups section.

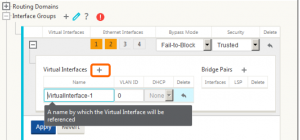
Once you have configured the Ethernet interfaces (for VPX, you can only choose to highlight 1-4), bypass mode and security, select the (+) icon to create a new virtual interface to be tied to the physical interface groups. *note: do not click ‘apply’ until you have defined the virtual interfaces for each of the interface groups.

The above example is specific to having interfaces 1 and 2 set for bridge mode – to complete this configuration, click the (+) icon for ‘Bridge Pairs’ and assign the two interfaces 1 and 2 in this example. Also note for VPX appliances, fail-to-wire is not supported, only fail-to-block. If you are not configuring bridge pairs, this is not required. Repeat these steps to configure all the interfaces on the appliance (note the screenshot below – interfaces 3 and 4 are not in bridge mode and do not have bridge pairs configured).

Virtual IP Addresses

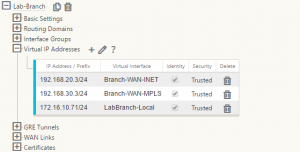
Virtual IP addresses define the IP space for the data plane and these are the IP addresses that will be used to put the packets on each of these links – also note that one of these virtual IP addresses on the branch network will be used as the client gateway. Create the IP addresses and bind them to their associated virtual interfaces created previously. *note: enter the IP addresses in IP address/mask prefix format.

*Remember to save*

WAN Links

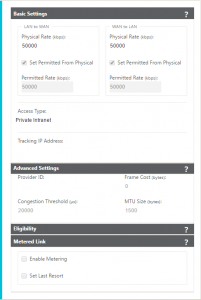
Under the WAN Link header, create a new WAN link – specify a name for the WAN link and specify the access type. For access types, select private MPLS to enable QoS\DSCP settings on the WAN link; select Public Internet to be able to use autodetection of Public IP if the link needs to pull the IP address from the ISP via DHCP and when security is required; use private internet for all other connections. For the purposes of this demo\PoC, I will be using all private internet. For each link, you need to define the physical rate of the interfaces – the permitted rate is set from the physical rate by default, but if there is other traffic on this WAN link, you can override the permitted rate to allow headroom for the other traffic on the link.

If you want to simulate 3G\4G\LTE traffic, set the configuration for the WAN link to include metering on the link and\or last resort. To complete the WAN link configuration, you need to bind it to an access interface – this cooresponds to a virtual IP and interface created previously. Additionally, you will need to define a gateway for this link – for this demo, we are using the virtual IP of the partner appliance as the gateway here. For actual production deployments, this would be appropriate for WAN services such as eLine where the IP is a private and the device is put on the same broadcast domain.

Also, remember to enable Proxy ARP for MPLS deployments that are in inline-mode.

Repeat the above process for each WAN link – in this example, there are 2 total WAN links.

**At this point, return to the sites section and create the 2nd site in the configuration.

Connections

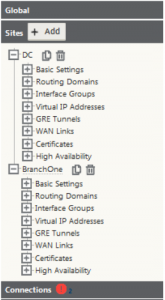
Once the 2nd site is created and has a valid configuration, there should not be any audit errors in the site section – but there will likely be errors in the connections section.

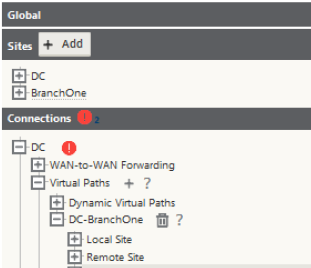
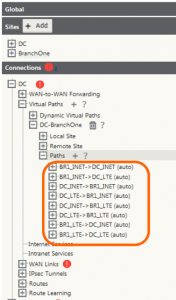
Open the connections bar and expand the datacenter site > Virtual Paths > DataCenter-RemoteBranch > Paths. You will notice that several paths have already been created – these auto-created paths come from public internet links as any internet WAN link tan terminate with any other internet WAN link at any other site.

*Remember to save*

In this example, only two of the paths were auto-created, but any number of paths will auto create.

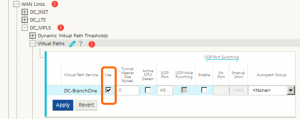
For private links (including MPLS) we need to enable the links to be used – go to Connections > Datacenter > WAN Links > PrivateLink > Virtual Paths – choose the edit pencil, and check the box for ‘Use’

Do the same thing for the other side of the connection under Connections > RemoteBranch > WAN Links > PrivateLink > Virtual Paths

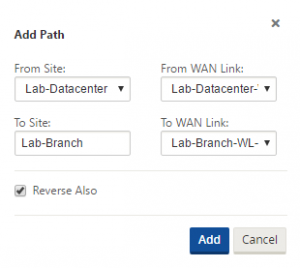
Lastly, you need to create the private path. Go to Connections > EitherSite > Virtual Paths > Datacenter-RemoteBranch > Paths – choose the (+) icon to add a path. In this example the only path to configure is between the datacenter and the remote branch – use the private link.

Ensure that the checkbox for ‘Reverse Also’ is checked – this will create the reverse path automatically.

There should no longer be audit errors in the configuration – if there are, go back through and observe what they are indicating to resolve them. Save the configuration again.

Change Control

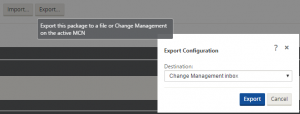
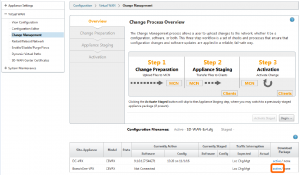
All configuration changes and firmware updates are made through the change management interface. When your initial configuration is ready, select the Export button in the configuration editor and select ‘Export to change management inbox’. We will now walk through the process to activate the configuration on the MCN.

Proceed to the Configuration tab > Virtual WAN > Change Management. On the CM overview page, click the ‘Begin’ button to get started.

Change Preparation

For the first change management process, you will need the configuration file as well as the current firmware for the appliances – firmware will be in tar.gz format and downloadable from www.Citrix.com. Note the current format for the upload file – this is specific to SD-WAN Standard Edition as well as the VPX appliance:

cb-vw_CBVPX_9.1.2.26.tar.gz

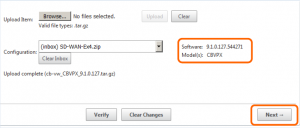
Choose Begin to start the CM process. The configuration file is already in the inbox, but you must manually upload the firmware file – browse to the location on your system, select the file then press upload to send it to the CM interface. Once successfully uploaded, the software will list the version number – click next.

You will be prompted to accept a license then be presented with a window to begin the change staging process. Additionally, if you need to upload a previous saved\exported configuration you can do that by using the browse button on this page.

Staging

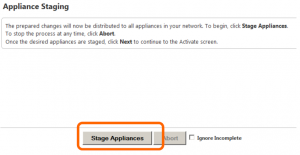
The staging step allows the configuration file as well as the firmware to be ‘Staged’ on all appliances in the environment – for our simple demo environment, staging on the DC and remote appliances will not take long at all, however – in a production environment, this may take some time to copy everything to all of the appliances. To begin the staging process, simply click ‘Stage Appliances’.

You will note a progress bar showing how far along the copy operation has progressed.

Activation

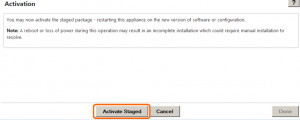
Once the copy is completed, you are presented with an activation screen – this allows you to activate all of the configuration and firmware changes to the environment. To do this, click the button labeled: ‘Activate Staged’

There will be an additional pop-up window prompting for your confirmation prior to activation.

Once the activation begins, the appliance will begin a countdown – the duration of this countdown depends on what is being activated. For the initial activation which includes firmware, the counter will start at 180 seconds. For smaller changes where only configuration is being modified, the counter will start at 30 seconds. *note: it may not take the full amount of time in the countdown

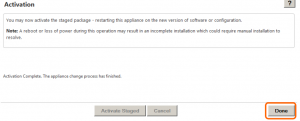
Once activation is complete, you should be returned to the CM window with a Done button.

Enabling the Citrix Virtual WAN Service

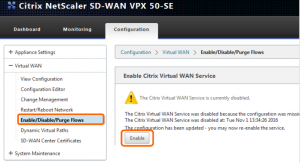
Now that the configuration has been applied on the MCN, the Virtual WAN service can be successfully enabled. To do that, go to Configuration > Virtual WAN > Enable\Disable\Purge Flows and click on the ‘Enable’ button.

Note that the monitoring pane will still show all paths as dead since the remote office appliance still does not have any configuration.

Configuring the Remote SD-WAN Appliance

If you have not already done so, set the appliance management IP address from the hypervisor console as defined in the ‘Getting Started’ section of this post. Next, we need to download the remote office configuration file from change management on the MCN appliance – this will be a .ZIP file.

*Note: Ensure that you download the remote office package rather than the MCN\DC package.*

Open a web browser to the remote NetScaler SD-WAN appliance. If you have not already done so, configure the time settings and licensing as defined in the ‘Getting Started’ section of this post.

Proceed to the local change management section under: Configuration > System Maintenance > Local Change Management – Click ‘Begin’ and proceed to browse for the previously downloaded remote site .ZIP file – *note: ensure that it is the remote office configuration file. Ensure that the ‘Upload’ button is pressed once the file is selected – click ‘Next’ to continue.

After validation, you will be presented with an ‘Activate Staged’ button just as one the MCN appliance. Proceed with the activation as before – once activation is successful, click the ‘Done’ button.

You may now enable the Virtual WAN service on the remote appliance under Configuration > Virtual WAN > Enable\Disable\Purge Flows

Completion

Once the Virtual WAN service has been enabled on both appliances, the monitoring tab should begin to show paths in the ‘Up’ state.

Notes:

  • Be sure to set routes for any other subnets not in the configuration – especially when deploying in gateway mode for the branch office. This is done within the configuration under Connections > Site_Name > Routes
  • Once you have an initial configuration on all appliances, configuration updates using Change Management will take significantly less time to activate. Additionally, the CM process will give an estimation of how much (if any) network interruption will occur during the change, and once completed, will display how much interruption actually occurred. Note the ‘Expected’ and ‘Actual’ columns.


  • Depending on network topology, there may be a need to address asymmetrical routing for this demo – for example, the traffic destined for the ‘datacenter’ subnet is on the same subnet as the local VIP, however on the return trip, traffic will be sent to a gateway before being sent over the SD-WAN network. This scenario is only specific to this demo environment and would not happen in a production deployment.

Troubleshooting:

  • Check the WANEm VMs to ensure that the bridge interface has been configured and is up and running
  • If the Citrix Virtual WAN service is not enabled, check that a valid license has been installed and ensure that there is a valid configuration loaded
  • Hypervisor virtual switches may require promiscuous mode\forged transmits\MAC address changes to be enabled
  • Ensure that NICs are bound in the correct order (Management is always port 0) and enabled

The post Getting Started with NetScaler SD-WAN appeared first on SeriousTek.
Enabling Horizon View PCoIP Connections via NetScaler

$
0
0

This post is probably not necessary because the configuration is pretty simple and easy to get it working – all you need are a NetScaler running 12.0 code or later, and a view connection server v7.0.1 or later. Currently, it is limited to proxying PCoIP traffic only.

NetScaler Settings for PCoIP

There are two parts to the configuration on the NetScaler:

  • PCoIP VServer Profiles – located in NetScaler Gateway > Policies > PCoIP ; this is where the logon domain name is defined; these are bound to the gateway vServer


  • PCoIP Profiles – located in NetScaler Gateway > Policies > PCoIP ; this is where you define the Connection Server URL and session timeout; these are bound to the gateway session policy

If you have already created a gateway vServer, you can edit the Basic Settings using the edit pencil (top right) and select the new vServer profile:


Additionally, the Gateway vServer needs to use the RfWebUI theme.

The session policy needs to contain the following settings:

  • Clientless Access: On
  • Default Authorization: On
  • PCoIP Profile: <profile_name>

If you are using Unified Gateway you will need to add a few expressions to the is_vpn_url pattern set – this is a default pattern set and cannot be modified, however, you can create a new one copying in the existing expressions by highlighting is_vpn_url and selecting Add. This is all done in AppExpert:

  • Configuration > AppExpert > Expressions > Advanced Expressions
  • Highlight the existing is_vpn_url and click ‘Add’
  • Give the pattern set a name, “is_vpn_url_pcoip” in this example
  • Add the following expressions (don’t copy\paste):
    • HTTP.REQ.URL.PATH.EQ(“/broker/xml”) || HTTP.REQ.URL.PATH.EQ(“/broker/resources”) || HTTP.REQ.URL.PATH.EQ(“/pcoip-client”)

The above newly created pattern set must then replace the existing is_vpn_url in your content switching policy for Unified Gateway

View Connection Server Settings

On your View Connection Servers, you need to set the following:

  • General > Use Secure Tunnel connection under HTTP(s) Secure Tunnel

That’s it!

Connection Options

Once configured will have 2 major options for connectivity – point the Horizon Client at the NetScaler Gateway URL, or use the Gateway portal itself. First, to use the Horizon Client, simply enter the URL of the NetScaler Gateway vServer and login:

Alternatively, you can use the NetScaler web portal and integrate with other apps to utilize the Unified Gateway experience:

Be aware that the Horizon Client will need to be installed to render the PCoIP connection:

References

http://docs.citrix.com/en-us/netscaler-gateway/12/netscaler-gateway-enabled-pcoip-proxy-support-for-vmware-horizon-view.html

https://support.citrix.com/article/CTX223370

The post Enabling Horizon View PCoIP Connections via NetScaler appeared first on SeriousTek.

‘Thank you’ to Citrix and the Community

$
0
0

I started my professional technology career as a help desk administrator supporting a small healthcare organization that was still using something that was called Citrix Metaframe XP – it was the first time I had dealt with a real IT infrastructure, and also the first time I interacted with a Citrix product.

That was nearly 13 years ago.

After that, I interacted with Metaframe and XenApp (among other products) on and off until I started working for a Citrix partner a gained experience with the entire product suite. Over the years products changed, customers changed, jobs changed, but my overall feeling of Citrix has never changed – ever since I first saw an application launch on a thin client, I was sold. Not to say that there were not issues or hard times over the years, but it was just really cool technology.

Now, I have the pleasure of working for Citrix and I get to interact with VERY smart people both internally but also in the Citrix Community. Citrix has also introduced a new community excellence program known as Citrix Technology Advocates and announced the 2017 members.

I am very honored and thankful to be a part of this group! Take a look at the full listing of 2017 CTA Members here.

I’d like to say a sincere THANK YOU to all those involved in making this possible and I look forward to working with everyone in the community.

The post ‘Thank you’ to Citrix and the Community appeared first on SeriousTek.
Sophos XG Firewall LTE Backup

$
0
0

I work a good bit from my home office so obviously internet access is pretty important – so important that I have 2 carriers: Comcast via coax and AT&T via bonded pair DSL. As you may also know, I use the Sophos XG firewall home edition as a full-featured firewall and internet gateway – the conversion from Sophos UTM to XG was a bit tricky due to the UI of XG being…let’s just say not that great. That has since changed, and the XG handles multiple internet connection failover well with little to no interruption in service.

So everything was going great as far as internet service was concerned…until…you know…hurricane Irma happened.

The solution to this was to use my hotspot…but that only goes so far since I’m only connecting my workstation or laptop. Then I had the idea to use a spare system I had and bridge the wireless hotspot to ethernet connection and plug that into the firewall. This worked surprisingly well, but I didn’t really like having another system between the firewall and the hotspot. Then I started digging in the XG UI and found there is a wireless WAN\LTE capability built right in!

Configuring Sophos XG for LTE

Note that WWAN is disabled by default and will confirm that you want to enable the feature. So my plan (yes) was to use USB tethering rather than WIFI hotspot, and to be honest, I was pretty skeptical that this was even going to work, but could always go back to wireless\ethernet bridging if needed. Note that the default configuration for the WWAN interface (screenshot above) is Dial-up PPP – for USB tethering this needs to be switched to Network Adapter (DHCP) as the device gives out an internal hotspot IP address. There are several additional settings depending on the type of modem – username\password, SIM PIN code, APN, initialization strings, etc – but these are not needed for this configuration. When you enable WWAN, you will see an additional interface added:

What was the device I was using to tether you ask? Why it was a spare Nexus 6 with an unlimited plan 🙂

Did it actually work when I plugged it in via USB?

Yeap.

How? No idea.

And once the phone was recognized, simply select ‘Connect’ and sure enough, internet service came right up!

So why do this when I could just use bridging and WIFI hotspot? For one, this is a much simpler configuration than having another hop via a system bridging the connection. But also, XG knows that this is cellular WAN and is a metered connection, so as long as you are connected, it will track bytes used.

Another thing I will note is that you are going to want to put a traffic shaping policy for all devices except the workstation that you want to have the majority of access to bandwidth. If your network is anything like mine, there are NUMEROUS devices on the network trying to get any internet access possible, and cellular WAN is not great for that…especially after a hurricane when everyone else is trying to use cellular data.

Sophos XG continues to amaze me – in this case using cellular WAN as a backup worked completely out of the box with no issues!

The post Sophos XG Firewall LTE Backup appeared first on SeriousTek.

NetScaler nFactor Authentication

$
0
0

In case you hadn’t noticed, lots of web services have been changing how they do authentication lately…maybe you’ve heard of some of them:

Google

nfa1

…or Microsoft

nfa2

What is really going on here? The forms are applying some intelligence based on who you are or what company you work for. For example, if you work for a company that uses federated authentication for Office 365, you will be redirected back to your company’s IdP. How does Microsoft do that? They take a look at your email domain when you type it in – using a policy or rule to filter based on the first ‘step’ or ‘factor’ of authentication.

Enter NetScaler nFactor Authentication

If you have a NetScaler that is running 11.0 or later (11.1 is recommended due to some additional enhancements) you have the ability to use NetScaler’s nFactor Authentication framework to achieve the same kind of things that you see above.

Do you want to prompt a user for a token code because they have higher permissions in the organization or have access to sensitive data without prompting everyone else? nFactor can do that.

Do you want to use certificate based authentication and token-based 2 factor authentication and SAML all on the same vServer? nFactor can do that.

Do you want your authentication form to be more responsive to users and help by providing better feedback and messaging in the form? nFactor can do that.

Even the new native OTP capability in NetScaler 12 is built with nFactor technology.

Some Notes and Terminology

First and foremost: nFactor is built on web technology – similar to how SAML web forms work. That means that each ‘factor’ is meant to be displayed in a web browser or frame – things that don’t natively support this may not work. The most common scenario here is Citrix Receiver – it does not (currently) support this type of authentication, but that does not mean that you cannot use nFactor authentication on a gateway vServer – it is possible, see this link for details.

Next, I hear many folks ask “how do I do xyz with nFactor”? Since nFactor is a framework, there are probably 47 different ways to do any one configuration, so I feel it is best to understand the nFactor framework and how to configure it, then figure out how to do xyz.

AAA vServer: The authentication virtual server is where the configuration starts

Policy Label: Think of this as a “container” for different factors or authentication steps

Login Schema: This is the xml file used to build the page that is viewed by the user – there are several built in schemas, and there is a LOT of customization possible. In later builds of NetScaler, a schema editor is built in allowing you to modify form fields, assistance text, etc. The default location for built-in schema files is /flash/nsconfig/loginschema/LoginSchema

(Advanced) Authentication Policy: These policies can be anything from traditional LDAP or RADIUS authentication policies (“legacy” policies) to special ‘no_auth’ policies that allow you to do some computation or manipulation of the authentication flow without involving the user

Next Factor: This is a pointer to a next ‘factor’ in the flow of authentication, this will be pointing to a ‘Policy Label’

NO_AUTHN: This is a special advanced authentication action meaning that we are not performing a traditional authentication, instead we are applying some expression against a previous set of credentials for example

noSchema: This is a special Login Schema that implies that there is no schema, or nothing is being displayed to the user. The purpose of noSchema is to allow a ‘processing factor’ to allow the NetScaler to do some work on a previous authentication step without showing anything to the user

Each of these items gets put into a “container” to build either a place for users to enter information or a place for the NetScaler to do some work on the string input by the user – like modify the domain name, or look at group membership, etc. It looks something like this (in a 1-to-1 format…there can be MANY expressions to make the flow get VERY complex):

Remember that both AAA vServers and Policy Labels are bind points for schemas, authentication policies, and pointers to the next factor.

Common nFactor Use Cases

  • Using a single vServer for both single and dual factor authentication using policy to determine if users should use dual factor
  • Configuring a domain drop down (or domain radio buttons) that look like they belong on the page and survive reboots without extra script configuration 
  • Provide users with helpful texts for authentication success\failures, or username format (For example: Enter username as ‘username@domain’)
  • Modifying usernames from sAMAccountName to UPN
  • Modifying domain of a negotiated internal username to switch from internal domain to public domain (Example: johnDoe@company.local to johnDoe@company.com – useful for Office365 federation)

Several other scenarios are outlined in the eDocs here.

  • Getting two passwords up-front, pass-through in next factor. Read
  • Group extraction followed by certificate or LDAP authentication, based on group membership. Read
  • SAML followed by LDAP or certificate authentication, based on attributes extracted during SAML. Read
  • SAML in first factor, followed by group extraction, and then LDAP or certificate authentication, based on groups extracted. Read
  • Prefilling user name from certificate. Read
  • Certificate authentication followed by group extraction for 401 enabled traffic management virtual servers. Read
  • Username and 2 passwords with group extraction in third factor. Read
  • Certificate fallback to LDAP in same cascade; one virtual server for both certificate and LDAP authentication. Read
  • LDAP in first factor and WebAuth in second factor. Read
  • Domain drop down in first factor, then different policy evaluations based on group. Read

Getting Started

The AAA vServer is where the initial nFactor configuration is done by binding an advanced authentication policy and a login schema – even if you are deploying nFactor for NetScaler Gateway, the configuration is held by a AAA vServer and applied via an authentication policy. Also, as this uses the full Authentication Engine, NetScaler Enterprise is the required license to use nFactor authentication.

You need to determine the workflow for user authentication and the different scenarios you will be supporting. Then, determine the first thing that users are going to see when they are trying to login – for example, are you going to start with just a single field for username? Or maybe username and password, then prompt for a second factor? This first step will be applied to the vServer directly.

For this example, we are going to go through the vendor scenario – the idea is that all of the employees of the company will be authenticated against an internal identity database (Active Directory), but I also have some 3rd party vendors that I want to give access but I don’t want to manage their identity. In this workflow, here are the steps to be taken:

  1. User presented with logon page with username only
  2. Perform AD lookup to see if user exists (or is\is not member of a specific group, etc)
    1. If exists: User goes to next logon page with username and password fields, enters password (username is pre-populated from previous)
    2. If not exists: User is sent to 3rd party IdP for federated logon

Request Servers (Legacy Servers)

First, we’re going to create 2 LDAP actions – you may already have these configured, but if not, they are fairly basic with one exception: create one that has the authentication checkbox unchecked. 

The purpose of this kind of policy is to see if the user even exists in our directory.

Next, you also need to configure a SAML server – in this case, I am using OktaPreview. For instructions on setting up the SAML configuration on NetScaler to work with Okta, see this post. If users fail the initial user lookup (or are not in the specified group) they will be sent to Okta to login.

At this point, you should have 2 ldap server definitions and 1 SAML definition.

Advanced Authentication Policies

We will create 4 advanced authentication policies:

  1. A policy to lookup the user in the directory without authentication
  2. A policy to ensure that the user returned from the previous (#1) policy has a length greater than zero (user exists)
  3. A policy to authenticate the user
  4. A policy to forward the user for SAML authentication in the event the user from policy #2 does not exist

Advanced Policy #1:

Action Type: LDAP

Action: (LDAP Request Server created previously that is not authenticating)

Expression: true

Advanced Policy #2:

Action Type: NO_AUTHN

Expression: HTTP.REQ.USER.NAME.LENGTH.GE(0)

Advanced Policy #3:

Action Type: LDAP

Action: (LDAP Request Server created previously that is authenticating)

Expression: true

Advanced Policy #4:

Action Type: SAML

Action: (SAML Request Server created previously)

Expression: HTTP.REQ.IS_VALID

Login Schema Profiles

We will create 2 login schemas for this example: one that is a simple username only login, then one that contains a pre-populated username field and an empty password field. First we will create the username only schema – note: we will not need to set User Expression or Password Expression in these schemas.

Login Schema #1

Next is the schema that will show the user the password field after their user has been found in active directory:

Login Schema #2

Note: Be sure to ‘select’ the schema layout when you are using the editor before saving.

We will also be using a noschema policy, but there should already be one configured by default (LSCHEMA_INT)

Policy Labels

Think of a Policy Label as an authentication factor or an authentication container – the first of these containers being the AAA vServer. According to the workflow, the first thing we want to do is take the username and see if it exists in active directory using a non-auth LDAP server, all of which will be configured on the vServer directly. The next “factor” or container will be to check if the username that is returned is not null (without showing anything to the user). After that, if the user does exist, we will prompt for a password using the pre-filled username schema #2 created above. If the user does NOT exist, we will have the SAML server policy bound that will send the user to Okta for 3rd party authentication.

Policy Label #1

Login Schema: noSchema

Priority: 100

Advanced Policy: (Advanced Policy #2)

Next Factor: (Policy Label #2)

Policy Label #2

Login Schema: (Login Schema #2)

Priority: 100

Advanced Policy (Advanced Policy #3)

Next Factor: (None)

Authentication vServer

Next, we will configure the AAA vServer – if you are integrating this with NetScaler Gateway, you will simply need to create an Authentication Profile and bind it to the Gateway vServer (if that is the case, the AAA vServer can be non-addressable).

The first thing to do is make sure there are no basic authentication policies bound to the vServer – if there are, remove them. Next, we will bind the username only login schema created earlier. Next, we will bind the following advanced auth policies:

  1. Advanced Policy #1; Priority 100; GoToExpression NEXT; NextFactor: (Policy Label #1)
  2. Advanced Policy #4; Priority 110; GoToExpression NEXT; NextFactor: (None)

Conclusion

This may seem like a lot of configuration especially if you are used to the traditional configuration of authentication on the NetScaler: “Primary and Secondary”. But hopefully you can see that the nFactor authentication framework enables numerous workflows that were previously not possible.

The post NetScaler nFactor Authentication appeared first on SeriousTek.
Duo Prompt and NetScaler nFactor Auth

$
0
0

Duo Security provides a rich identity management and authentication platform and it is commonly used to enable multi-factor authentication in enterprise networks. Duo is very flexible and has examples for integrating with NetScaler here – you will see that there are two different configuration examples: one for using the Duo auth proxy service to do AD authentication as well as additional factors, and a second for using the Duo service to do just MFA.

Both of these configurations work using a ‘Duo authentication proxy’ that gets installed on a local server and communicates with the NetScaler via radius and they work very well for multi factor authentication scenarios. A ‘Duo Prompt’ is presented to the user and they are able to use one of three different factors to validate their login. All secure communication to the Duo service is handled via the auth proxy service rather than the NetScaler.

The Problem

The problem is that the examples linked above will break if you try to use NetScaler AuthV2 aka nFactor (or even the RfWebUI theme which is based on AuthV2). This is due to the fact that the Duo Prompt is delivered from the auth proxy via an iFrame which is not currently compatible with AuthV2 (without some heavy coding). So if you try to configure Duo using the above methods in conjunction with nFactor, you will likely get a page that looks like this:

Instead of a nice prompt like this:

The (Sort-of) Workaround

You can configure the Duo auth proxy to perform just like a typical radius server and present users with a ‘passcode’ field in addition to username and password…but what about the push and call me options? We will actually use this workaround to get to the solution, but we are also going to use native nFactor capabilities. The problem is that the iFrame is not supported, and that is what gets presented to users for them to choose the method of verification…but if you look at it (the Duo prompt) it is nothing more than a logo and 3 choices – everything else is still handled by the Duo auth proxy.

When I was looking at this problem, I realized that there are two potential solutions:

  1. Using some serious code modifications to allow the NetScaler to either properly display the iFrame presented via the auth proxy…or even to completely work without the auth proxy service. I’ll refer to this as the hard way.
  2. Replace the duo prompt functionality with nFactor capabilities, thus allowing the user to choose the validation method via Duo.

I opted for option number B.

What You Will Need

Some of the prerequisites you will need to get this all working:

  • A NetScaler appliance with at least 11.0 (I would suggest 11.1 at a minimum)
  • An existing Duo Security account and configuration – Duo is nice enough to allow a free account for testing and demo purposes
  • A radius app definition in Duo (see here – we need the integration keys and api host)
  • Duo authentication proxy installed and running with a basic configuration (documentation here)
  • An authentication vServer, an auth profile if using gateway, and an existing LDAP auth advanced policy definition on the NetScaler
  • Working knowledge of nFactor authentication (see this post)

You should already have the auth proxy up and running at this point – it is a simple service and is well documented with good logging capabilities. It should also be noted that we will NOT be using the existing Duo\NetScaler integration documentation – this method is based purely on radius communication and there is no need for the Duo prompt iFrame or for the auth proxy to authenticate the user with AD. The way that this workaround works is to configure multiple radius server listeners on the auth proxy each with a single factor defined. This way, we can use nFactor with multiple radius policies based on which selection is made by the user.

Configure the Auth Proxy

To get started, let’s configure the auth proxy service – here is an example configuration, make necessary changes to accommodate your environment:

[radius_server_auto2]
ikey=YOURIKEYGOESHERE
skey=YourSKeyGoesHere
api_host=your-apihost.duosecurity.com
failmode=safe
radius_ip_1=10.1.1.13
radius_secret_1=radiuspsk123
client=duo_only_client
factors=push
port=18121

[radius_server_auto3]
ikey=YOURIKEYGOESHERE
skey=YourSKeyGoesHere
api_host=your-apihost.duosecurity.com
failmode=safe
radius_ip_1=10.1.1.13
radius_secret_1=radiuspsk123
client=duo_only_client
factors=phone
port=18122

[radius_server_auto4]
ikey=YOURIKEYGOESHERE
skey=YourSKeyGoesHere
api_host=your-apihost.duosecurity.com
failmode=safe
radius_ip_1=10.1.1.13
radius_secret_1=radiuspsk123
client=duo_only_client
factors=passcode
port=18123

Once you have the configuration file updated, you will need to restart the auth proxy service and verify that it stays running, if not, check the log file to determine which line in the configuration contains an error. Also, take note of the different factors and which ports they are listening on as we will need this information to configure the radius server definitions on the NetScaler.

NetScaler RADIUS Configuration

The first thing we will do on the NetScaler is configure the radius server definitions and the advanced auth policy expressions. Under Security > AAA >Policies > Advanced > Actions > RADIUS configure three very similar server definitions, taking note of the secret key and port number of the server as defined above. Also note that you will need a timeout of at least 60 seconds to allow for Duo communication and the user to approve the request etc.

The only other non-default setting used in the server definition is password encoding is set to MSCHAPv2. You should now have 3 radius server actions:

Next, we need to configure the advanced auth policies under Security > AAA >Policies > Advanced > Policy. Again, create 3 very similar policies, taking note of the expression, both the AFTER_STR string and the CONTAINS string as these are used later in the nFactor schema configuration.

The three expressions are as follows (don’t copy paste):

HTTP.REQ.BODY(500).AFTER_STR(“duoauth=”).CONTAINS(“push”)

HTTP.REQ.BODY(500).AFTER_STR(“duoauth=”).CONTAINS(“call”)

HTTP.REQ.BODY(500).AFTER_STR(“duoauth=”).CONTAINS(“pass”)

Match the CONTAINS string to the pre-created radius server actions. You should now have 3 additional advanced auth policies:

NetScaler Login Schemas

Now we need to configure the login schemas for this workflow – there are a few options, this post will contain two of those options, but it should be more than enough to work into nearly any configuration. The first workflow is to have the username field, password fields, and Duo auth selection all in a single factor. The first schema below will generate a UI that looks like this:

Login schema XML:

<?xml version="1.0" encoding="UTF-8"?>
<AuthenticateResponse xmlns="http://citrix.com/authentication/response/1" >
<Status >success </Status>
<Result >more-info</Result>
<StateContext />
<AuthenticationRequirements>
<PostBack> /nf/auth/doAuthentication.do</PostBack>
<CancelPostBack>/nf/auth/doLogoff.do</CancelPostBack>
<CancelButtonText>Cancel</CancelButtonText>
<Requirements>
<Requirement><Credential><ID>login</ID><SaveID>ExplicitForms-Username</SaveID><Type>username</Type></Credential><Label><Text>User Name:</Text><Type>plain</Type></Label><Input><AssistiveText>Please enter username</AssistiveText><Text><Secret>false</Secret><ReadOnly>false</ReadOnly><InitialValue></InitialValue><Constraint>.+</Constraint></Text></Input></Requirement>
<Requirement><Credential><ID>passwd</ID><SaveID>ExplicitForms-Password</SaveID><Type>password</Type></Credential><Label><Text>Password:</Text><Type>plain</Type></Label><Input><Text><Secret>true</Secret><ReadOnly>false</ReadOnly><InitialValue></InitialValue><Constraint>.+</Constraint></Text></Input></Requirement>
<Requirement><Credential><ID>duoauth</ID><Type>none</Type></Credential><Label><Text>Duo Auth Method:</Text><Type>plain</Type></Label><Input><ComboBox><InitialSelection>push</InitialSelection><DisplayValues><DisplayValue><Display>Send a Push</Display><Value>push</Value></DisplayValue><DisplayValue><Display>Call Me</Display><Value>call</Value></DisplayValue><DisplayValue><Display>Enter Passcode</Display><Value>pass</Value></DisplayValue></DisplayValues></ComboBox></Input></Requirement>
<Requirement><Credential><ID>loginBtn</ID><Type>none</Type></Credential><Label><Type>none</Type></Label><Input><Button>Log On</Button></Input></Requirement>
</Requirements>
</AuthenticationRequirements>
</AuthenticateResponse>


The next workflow simply creates a ‘Duo auth factor’ that is displayed once the user has been authenticated, including the already entered username. The UI for this specific factor will display this:

Login schema XML (PreFillUserDuo):

<?xml version="1.0" encoding="UTF-8"?>
<AuthenticateResponse xmlns="http://citrix.com/authentication/response/1">
<Status>success</Status>
<Result>more-info</Result>
<StateContext></StateContext>
<AuthenticationRequirements>
<PostBack>/nf/auth/doAuthentication.do</PostBack>
<CancelPostBack>/nf/auth/doLogoff.do</CancelPostBack>
<CancelButtonText>Cancel</CancelButtonText>
<Requirements>
<Requirement><Credential><ID>login</ID><SaveID>ExplicitForms-Username</SaveID><Type>username</Type></Credential><Label><Text>User name</Text><Type>plain</Type></Label><Input><AssistiveText>Please supply either domain\username or user@fully.qualified.domain</AssistiveText><Text><Secret>false</Secret><ReadOnly>true</ReadOnly><InitialValue>${http.req.user.name}</InitialValue><Constraint>.+</Constraint></Text></Input></Requirement>
<Requirement><Credential><ID>duoauth</ID><Type>none</Type></Credential><Label><Type>none</Type></Label><Input><ComboBox><InitialSelection>push</InitialSelection><DisplayValues><DisplayValue><Display>Send a Push</Display><Value>push</Value></DisplayValue><DisplayValue><Display>Call Me</Display><Value>call</Value></DisplayValue><DisplayValue><Display>Enter Passcode</Display><Value>pass</Value></DisplayValue></DisplayValues></ComboBox></Input></Requirement>
<Requirement><Credential><Type>none</Type></Credential><Label><Text>Select Duo Auth Method</Text><Type>confirmation</Type></Label><Input /></Requirement>
<Requirement><Credential><ID>loginBtn</ID><Type>none</Type></Credential><Label><Type>none</Type></Label><Input><Button>Go!</Button></Input></Requirement>
</Requirements>
</AuthenticationRequirements>
</AuthenticateResponse>


Feel free to modify the schema to customize any strings, etc. However, do NOT modify the credential ID of duoauth or the ComboBox display values as these are referenced in the radius action expressions.

Edit 5/1/2018: See below for the Login Schema XML for a radio button factor

<?xml version="1.0" encoding="UTF-8"?>
<AuthenticateResponse xmlns="<a class="Xx" dir="ltr" tabindex="-1" href="https://www.google.com/url?q=http://citrix.com/authentication/response/1&sa=D&source=hangouts&ust=1525266050625000&usg=AFQjCNFB3vuWEvs_qSXTna9usXVEOkUWsQ" target="_blank" rel="nofollow noreferrer noopener" data-display="http://citrix.com/authentication/response/1" data-sanitized="https://www.google.com/url?q=http://citrix.com/authentication/response/1&sa=D&source=hangouts&ust=1525266050625000&usg=AFQjCNFB3vuWEvs_qSXTna9usXVEOkUWsQ">http://citrix.com/authentication/response/1</a>">
<Status>success</Status>
<Result>more-info</Result>
<StateContext></StateContext>
<AuthenticationRequirements>
<PostBack>/nf/auth/doAuthentication.do</PostBack>
<CancelPostBack>/nf/auth/doLogoff.do</CancelPostBack>
<CancelButtonText>Cancel</CancelButtonText>
<Requirements>
<Requirement><Credential><ID>title</ID><Type>none</Type></Credential><Label><Text>Choose Duo Prompt Type</Text><Type>plain</Type></Label></Requirement>
<Requirement><Credential><ID>duoauth</ID><Type>none</Type></Credential><Label><Type>none</Type></Label><Input><RadioButton><InitialSelection>push</InitialSelection><DisplayValues><DisplayValue><Display>Send a Push</Display><Value>push</Value></DisplayValue><DisplayValue><Display>Call Me</Display><Value>call</Value></DisplayValue><DisplayValue><Display>Enter Passcode</Display><Value>pass</Value></DisplayValue></DisplayValues></RadioButton></Input></Requirement>
<Requirement><Credential><ID>loginBtn</ID><Type>none</Type></Credential><Label><Type>none</Type></Label><Input><Button>Go!</Button></Input></Requirement>
</Requirements>
</AuthenticationRequirements>
</AuthenticateResponse>

NetScaler nFactor Configuration

First, we need to create some authentication policy labels (Security > AAA > Policies > Auth > Advanced > PolicyLabel).

We will create a PL (duo_dropdown) that will be used by either of the workflows defined above – it will contain the 3 radius policies created earlier, bound with a GoTo Expression of END. This PL will have a noSchema (DuoDropOnly) schema bound as well.

For Username\Password\Duo combined in a single factor: You should already have an authentication vServer configured with an LDAP policy. To convert this to use Duo, you need to set the Next Factor of the LDAP advanced policy to be the PL created earlier (duo_dropdown) as well as to bind the Login Schema using the 1st XML above – remember, for the AAA vServer, you need to create a login schema policy – in this example, the expression is simply ‘true’.

The end result:

For Duo as separate factor: create a PL (duo_user_dropdown) that will display the pre-filled user field and Duo auth dropdown. Bind the 2nd login schema defined above (PreFillUserDuo) and bind a NoAuth policy. The next factor will be the PL created above (duo_dropdown).

We will again use the existing authentication vServer configured with an LDAP policy. The login schema can stay the same, only the Next Factor for the ldap policy needs to change to point to the PL created above (duo_user_dropdown)

The end result:

Notes

  • Feel free to change the assistive text strings to match your deployment needs
  • You can also modify the radius server policy expression to include group membership
  • It is also possible to use radio buttons in the login schema to achieve the same functionality as the drop down
  • Read up on the SDK for more details on what you can do in the Login Schema

Thanks to JasonM for insisting that this had to be possible and helping me to get it working – his post on this is available here.

The post Duo Prompt and NetScaler nFactor Auth appeared first on SeriousTek.

Powershell Duplicate file Cleanup for Plex Camera Uploads

$
0
0

Some time ago, my wife had her phone stolen and we had not setup any sort of backup for the pictures, so a good number of photos and videos of our kids were lost that day. We now both use Google devices, so we have automatic backup to Drive for free, but I didn’t want to rely only on that.

Enter Plex Camera Upload

We use Plex a lot in our house – one of the major features we use is the automatic upload of photos to a library – this library is shared with parents and in-laws and it also provides a simple way to backup photos or videos taken by our phones. Initially I had some issues with the feature since I was storing files on an SMB share mounted to Linux – and when that happened, I found I needed to restart the upload to get things working.

Since then, things have just worked. Even switching to new devices, once the Plex app is installed and configured for upload, it just works. Until it doesn’t. A recent update broke the upload feature.

It has since been fixed, but in the meantime, I went back and disabled\reset the camera upload capability to try to get it working. Needless to say, I have some duplicate files in my Camera Uploads directory. I think there is some validation in the Plex app for previously updated files, but not much. I had racked up about 4000+ duplicate files and these are not small files, so there was several GB of space savings to be reclaimed. If only there were an automated way to do this…

Powershell to the Rescue

The following script will do the following:

  • Prompt the user for a path to the Camera Uploads directory
  • Parse all of the image and video files in the directory and group them by file size where each group has more than 1 file
  • Generate a SHA1 hash of each of the files to guarantee that they are actually duplicates
  • Delete hyphenated or malformed date files

A few notes:

  • I found -1, -2 and -3 duplicate files, there could potentially be more in your case, but the script would need to be modified to accommodate for this
  • Nothing is deleted unless you pass the -delete parameter to the script and confirm
  • The directory selection window likes to pop up behind the ISE window…making it look like the script is hung – check the log file for activity in your MyDocs

<#
.SYNOPSIS
Script to remove duplicate photos from the Plex Mobile Uploads directory

.DESCRIPTION
This script will enumerate all files in the Mobile Uploads directory, then find files that are the same size. A SHA1 hash is generated for each of these files to verify that they
are the same image prior to being deleted. Files that have incorrect date formats (1970-01-01) or are hyphenated take precedence to be deleted, unless all duplicate files are formatted
incorrectly, then the first file found to be duplicate will be deleted.

.NOTES
Script only looks for -1, -2 or -3 JPG files or -1 and -2 MP4 files
More file types can be added to the Get-ChileItem -Include section if needed

.PARAMETER delete
If the 'delete' parameter is used, the script will delete files once hashed duplicates have been found

#>
param(
    [parameter(Mandatory=$false)]
    [switch]$delete=$false
    )

$logFile = "$([Environment]::GetFolderPath("mydocuments"))\DupeDeleteLog.txt"

# Write to a log file in the current users MyDocs directory
Function Write-Log
{
    Param([string]$logStr)
    Add-Content $logFile -Value $logStr
}

# User select location to find duplicate files
Function Get-FolderName 
{ 
    Add-Type -AssemblyName System.Windows.Forms 
    $FolderBrowser = New-Object System.Windows.Forms.FolderBrowserDialog 
    [void]$FolderBrowser.ShowDialog() 
    $FolderBrowser.SelectedPath 
} 

Write-Log "$(Get-Date)"
Write-Log "Waiting for input from user to select working directory..."
$mypath = Get-FolderName 

# Initial log file notes
If($delete){Write-Log "WARNING: File deletion will occur!"}
Write-Log "Checking for duplicates in $($mypath)"
Write-Log "Finding same size files and hashing them. This will take some time...."

$dupeHash = foreach ($i in (Get-ChildItem -path $mypath -Recurse -Include "*.jpg","*.jpeg","*.mp4" | ? {( ! $_.ISPScontainer)} | Group Length | ? {$_.Count -gt 1} | Select -Expand Group | Select FullName, Length)){Get-FileHash -Path $i.Fullname -Algorithm SHA1}
$dupeHashGrouped = $dupeHash | Group Hash | ? {$_.Count -gt 1}

# Set confirm, if $delete param is not set, no delete will occur
If(!($delete)){$delConfirm = "Y"}
If($delete)
{
    Write-Log "Waiting for input from user to confirm delete..."
    $delConfirm = Read-Host "WARNING: This script will now DELETE FILES. Press 'Y' to confirm you want to DELETE, or any other key to cancel"
}

If (($delConfirm -eq 'y') -or ($delConfirm -eq 'Y'))
{
    foreach ($dhGroup in $dupeHashGrouped)
    {
        Write-Log "Current file hash: $($dhGroup.Group[0].Hash)"
        Write-Log "Matching files: $($dhGroup.Count)"
        $goodFile = $false
        $i = 1
        foreach($matchFile in $dhGroup.Group.Path)
        {
            If($i -eq $dhGroup.Count -and (!($goodFile)))
            {
                #Last file, no good found...keeping
                Write-Log "Last file in group. Keeping: $($matchFile)"
            }
            ElseIf($matchFile -like "*1970*")
            {
                Write-Log "File in group contains invalid date 1970: $($matchFile) - will be deleted."
                If($delete){Remove-Item -Path $matchFile -Confirm:$false}
            }
            #modify if more duplicated hyphens are found
            ElseIf($matchFile -like "*-1.jpg" -or $matchFile -like "*-2.jpg" -or $matchFile -like "*-3.jpg" -or $matchFile -like "*-1.mp4" -or $matchFile -like "*-2.mp4")
            {
                Write-Log "File in group is hyphenated: $($matchFile) - will be deleted."
                If($delete){Remove-Item -Path $matchFile -Confirm:$false}
            }
            Else
            {
                If($goodFile)
                {
                    #Already found valid file in group
                    Write-Log "Deleting this file: $($matchFile) already have good file."
                    If($delete){Remove-Item -Path $matchFile -Confirm:$false}
                }
                Else
                {
                    #Don't have good file in group; keep
                    Write-Log "Keeping: $($matchFile)"
                    $goodFile = $true
                }
            }
            $i++
        }
        Write-Log " "
    }
}
Else
{
    Write-Log "Deletion cancelled by user"
}

The script will also be posted in my PowerShell library here.

The post Powershell Duplicate file Cleanup for Plex Camera Uploads appeared first on SeriousTek.
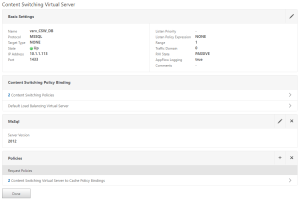

Troubleshooting Tips for Citrix ADC (NetScaler)

$
0
0

I’ve collected numerous Citrix ADC (NetScaler) troubleshooting tips and commands over the years, so here they are. Note that some of these tools, file paths or methods may have changed over time. Also note: single\double quotes are inconsistent (sorry) and usually not needed. Note a third time: don’t copy paste from the web to cli\gui – things will likely get mucked up.

Log File Locations

ns.confconfiguration file/flash/nsconfig
ns.conf.xolder configuration file; increments after any config change/flash/nsconfig
newnslogmain log file (ns data format)/var/nslog
newnslog.xx.gzarchived newnslog file/var/nslog
ns.liclicense file/flash/nsconfig/license
nstrace.shscript to collect nstrace/netscaler
nstcpdump.shscript to collect tcpdump/netscaler
nstrace.xpacket trace file/var/nstrace
vmcore.x.gzcore dump file during a crash/var/crash
kernel.xkernel dump file during a crash/var/crash
process-piduser process core file/var/core
savecore.logcore dump log file/tmp
pitboss.debugopen pipe for debug info/tmp
aaad.debugopen pipe for authentication debug info/tmp
ns.logsystem syslog file/var/log
messagesall logged entries/var/log
auth.logauthentication/authorization/var/log
dmesg.*hardware errors/boot sequence errors/var/nslog

Authentication

The most useful authentication troubleshooter – the aaad.debug pipe. Note that it will not return to a prompt without a ctrl+c – you are viewing it in real time, so it is not like viewing a log file. You need to execute this command before someone tries to login.

CLI > shell# cat /tmp/aaad.debug
  • Pipe must be open to gather information
  • Watch for ‘Sending <accept | reject> to kernel for <username>’
  • RADIUS server responses will be seen
  • If NS is SAML SP, assertion will be seen, deflated

Log strings found in /var/log/ns.log
These are mostly specific to Negotiate policies found when doing IWA.
Connection Issues

  • Couldn’t open server connection to http://1.1.1.1
  • Couldn’t create connection to ip 0xxxxx

Functional Messages (not errors)

  • NTLM: Sent NTLM Challenge to client > AFTER sending NTLM challenge
  • NTLM: NTLM auth successful!, user: <>
  • NTLM: NTLM Authentication failed for <>

Error Conditions

  • NTLM Auth: expected type1 found 3
  • NTLM RESP: Expected type2, found response code 200 is not 401
  • NTLM: Did not find Type2 from server, resetting state to 1
  • Unexpected NTLM type, 0, seen

SSL VPN Logins

  • realtime logins (CLI): tail -f /var/log/ns.log | grep “SSLVPN”
  • previous logins (CLI): grep “SSLVPN” /var/log/ns.log

Crashes and Hangs

Crash dump files are stored in the following locations:

  • Citrix ADC (PPE) crash: /var/core
  • BSD system crash: /var/crash
  • Hang\race conditions:
    • Don’t force a reboot! You need a core analysis – dump the core
    • For physical appliances, use the NMI button
    • For virtual appliances, see https://support.citrix.com/article/CTX207598 ; make sure to put pb_policy back after gathering a dump

Interface Troubleshooting

Use ‘show interface’ to determine what is happening on the network interface

  • Look at InDisc() and OutDisc()
    • Discards: appliance asked to handle more traffic than it is capable of
  • Fctls: frame sent from switch saying there is too much traffic
  • Stalls: packet is n the interface and could not get out for processing in a certain amount of time
  • Hangs: BSD checking to see if the interface is responsive or not
  • Muted: implies there is a loop; seeing the same packet on multiple interfaces

Load Balancing Basic Troubleshooting

  • Does bypassing the LB vServer work?
  • Is DNS name resolution working?
  • Check the monitor state – is an appropriate monitor bound?
  • Where is the request getting to? Does the backend server get the request? Does the network need MBF?
  • Dumb down the vServer: if SSL, does HTTP work? If HTTP, does TCP work?
  • Check persistence settings:
    • Are we using SourceIP behind a proxy\NAT? If so, use SRCIPSRCPORTHASH LB method instead
    • If SSL, use SSLSession
    • COOKIEINSERT does not work for all clients or applications
    • Try disabling persistence and use SRCIPSRCPORTHASH LB method – this may help uneven LB

Local Syslog

Logs are stored in /var/log and named accordingly; logs are compressed and rotated as per the settings in /etc/newsyslog.conf

  • Newsyslog process runs every hour via cron
  • Log file sizes must be met prior to rotation, files will be timestamped on the hour
  • See: https://support.citrix.com/article/CTX121898 to modify schedule
  • The rotation process can be debugged by running #newsyslog -v
  • *When using the local syslog viewer, always filter by module*

NSCONMSG (all the things)

Much of the (very detailed) performance data and stats of virtual servers is stored in the newnslog file in /var/nslog. Rotation of these files is controlled by nslog.sh and nsagg.conf – *modifying of these files is NOT recommended* – each appliance will have unique optimization settings for these log files depending on appliance size, platform, etc. The nsconmsg command is run from the shell prompt.

*Read the help file!!* nsconmsg -help
*Read the CTX article!* https://support.citrix.com/article/CTX113341

Common nsconmsg arguments:

  • -d <operation>
    • Current (current performance data)
    • Stats (current statistics counters)
    • Memstats (current memory statistics)
  • -K <file name> (performance information from this data file)
  • -s <name=value> (debug parameters)
    • ConLB (load balancing performance data)
    • ConCSW (content switching performance data)
    • ConSSL (SSL performance data)
  • -g <match string> (display only these symbols full pattern match)

Some nsconmsg examples (assuming archived nslog named oldconmsg):

  • nsconmsg -d current -g cpu_use
  • nsconmsg -K newnslog -d event
  • nsconmsg -d current -g ha_cur_master_state
  • nsconmsg -s ConLB=2 -d oldconmsg
  • nsconmsg -s ConCSW=2 -d oldconmsg
  • nsconmsg -d current -g pol_hits
  • nsconmsg -s ConSSL=2 -d oldconmsg
  • nsconmsg -s ConCMP=2 -d oldconmsg

Packet Captures

By default, the ADC uses the nstrace script and outputs to /var/nstrace – either CAP or PCAP file formats (use ‘-traceformat’ to specify from CLI) Can be run from GUI or CLI.

  • Use ‘-size 0’ to capture all packets (specify in zero in ‘Packet Size’ field in GUI)
  • Let the ADC decrypt all encrypted traffic in the trace with the ‘-sslplain’ argument
    • This is available in the GUI, but you must expand the More section
    • *BE AWARE* of what you are doing – saving unencrypted traffic!
    • This option eliminates the need to import private keys into wireshark
    • Note: wireshark cannot decrypt ECC!
  • Start a trace (CLI): start nstrace -size 0 -mode sslplain
  • Stop a trace (CLI): stop nstrace
  • Show the status of the trace: show nstrace
  • Capture filter for a specific vServer: -filter “vsvrname == <vserver_Name>”
  • Capture filter for a destination IP: -filter “DESTIP == <ip.address.here>”
  • Other filters:
    • SOURCEIP
    • DESTIP
    • DESTPORT
    • CONNECTION.INTF.EQ(0/1)*
    • CONNECTION.VLANID.EQ(3)*
    • *Interface\VLAN captures require the ‘-tcpdump ENABLED’ argument
  • Cyclical Traces can help troubleshoot intermittent issues by allowing you to define the length of time for each trace file and how many files before overwriting
    • Example: Start a new trace every 30 seconds and create no more than 50 files before starting to overwrite the files
    • >start nstrace -size 0 -mode sslplain -filter “CONNECTION.DSTIP.EQ(10.1.1.13) || CONNECTION.SRCIP.EQ(192.168.1.118)” -nf 50 -time 30

Performance Issues

A few notes:

  • The Packet Processing Engine (PPE) should always be at or near 100% utilization using #top in BSD
  • Httpd is the web GUI process
  • CPU reported by the hypervisor may show 100% – PPE polling mode; see https://support.citrix.com/article/CTX229555 for more details
  • Use “>stat cpu” to see actual CPU usage by PPE
  • Gather current and\or previous newnslog files
  • Citrix ADC uses nsprofmon for CPU profiling
    • Started at boot time, runs continuously
    • If any PPE CPU exceeds 90%, data will be captured to newproflog_cpu_<cpu_id>.out
    • Logs to /var/nsproflog
  • NSPROFLOG data capture parameters can be modified
    • Before using, please read: https://support.citrix.com/article/CTX212480
    • Nsproflog.sh cpuuse=700 start (will capture data when PPE CPU over 70%)
    • Nsproflog.sh lctidle=2000 start (will capture data when idle CPU time exceeds 2ms in idle functions)
    • Nsproflog.sh stop (stops the profiler and generates .tar.gz file with profiling data)

Policy Hits

This gets its own section because I use it ALL THE TIME. It will let you know which session policy or authentication policy is being hit by a gateway user (for example).

nsconmsg -d current -g pol_hits
nsconmsg -d current -g _hits
nsconmsg -s disptime=1 -d current -g pol_hits

Show Commands – Load Balancing

Useful commands

  • > show lb vserver <vServer Name>
  • > show cs vserver <vServer Name>
  • > show service <service name>
  • > show connectiontable (add: ” | grep <IP address|port>”)
  • > show connectiontable (add: “ip == <ip address> && state == established && svctype == SSL && svctype != MONITOR”)
  • > show persistentSessions
  • > show dns addrec -type proxy

Show Commands – Performance

Useful commands

  • > show version
  • > show node
  • > show info
  • > show license
  • > show savedConfig
  • > show run
  • > show hardware
  • > show interface -summary
  • #sysctl -a netscaler | more
  • #dmesg
  • #cat /var/nslog/dmesg.boot
  • #tail -f /var/log/ns.log

Stat Commands

  • > stat ns
  • > stat interface -summary
  • > stat interface <interface name>
  • > stat ssl
  • > stat cpu
  • > stat lb vServer <vServer name>
  • > stat cs vServer <vServer name>
  • > stat service <service name>
  • > stat dns <records>
  • > stat http

The post Troubleshooting Tips for Citrix ADC (NetScaler) appeared first on SeriousTek.
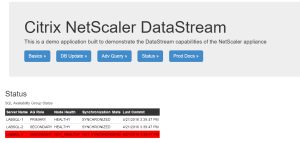
Home Lab: Migrating from ESX to Proxmox

$
0
0

I recently converted my home lab virtualization environment from vSphere\ESX to Proxmox and documented some of the useful tools and commands I used to do so.

A little history

My lab environment has gone through MANY iterations, both in hypervisor and storage:


Learning a variety of hypervisors was due mostly to my background in consulting and I’ve tried or used most of the major hypervisors available: HyperV, XenServer, ESX and several flavors of KVM\QEMU: raw VIRSH, Nutanix AHV (CE) and now Proxmox. Storage has been much the same: StarWind iSCSI, FreeNAS NFS, iSCSI and SMB, local storage, vSan, back to StarWind, and now I’m a very happy Synology DS owner.

The Pros and Cons (and why we are here)

For the longest time, my lab was primarily ESX, with maybe one or two additional hypervisors running for learning or experimentation – I worked for a VMware partner and did a lot of work in it, so it made sense. Plus, a few years ago, everything ran on ESX, and only some things ran on other – so any appliances, applications or whatever just worked. Now things are different and I’m finding I have less time to fiddle, and need as much ‘WAF’ as possible, so cost, noise, power and cooling are big concerns…Keep It Simple, Stupid. So let’s talk about ESX.

ESX just works and so do the supporting components (vSphere, vSAN, etc) assuming that you have experience and\or know what you are doing.

High performance this is cool and all, but again…KISS this is a homelab, not an enterprise.

…but…

vSphere resource tax yes, there are a TON of things like HA, DRS, vMotion, dvSwitching, vSAN that are just awesome with vSphere, but do I really need these things? I started thinking about it, and I could honestly not tell you how many times I (or DRS) ever vMotioned anything…maybe less than a dozen times over several years. And when you think about it, it all implies that you have multiple hosts, shared storage, and here we are losing WAF…quickly.
And not to mention the CPU, storage and RAM just to run a vCenter appliance.

Pretty much everything supports most hypervisors now so that makes things much easier to switch

KVM\QEMU Part 1

I have an older Intel NUC that runs Ubuntu for Plex with Intel QAT acceleration, and one day decided to install KVM. And I was pretty impressed at how easy most things were. I was even able to fight my way through PCIe passthrough and snapshot backups – enough to convince me to convert one of my primary hosts to Ubuntu\KVM. Local SSD storage is fast and simple…done. Console sessions are fairly easy, just open an SSH session and redirect local ports over the SSH session, and connect VNC to 5900 – just works.

I will warn you: there is a bit of a learning curve with Linux in general (if you’re not comfortable with command line) and with VIRSH, especially if you’re used to a nice happy UI like ESX. But, other than that, it works great.

The other major drawback to this setup is that monitoring and administration is all CLI. There are a few options like Kimchi which is HTML5 based, but it’s pretty cludgy to get setup, and it does not appear to have been updated recently. There is also VM Manager but it runs on Linux desktop, which is not my daily driver, and it is a very client\server application that runs when it is open.

Enter Proxmox

Many years ago, my cousin was talking about this cool new virtualization thing called Proxmox (PVE)but I never really looked into it. Fast forward to now when I realized that Proxmox is essentially a highly customized build of Debian built for virtualization, with several other benefits, including:

  • Rich, robust and easy to use web UI – added bonus, it doesn’t eat 10G of RAM (ahem, vCenter)
  • VNC console built into the web UI is wonderful
  • ZFS built in which is great, given my FreeNAS experience
  • It’s still just Debian, so you (should) already know how to use it, and if you need other components, just apt install them
  • While I haven’t used them, you can also:
    • Cluster
    • High Availability
    • And then some

How to Get Started with Proxmox

The best place to start is linux basics – understanding the file system (good understanding of LVM is very helpful) and CLI will make your transition to Proxmox (and KVM in general) that much better. For the most part, the web UI is VERY intuitive, and easy to use\understand. There are a few things you need to know:

  • Virtual machines are given an ID starting at 100; many commands will request you use the ID rather than a VM name, so if you’re used to PowerCLI, this is a little different
  • When you install, the default settings will add a ‘local’ store; this is a very useful place to copy VM images – it is mounted to /var/lib/vz/
  • The default file type is .raw but remember, qemu-img is an incredibly powerful tool and can modify most any VM file type

Migrating VMs from ESX

It’s FAR easier than I had expected to migrate from ESX to Proxmox – it takes just a few minutes to copy the VM file (depending on size) and a reboot or two to get drivers sorted. Here’s a basic step-by-step to get you started for Windows VMs.

  1. Enable SSH on your ESX host if it is not already running
  2. SSH into your ESX host and find the VMs backing disk file(s) – datastores are located in /vmfs/volumes/ you can cd by the name, then the directory will become the GUID of the datastore; browse to the VM directory and find the file names
  3. Shutdown the target VM
  4. SSH to your Proxmox host and SCP the file over:
    1. scp -v root@10.1.1.111:/vmfs/volumes/5cf0a01-f2231abb-9221-90ae1ba337221/TestVM/TestVM-flat.vmdk /var/lib/vz/images/TestVM.vmdk
    2. Remember you want the -flat vmdk file
    3. If you’re coming from another non-ESX system, the procedure is very much the same, I pulled over some qcow2 files and the next steps still apply
  5. Create the VM in Proxmox – I’ve found that keeping a small HDD mounted via VIRTIO can reduce a step or two later; note the VM ID; don’t power on yet
    1. You can keep NIC and SCSI adapters as VIRTIO, just understand they won’t be available until you load drivers; any storage you do need must be on the IDE bus for the initial boot, you can switch to VIRTIO after drivers are installed
    2. You can pre-load VIRTIO drivers while the system is still running in ESX, as well as uninstall VMware tools, but I prefer to wait
  6. Once the file is on the Proxmox host, import the disk into the newly created VM:
    1. qm importdisk targetVMID sourceVMFile.vmdk destinationStorage -format raw
    2. Example: qm importdisk 107 /var/lib/vz/images/TestVM.vmdk LocalZFSStore -format raw
  7. Back in the PVE UI you should now see a detached HDD in the hardware tab of the newly created VM (once the qm command completes); add this HDD to the VM, making sure to specify IDE as the bus type
  8. If you have not already done so, download the latest VIRTIO driver ISO and upload it into PVE storage; mount this ISO into the new VM
  9. Check the options tab under boot order to make sure that the newly added IDE HDD is the first boot device; power on the VM
  10. The system should boot successfully, going through a few hardware changes, etc. Open device manager and add any needed drivers (from the VIRTIO CDROM you mounted earlier)
  11. Uninstall VMware tools if you have not already done so, and shutdown the VM
  12. Now you need to clean up extra hardware, and make sure everything is on the VIRTIO bus
    1. If you kept the small default HDD from VM creation, this can be detached and removed
    2. Detach (but do NOT remove) the correct system HDD; re-attach it and set VIRTIO as the bus
    3. Set your NIC to VIRTIO if it is not already
    4. Verify your boot order is correct in the options tab, especially after moving the HDDs around
  13. Don’t forget to clean up your local storage…when you used the importdisk command, the image file was copied, so you no longer need the vmdk that you copied over.

The biggest troubleshooting step is around making sure that the system has the correct drivers for the VIOSTOR and VIRTIO disk – if the system BSODs after just a moment of booting, it is likely due to the missing storage driver. Simply set the HDD back to IDE bus (by detach and re-attach) and it should boot.

The post Home Lab: Migrating from ESX to Proxmox appeared first on SeriousTek.
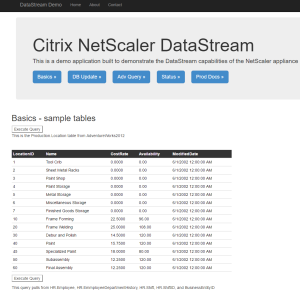
Installing Citrix ADC (NetScaler) on Proxmox

$
0
0

A few days ago, I did a thing and one of the first issues I had was getting a NetScaler (Citrix ADC) appliance up and running on the new host…because, you know….priorities. This scenario is certainly supported as the hypervisor is KVM, but on the initial boot, it got stuck here:

And that’s no good. How did we get here? Let’s go through the basics as it’s slightly different than just importing an OVF template.

Getting Started

Obviously the first step is to download the KVM image – it will be in a .tgz file. From here, I suggest uploading into the local images directory.

Once uploaded, go ahead and extract the contents using tar xvzf NSVPX-KVM-12.1-49.23_nc_64.tgz (obviously use the build applicable to you). You’ll notice there’s a checksum file, an XML file and the image file in a qcow2 file. There are a few ways to proceed from here, but my preference is to simply create an “empty” VM and import the disk using qm importdisk.

According to the documents, interfaces and disks do support VIRTIO, so add them as such; double check that the imported disk is set to boot after completing the import and attaching. As with any VPX, the minimum required CPU cores is at least 2 and a basic recommendation for RAM is 2GB + 2GB per PPE.

The Boot Problem

So now that you’ve got the VM registered and powered on and sort of booted…or booting – it goes nowhere, and sits at the above screenshot forever, eating 1 core of CPU. Realizing the problem is likely due to the fact that we created the system from scratch rather than using the included XML definition file, I took a look at it again:

Looks fairly simple, 2 CPUs, 2GB of RAM, VIRTIO disk and NIC, VNC graphics, console and serial connection. OH.

The default configuration of a VM does not include a serial port. Just add one. And boot the NetScaler. DONE!

The post Installing Citrix ADC (NetScaler) on Proxmox appeared first on SeriousTek.
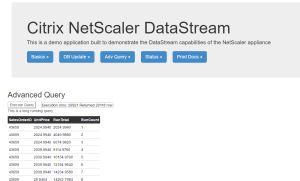
Go Home Android Discover, You’re Drunk

$
0
0

OK Google: We need to talk. I’ve used and loved Android OS phones for a LONG time now and lately, I really enjoyed the Cards feature in pure Android (Nexus, Pixel, etc). But unfortunately, you changed it to Android Discover and it’s mind-numbingly frustrating and useless now. It used to show reminder cards about upcoming package deliveries, useful news stories and calendar reminders…now it’s almost like it just picks random words from my search history (or any of the other data that I know you have about me) and tries to find the least relevant thing to show me. And can we please PLEASE have a way to turn off “trending” and “local news”??!?

Allow me to explain through a series of screenshots I’ve taken over the last few months.

I don’t speak Spanish

And I’m fairly certain that you would know that, Google. So WHY are you suggesting a post about a Nissan GTR that is very clearly in Spanish? (I mean, I do love the GTR, but still)

Posts from 2 or 3 years ago

Especially ones about computer security (and most things in the technology industry) are completely irrelevant even after 6 months. RFE: Can we please have a way to filter out old posts in the Discover feed?

Just…NO.

I know you know what I do for a living. This is like suggesting “These are the different parts of a car” to an auto mechanic!!! Even though it did not show below this suggestion, NO this card is NOT useful right now. Or ever.

Stop nagging me with the SAME story

This is a big one. The internets are filled with “news outlets” and “journalists” that all cover roughly the same thing. BUT that’s no excuse for trying to suggest the SAME story just from different outlets…not twice, but three times. If I read it once, I’m not going to read it again just because the same story is on a different site with a few different words.

These are NOT the droids you’re looking for

Or the topics that are being suggested, either. I think the AI/ML for suggestions needs a bit more work here, but these things are not the things that they say they are. Even though I enjoy Mythbusters and network switches, I have never once searched for DOTA (or a rack PDU).

Two for the price of one

This example looks a lot like “the same story over and over again” this one is just extra lazy because there are two identical stories that were suggested within a single screen scroll. Come on. (And I also don’t speak Hindi).

Worst example yet

If I search for something with “the” in the query are you going to start suggesting every article that contains “the”??? OK, maybe there was some mention of VMware in the article? Nope. Just a video game script that has ZERO to do with VMware ESX.

I enjoy Google products, I really do. But Android Discover needs some work, or more controls around what is suggested. To be honest, the previous version worked great, so I’m not sure why it needed fixing. If you have any suggestions as to how to improve the cards that show up in discover, please post a comment below.

The post Go Home Android Discover, You’re Drunk appeared first on SeriousTek.

Site Local GSLB with Citrix ADC

$
0
0

If you know anything about GSLB, you likely know that it is nothing more than a DNS trick that allows you to programatically return an IP (or CNAME) for a name based on service health or proximity to a location. But you may not know that you can also use GSLB in conjunction with Link Load Balancing to ensure that internal resources are highly available.

What is Link Load Balancing (LLB)?

Link load balancing is exactly what it sounds like – you are load balancing your external internet gateways\ISPs to provide for higher availability and higher throughput. *Note: this is NOT SD-WAN! The benefits of LLB are only realized when there are multiple outbound connections from different clients. Imagine the scenario:

If you need to host some web service or application, you would traditionally just use a NAT and create a firewall rule – pretty simple. In this scenario, how would you make that highly available? There are a few ways to do this, and we’re going to use something I call Site Local GSLB on our Citrix ADC.

It should also be noted that you don’t need to be using LLB on the Citrix ADC – it can also be configured on your edge firewall\router as well. The only thing to remember for this GSLB configuration is that we need rules and translations for both sides.

Make Your NAT Highly Available

One method to making port forwards highly available would be to simply add both A-records with the different IP addresses such that multiple addresses are returned. But this doesn’t solve the problem when one of the links is down. This is where Citrix ADC comes in with GSLB – the most important point is that GSLB is just a glorified DNS trick, but normally it’s used between two sites. This is not to say that two sites are required, it is just the most common deployment.

To do this we will need many of the same things as in a traditional GSLB configuration:

  • ADNS service on the ADC
  • NAT for ADNS service (from both gateways)
  • NAT for actual web service (from both gateways)
  • GSLB sites (sort of)
  • Delegated subdomain with NS records for both public IPs
  • Lots of DNS records

ADC Configuration

This configuration assumes that you already have a basic understanding of GSLB and getting it configured on an ADC – if not a good place to start is here. We will also assume that you have already configured a ADNS service and GSLB site – note that we only need ONE site, and the public IP address will not be used since we will be using CNAME based GSLB services. The services will be active\passive in this example.

First, we need to create 3 monitors – one for each of the gateways in this example, then a third monitor for the backup gateway that is reversed. A simple ICMP monitor will work, with the destination being the next-hop of your ISP circuit. Here is a screenshot of the reversed monitor:

With the 3 monitors created, we will next create the GSLB services – one for each gateway, keeping in mind that naming needs to reflect the correct CNAME to be returned to the client that corresponds with the IP that is NAT’d via the primary gateway, and that we do NOT need to worry about IP addressing.

On the first service (the primary) add the monitor created for the primary gateway.

On the second GSLB service, we will add a monitor threshold of 10 and bind the secondary gateway monitor as well as the reverse primary monitor.

Bind the reverse monitor with a weight of 10.

The reason we are using a reverse monitor and weighting here is due to the fact that most of the time, both gateways will be up, but we will only use 1. When the primary goes down, the primary monitor will go down, thus bringing the primary GSLB service down, but it will also flip the reverse monitor to up, thus bringing up the the secondary GSLB service.

Once the services are configured, and correctly showing as Up\Down, we need to create a GSLB vServer – note that we are creating a CNAME based GSLB vServer. Bind the previously created services, and set the FQDN for the GSLB domain.

The ADNS service should automatically bind to your existing ADNS service – if not, you will need to create one and bind it.

Public DNS Changes

The last pieces of configuration needed are a few changes to DNS records – these changes should be the last changes made. Address records need to be created on PUBLIC DNS servers to match the CNAMEs that are returned, in this example, you would need to create an ARecord for website.company.com that points to 71.100.100.1 and an ARecord for website2.company.com that points to 72.200.200.2

A CNAME record needs to created on PUBLIC DNS servers for the original site that the user requests – for example, site.company.com will be a CNAME for website.gslb.company.com. Ensure that gslb.company.com is a delegated subdomain which points to the ADNS service on the ADC with SOA NS records for BOTH public IP addresses in this example (and the associated firewall rules to allow DNS traffic to the ADNS service through BOTH NATs).

Testing and Validation

Once all of the DNS changes have been made, the easiest way to test is to simply change the gateway monitor bindings (or even the monitors themselves) to bring down the primary GSLB service. Once that is done, you will get a different response from the ADNS service. The easiest way to test this is with nslookup or dig. The flow will look like the following:

The post Site Local GSLB with Citrix ADC appeared first on SeriousTek.
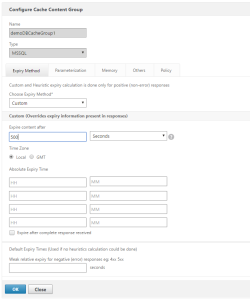
Viewing all 48 articles
Browse latest View live