There have been several questions and comments around the first post that describes a workaround to get Duo multi-factor authentication working with NetScaler (Citrix ADC) and nFactor. The issue stems from the fact that nFactor authentication uses both advanced authentication policies and it uses the RfWebUI theme – so if either of these conditions were met in your configuration, you were greeted with a rather ugly and non-functioning UI like this:
Good news, everyone!
Changes have been made both in the NetScaler code as well as the Duo authentication proxy code to allow for the native Duo Prompt iFrame to display correctly! So if you want to deploy Duo with advanced authentication policies on the NetScaler, this is the configuration for you. Fortunately, there’s not too much that is needed:
NetScaler (Citrix ADC) needs to be running at least 12.1 build 50.x or later for the updated jquery that allows this to happen
The Duo authentication proxy service needs to be running the 3.1 July 2019 build or later (though it is not noted in their release notes)
The authentication proxy configuration needs to have the type set to citrix_netscaler_rfwebui rather than citrix_netscaler
Changes to your nFactor authentication policies
And that’s it – you will now be able to render the full Duo Prompt iFrame in conjunction with nFactor authentication!
The nuts and bolts
There is not too much that is different with this scenario on the NetScaler, as you are now able to use the Duo Prompt either as a standalone authenticator (where the auth proxy is also doing AD\LDAP validation) configured only as a RADIUS server, or as a 2nd (or 3rd, or Nth) factor after letting the NetScaler do AD\LDAP, EPA and whatever other authentications.
The Duo authentication proxy configuration that needs to change is the type:
If you’d like to see a full example configuration for the NetScaler, take a look over at Jason’s post here.
Why do I need this?
There are a few problems with the workaround posted initially – not rendering the full Duo Prompt prevented some significant things from happening:
Users that had not yet enrolled any devices were not able to do so using the workaround…meaning that they would have to have the device setup outside of the logon page
Users did not have the option to use SMS (which I guess is still a thing…I did not test this claim, but it was reported)
Users that had multiple devices enrolled could not select which device they wanted to authenticate with
That being said, if the above scenarios don’t apply to you, the workaround implementation may be a better option as it is (in my opinion) a much cleaner and faster experience. The iFrame is rendered at your Duo API server, so there is a few seconds of delay while this is happening. The frame does get cached, so it does not happen every time, but could potentially lead to user confusion as nothing gets displayed in the delay time.
Well, it’s that time again – you know, when you get tons of email from security vendors reminding you that your security sucks, no security is perfect, this bug, that vuln and blah blah blah. Let’s take a step back and get started the right way with a series of posts that address a few places where you can improve your day-to-day technology security.
Risk
No security is perfect, you are simply mitigating risk – so it is really about how comfortable you are with a certain level of risk and how difficult it is to use. For example, are you prepared for someone being able to post not-so-nice things on your social media accounts or send emails with malicious attachments that appear to come from you?
Maybe your computers at home will become zombies and start sending malicious traffic as a part of a global bot net…not the end of the world right? Maybe you won’t be getting all the throughput from your ISP that you are paying for. Maybe you are opening yourself up to future attacks from that same bot net.
What about money? What happens when an attacker logs into your online banking account, sets up a new bill pay or transfer and sends all of your money off? Maybe you’ll get an email notification (assuming you still have access to your email account) that a new transfer or payee has been setup or maybe you’ll be out shopping and your cards will be declined. Maybe you’ll be able to get some of that back…
But what happens if you have documents and pictures…family photos, wedding pictures and kids pictures from years ago. Are you willing to risk those pictures being COMPLETELY LOST. Forever.
Security [can be] hard
Doing security right is one thing when you know what you are doing, but for people that don’t quite understand security, it’s probably just because there was an easy way out…and that easy way out was probably less risky yesterday than it is today. It doesn’t help that one person’s accepted level of risk is different than another person’s – making it a bit objective…and this leads to endless “discussions” (arguments) about security.
The hardest part about doing security well is the fact that there are NO “immediate benefits”. Having the ability to access your bank accounts on your mobile device is ‘cool’ and could be considered a benefit…having to use a strong password with multi-factor authentication does not add any additional “benefit”…other than, you know…keeping your money.
So while good security may be common sense for some security professionals or technologists, it isn’t for everyone else – and is probably seen as a hindrance…right up until money\photos\privacy\something is lost or stolen.
Taking a Step Back
So for the next month, I’ll [try] to take a step back and go back to security basics.
Yes, that password. You know, the one that you use on EVERY. SINGLE. LOGIN. But hey, it’s a really good password, you say. Psssst…it doesn’t matter. If you re-use even one password, you are twice as likely to have your account “hacked”, your identity stolen, or any number of bad things.
Take note of the large chart and the column that says “User assists attacker by…” Notice how many of those fields state being human? Most of them. Put simply, humans are not good at passwords. Still don’t believe me? See: Appendix A: Strength of Memorized Secrets in the NIST 800-63B (https://nvlpubs.nist.gov/nistpubs/SpecialPublications/NIST.SP.800-63b.pdf)
<em>Despite widespread frustration with the use of passwords from both a usability and security standpoint, they remain a very widely used form of authentication... Humans, however, have only a limited ability to memorize complex, arbitrary secrets, so they often choose passwords that can be easily guessed. </em>
And if you haven’t already, please go take a look at the https://haveibeenpwned.com/ tool and check any emails or logins you may have that have been exposed. Chances are, you have at least a few exposed usernames and passwords – and if you (yes you) ever re-use a password, that number just goes up.
But the problem is that most (if not all) of the online services we use every day still rely on passwords for authentication. So let’s talk about some of the ways that we, as humans, can avoid assisting the attackers, and help improve our daily operational security.
STOP Re-using Passwords
Now. Just don’t do it. To be completely honest, you would be better off by writing down your passwords on a sheet of paper…but then you need to worry about physical security – do you keep it under your keyboard at your desk (no) or do you keep it in your wallet (no) or do you keep it locked up in a safe (maybe).
Or you could use different password phrases or sequences for each login. For example, my password for banking.com would be: bAL0g1n10& but my password for health.com would be hEL0g1n10& – the idea being I take the first 2 letters of the service I’m trying to login to and putting that into my favorite passphrase. This is just an example, make up your own that works for you.
Complexity Matters
Or does it? If you recall from the above Azure AD article, anything less than 9 characters can be cracked in under a day, regardless of the number of letters, numbers, case, or special characters. Want real-life proof of this? Give this a read: https://thehackernews.com/2019/10/unix-bsd-password-cracked.html
Password Length
Possible Permutations
Time in seconds
Time in minutes
Time in hours
Time in days
6
782,757,789,696
8
0.13
0.002
0.00009
7
75,144,747,810,816
751
12.52
0.21
0.01
8
7,213,895,789,838,340
72,139
1,202.32
20.04
0.83
9
692,533,995,824,480,000
6,925,340
115,422.33
1,923.71
80.15
10
66,483,263,599,150,100,000
664,832,636
11,080,543.93
184,675.73
7,694.82
But the problem is this: the longer a password is, the harder it is for humans to remember it and the harder it is to come up with different ones…so here we are back at the original problem of usability and re-use – and there is a very fine line between enforcing ‘complexity’ and risk.
Federation can Help
Federation is a fancy way to say “Login using XYZ” – you’ve likely seen this before and common federated partners are Google, Facebook, LinkedIn and others. One of the primary goals of single sign-on is to reduce the number of credential sets that are used, meaning fewer passwords to remember (and that’s a good thing).
But there are a few things that you need to remember with federation:
This does NOT mean that the new login uses the existing (federated) account – a new user object IS created on the new service, but uses a common attribute, like email address, to link this account to the federated one.
Federation does NOT improve the strength of your credentials – so if you are logging in to Ebay with your Google account, the strength of your Ebay credentials are now effectively the same as your Google credentials.
If your federated account has weak credentials, you have effectively increased your risk of a security breach on any site that uses that federated login – Understand the risk!
The takeaway: make one of your accounts have very strong credentials (and MFA, and anything else to make it more secure) and federate as many logins to this single account as possible.
That being the case, one of the best ways to improve security is to use multi-factor authentication.
Use MFA
If you are not using multi-factor authentication (or don’t know what it is), stop reading this article RIGHT NOW and turn it on for any service that you can (or go read this NIST paper: https://nvlpubs.nist.gov/nistpubs/SpecialPublications/NIST.SP.800-63b.pdf ). Many web services like banking or healthcare should already have the option to enable an additional factor of authentication – some even require it, and this is a good thing.
But why? This is just a simple step that gets around the being human problem when it comes to proving to computers that we are who we say we are. So in the event that we do re-use a password or our credentials are stolen, MFA will stop an attacker from gaining access as they will likely not have your MFA token.
Quick Basics
Authentication “factors” are things that you are already familiar with: something you know (your username and password), something you have physically (like an RSA token, Google Authenticator on your phone) and something you are or do (like biometrics, or approving an app request on your phone). There are TONS of different solutions, but for the most part they all effectively fall into one of these categories.
A common factor used by web services is to send a “one time use” code via SMS text or email. While this does add some extra security, it is not the most secure (more on that later) and the user experience isn’t great – you have to wait for the message to arrive, switching apps on your phone isn’t easy with copy\paste, and you have to do all of this EVERY TIME you login.
Not all MFA Solutions are Created Equal
There are several options when it comes to adding another authentication factor to a login, but you need to be aware that they do not all provide the same level of risk mitigation. Here are the most common factors in use and why you should or should not use them:
Factor
Security
But why??
Username\Password
BAD
Yes, but why?
SMS, Phone
Less bad (but still bad)
SIM card hacking is easy
OTP
Less bad (depends)
SMS\Phone\Email (see above)
TOTP
Pretty Good
Still vuln to replay, phishing; just a PSK
App Push
Good
Replay attack requires social engineer
SmartCard
Moar Gooder
PIN unlock, use CRL; Complex deploy
FIDO2
Most Gooder
BIO or PIN; Strong Authentication
OTP and TOTP are similar in that they are both short (usually 4 or 6 characters long) strings – but the subtle difference being that the ‘T’ in TOTP means that every 30 seconds or so, the code will change. OTP on the other hand, is a system-generated code that is then sent to the user via a different channel, other than the actual service itself.
SMS and Phone
While this may be a very common authentication factor deployed today, it is by no means the most secure. SMS messages and phone calls are used to send one time passcodes to the be used for validation. But, it is not the phone that is the actual factor – but rather the SIM card (or phone number) that is being used to send the code to. Unfortunately, it is VERY easy for someone to steal or clone a SIM card, then they would simply receive the one-time-use passcode and this multi-factor authentication method is all but defeated. Here’s a very recent example: https://www.theverge.com/2019/8/31/20841448/jack-dorsey-twitter-hacked-account-sim-swapping
Time-based One Time Passcode (TOTP)
TOTP as a factor is a bit more secure because it doesn’t rely on the same SMS\Phone\SIM technology as others; it also tends to be a good bit more user friendly since there is usually a hardware token the user has or an app that can be easily used. Unfortunately, TOTP is not as common outside of the enterprise.
But even this is not perfect as it is still possible to get unsuspecting users to “login” to sites that look like the real site, but are actually malicious – this is known as a replay attack. When the user logs in to the malicious site (with the username\password\TOTP token) the attacker immediately turns around and uses those real credentials to (‘replay’) login as the victim.
Alternatively, an attacker using social engineering, can simply call a user and obtain the TOTP token code – he then has 30 seconds (give or take) to login as the victim.
App Push
The App Push factor is similar to OTP via SMS\SIM except that it typically relies on modern software to securely communicate with the server and confirm with the user that he or she really wants to log on. That said, this method is still vulnerable to social engineering, similar to the other factors – user training and knowledge is key to ensuring less risk.
SmartCard
This may also be known by other names – including Client Certificate authentication or PIV\CAC in US DoD environments. This form of authentication is quite secure – it requires both a physical card (thus the name ‘smartcard’) with a chip containing a client or user certificate. The chip requires a PIN to unlock and is built to self-destruct if physically tampered with. If the card is lost, a certificate revocation list can be employed to ensure it cannot be used in the wrong hands, thus forcing a new smartcard with new client certificate to be minted.
The problem with smartcards is that the environments are VERY complex to deploy and maintain and require significant administrative involvement; this makes them unfeasible to use for public sites or services.
FIDO2
FIDO2 is the latest set of specifications from the fido alliance – the industry’s answer to the global password problem and addresses the numerous issues with current authentication mechanisms. It is build with end-to-end security, even able to prevent replay attacks. There is a great deal of information at on the FIDO Alliance site here: https://fidoalliance.org/fido2/
The Answer?
Any MFA is better than no MFA as it lowers risk and increases difficulty for malicious actions or account takeovers. User training and education playing a very important role in further reducing risk. The trade-off for security is usually user experience, so it is important to choose the right MFA scheme. User context can aid in improving the experience, but the key thing to remember is that traditional usernames and passwords simply do not provide good security.
I like working & playing with storage…all kinds of storage: Local storage (old RAID with spindle HDDs, solid state drives), networked storage, cloud storage, storage ALL THE THINGS. My lab (and home environment) has changed throughout the years and I’ve used several different products. To order from length of time used would look something like this:
There are plenty of posts here of my experiences with all of them over the years and for me, each has its own advantages and disadvantages. Lately, though, I’ve been trying to simplify the environment that I manage…so while I’m sure I could set everything up manually, with scripts and what not, that does not lend itself to always working. So I decided to try to find a single solution that just works without my needing to dig into the weeds or write a hundred scripts just to get snapshot synchronization working.
I have a few general requirements for my storage:
SMB shares for documents, photos, music and miscellaneous files
Another random file protocol or two (FTP for MFC scan-to ability)
Fast iSCSI (or NFS) storage for lab VMs
A way to locally backup PCs and VMs
Way to replicate some of the data elsewhere
Enter Synology
I’ve known about Synology products for a LONG time. I went back and forth with Jason over at https://itrandomness.com/ about performance, scalability\upgradability, and overall experience. At the time, I was touting all of the FreeNAS capabilities and performance after having heavily tuning it. I ran into one or two bugs, but was able to get through them and for the most part, FreeNAS provided great performance and most of the protocols and capabilities I needed.
But the hardware was too much…4U boxes do NOT tend to provide much in the way of wife acceptance factor (WAF). My 1 and 2 TB drives were filling up. I needed something simpler that just worked. It was time for an upgrade.
And then to decide: do I custom build something again? No. We’re going for simplicity. I had done loads of research in the past to compare vendors, and came up with two: QNAP and Synology. I didn’t end up purchasing a QNAP, so I can’t give them a very fair review. I determined from my research that the Synology software suite as a solution seemed a good bit better – meaning, they won lots of points in the it just works category. So I found a suitable desktop model, and here we are.
This, is the DS1819+. It’s quiet, it runs cool, and there are capabilities that I had not used in the past, that I am now finding uses for.
Checking the Boxes
I wanted to get my hands on smaller hardware prior to making the final decision, so I purchased a smaller 2-bay model first to kick the tires. Obviously I was impressed, and this smaller box is now a remote backup and replication target for another environment that I “manage”. Synology DiskStation Manager (DSM) is the operating system that runs on the appliance, and it’s VERY intuitive and easy to use. Out of the box, DSM supports all of the storage protocols anyone should need.
Managing the Synology is done mostly via a web interface that is built so well that it’s very difficult to tell it’s a web interface. There is also optional (advanced) access via SSH, but it can be enabled\disabled as needed.
If you need another capability like simple file backup (Hyper Backup), System Backup (Active Backup for Business), Hypervisor capability (Virtual Machine Manager), or even a simple IP Camera DVR (Surveillance Station) – these extra apps are all available in the package center. DSM offers support for the BTRFS file system, snapshots and replication. There are also a good number of mobile apps available for management, file share access, and productivity. You can make your appliance available publicly, but there were some malicious attacks in the past, so I won’t be (nor do I need to) doing that.
It’s been almost a year now, and I have ZERO complaints. Next post I’ll cover some of my use cases and app configurations.
One of the requirements of my production (home, lab, etc) storage system is to have backup capabilities. Previously, when all of the hypervisors in my lab were running ESX, it made sense to use Veeam – it worked great, and I could store the backups on a volume that was a part of a replication task.
But hypervisors change so Veeam was no longer an option. I thought the Active Backup for Business (ABFB) solution would work in a similar way, but it turns out they don’t support KVM for direct backup. Fortunately, ABFB supports agent based backups for servers and PCs, regardless if they are virtual or hardware. So this takes care of two cases – lab systems AND PCs in the house which I may (or may not) have been backing up previously.
What about the restore?
If you’ve deployed a Windows system from an ISO before, you know that it can take a while just to get the system the way you want. If it’s new hardware, you need to worry about drivers…if it’s a 3rd party (non-HyperV) hypervisor, you need VM tools. One of the greatest tools that has been available to make this process easier is the Microsoft Deployment Toolkit, or MDT.
Think of MDT as the evolution of Remote Installation Services (RIS) that supports all new Windows OSs and tons of customization and installation options. Everyone that deploys Windows and is not already using some form of automation should consider MDT – I use it extensively to deploy lab systems for testing and it works great for this.
The easiest way to deploy is to boot to the network allowing the WinPE image to run and connect to the MDT server. Then I realized that Synology offers an ISO image to boot from if you need to restore from an Active Backup for Business backup.
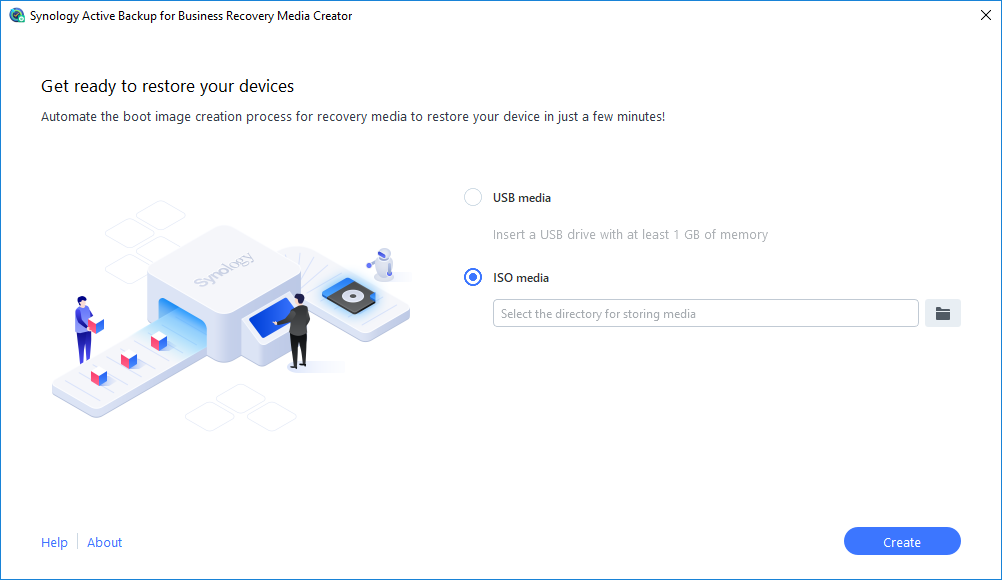
Synology Active Backup for Business Recovery Media Creator
The media creator uses some of the same tools that MDT uses including WinPE and WDS, so if you have not installed those tools on your system, you will need to do that before the media creator runs.
Adding the Restore Tool to MDT
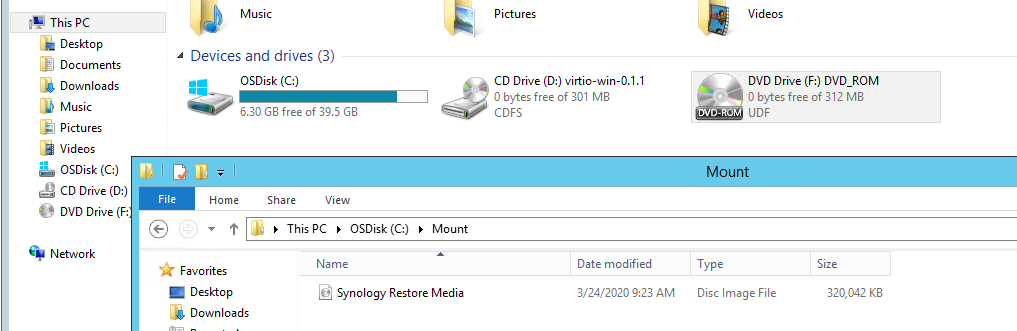
Once you have the Recovery Media ISO, mount it to any system (or virtual cdrom, etc) to browse the files – it should be about 320MB though this is subject to change over time with new releases.
Mounting the Restore ISO
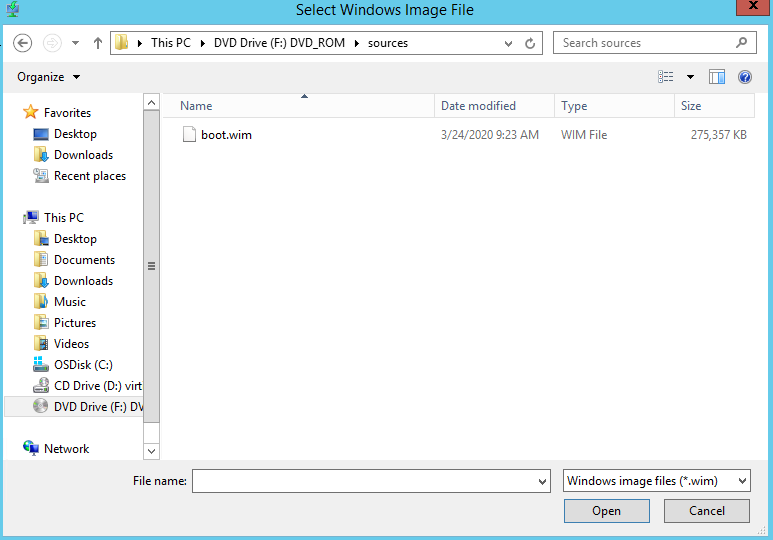
Once mounted, browse the ISO to locate the boot.wim file, it will be located in the /sources directory. In this case, the .wim file is ~275MB.
The boot.wim file
Copy this boot.wim file to a temporary directory and open the Windows Deployment Services console on your MDT server. We will be adding a new boot image using the boot.wim file that was extracted previously. Follow the steps in the UI, giving the image a descriptive name.
Add Boot Image
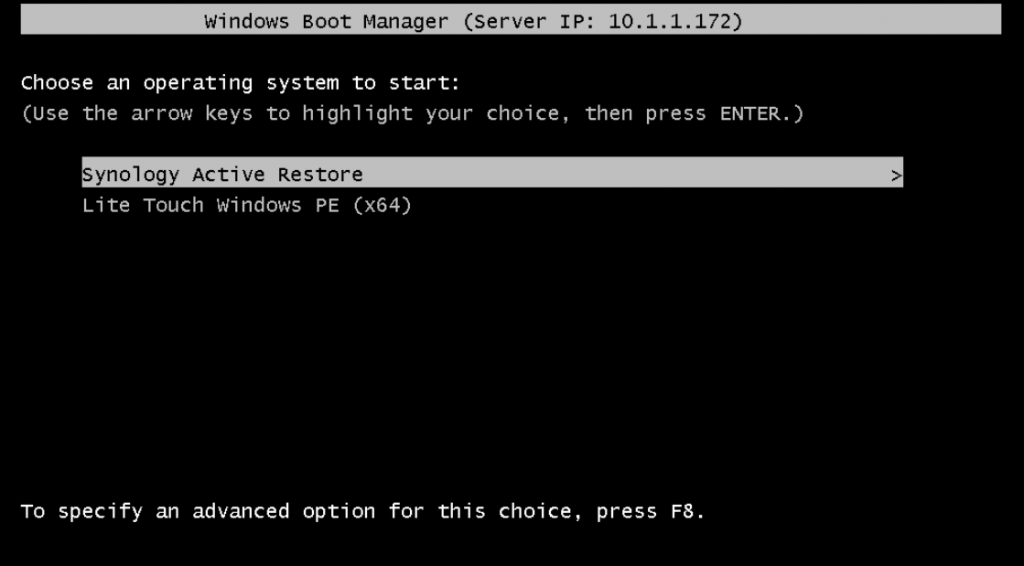
Once complete, the new image will have the default priority (500000), which, if you have not changed the priority, you may have systems that will default boot to the restore media rather than the MDT deployment image. Make sure to change the priority to meet the needs of your deployments.
Boot choices with Synology Active Restore priorityModified image priority
Automated Restore
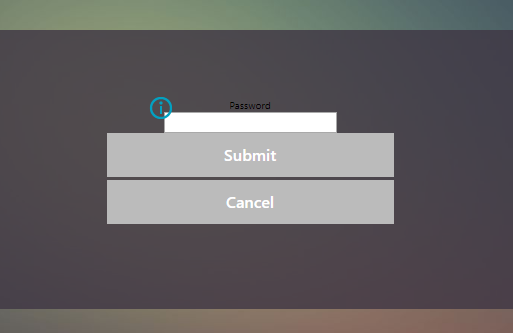
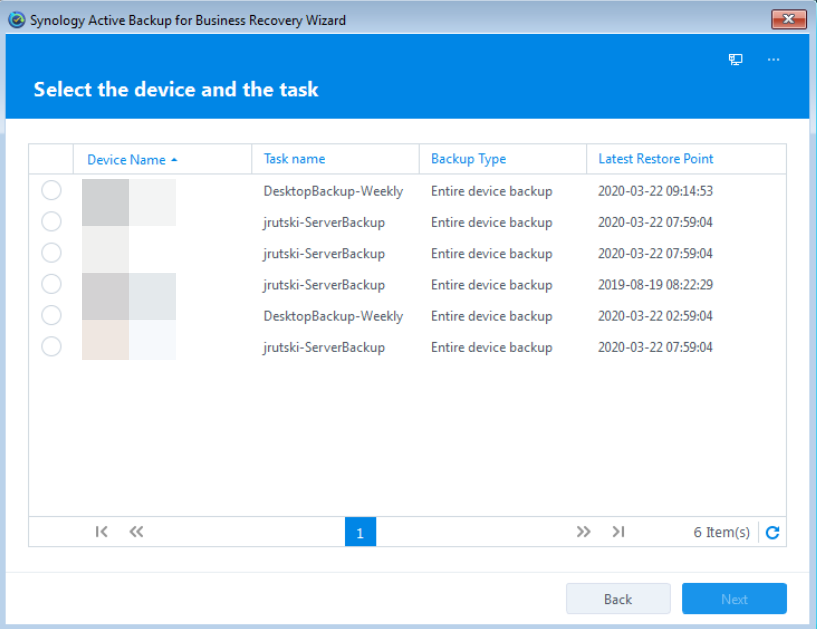
Once you boot into the Restore Image, you will be prompted to connect to your Synology DSM. From there, you will then be presented with the available devices that have been backed up.
Available devices and backups
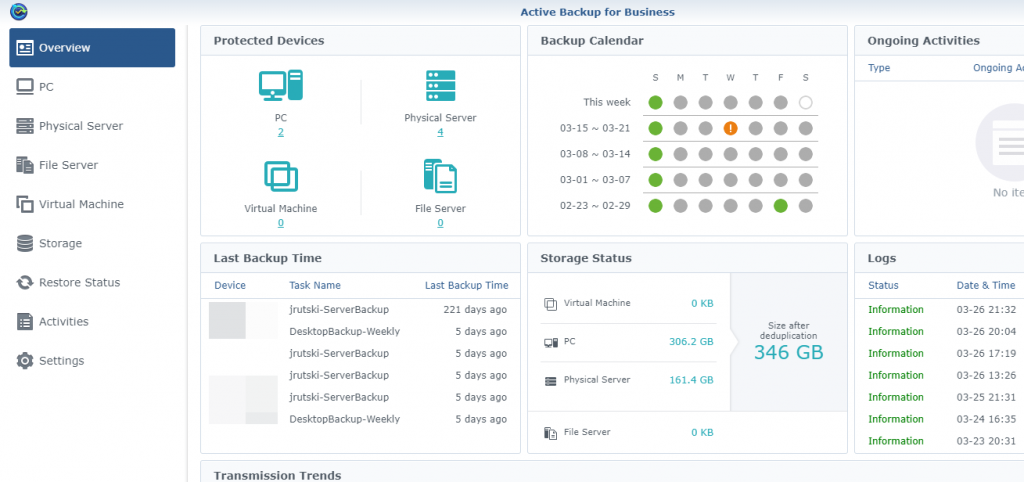
This should match what you see in the Active Backup for Business portal on the DSM.
Active Backup for Business
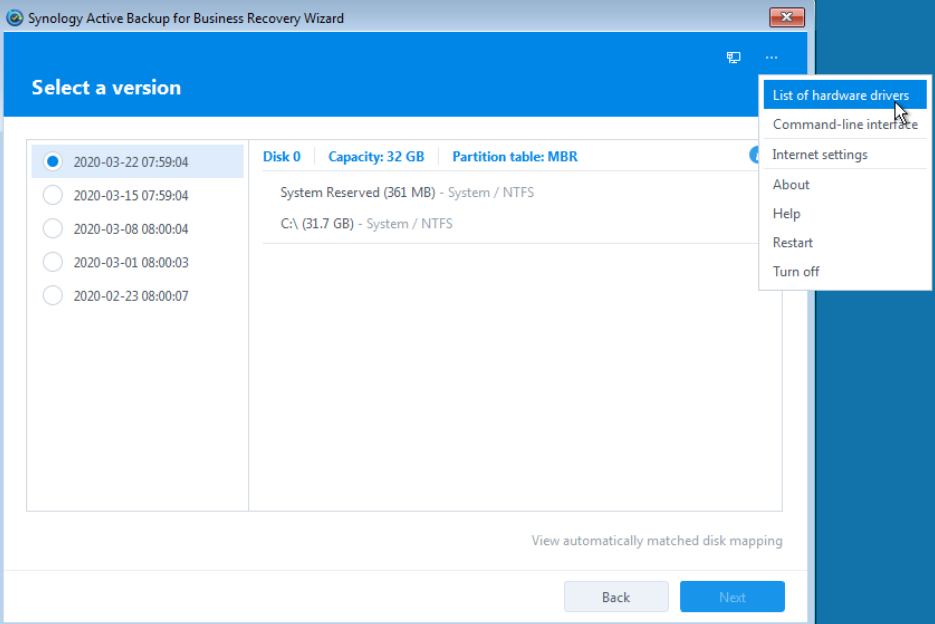
Once a device is chosen to restore, you will be able to see additional details about the restore image, different versions available, as well as a few tools to manage the restore.
Restore
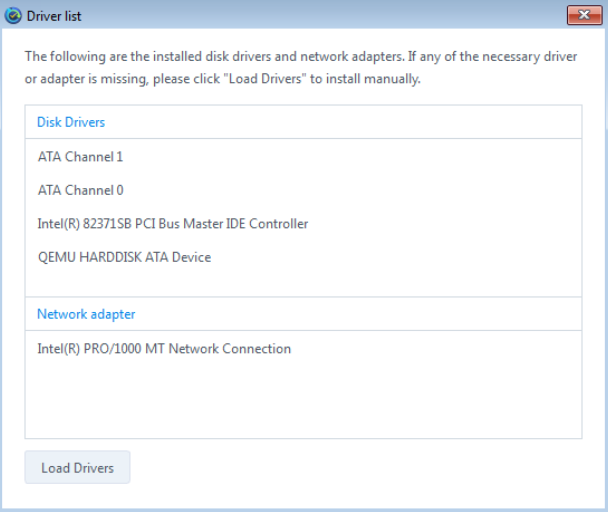
You can also see the drivers that are currently loaded as well as add any additional drivers that may be needed to complete the restore.
Drive List
…and that’s it.
This simple integration makes Active Backup for Business that much better for Windows systems – simply boot a replacement machine (or VM) to the network and choose the restore image. It’s as simple as that!
There was a comment recently on the Duo integration blog post about how to do a similar integration between Citrix ADC (NetScaler) and One Identity Starling MFA. Thanks to nFactor authentication, this is a relatively simple task. One Identity Starling is very similar to Duo in that there is a ‘RADIUS agent’ that runs as a service on-prem that communicates with a cloud service. This is the first piece to be configured.
Getting Started
First, download and install the Starling Two-Factor RADIUS Agent on a Windows server in your datacenter – documentation can be found here. Once installed, there are essentially three settings that need to be configured:
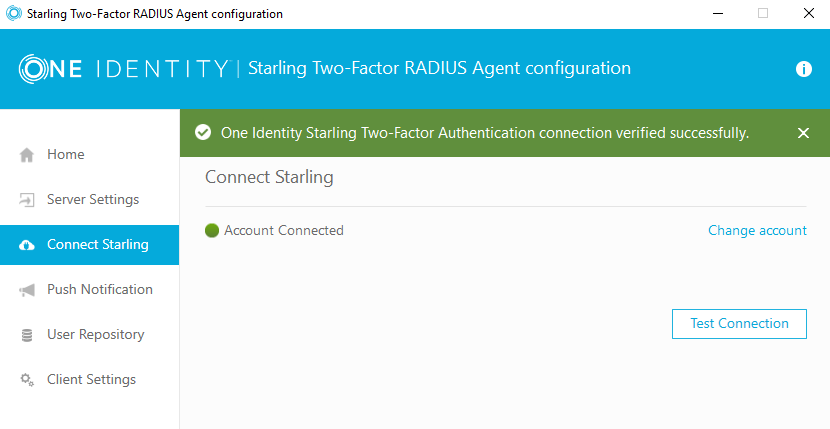
Connect Your Starling Account
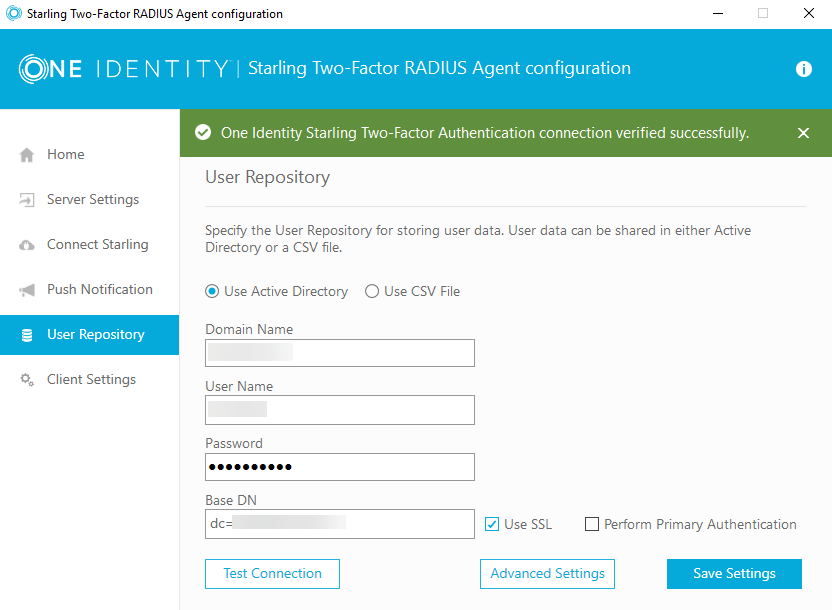
First, you will need to connect the agent to the Starling service by logging in via the Connect Starling UI. Next, configure the user repository – in this example, I have configured Active Directory:
User Repository
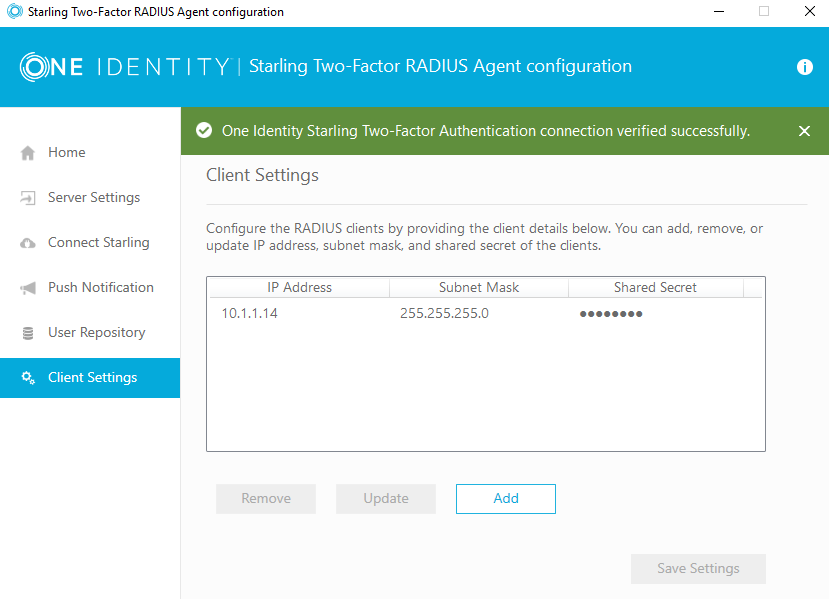
You then need to configure the client settings – remember, by default, RADIUS traffic originates from the NSIP. You will also configure the shared secret here – you will also need later for the RADIUS configuration on the ADC.
RADIUS Client Settings
There are a few other settings, but the default settings should work just fine.
nFactor Configuration
The first thing to configure on the ADC is the RADIUS server – you will only need the IP address and shared secret. No additional setting should be changed if you are using the default settings on the agent.
RADIUS server
From here, there are several options to present this to the users – it can be a 2nd step or it can be presented along with the first username\password credentials. I recommend following the ‘dropdown’ configuration from my duo configuration here. There are a few additional configurations we need to make due to the way that the RADIUS agent expects input.
The RADIUS agent expects the user to enter strings into the text field based on how they would like to authenticate. For example, enter ‘SMS’ to receive an OTP code via text, ‘Phone’ to receive a code via a phone call, or leave the field empty to receive a push notification via the app. While this does work, it is a painful scenario for users that may not have the app installed, having to enter an additional string of characters.
When creating the dropdown schema, attention must be paid to the ID of the of the dropdown and the InitialSelection values, to set them to the values that OneIdentity is expecting:
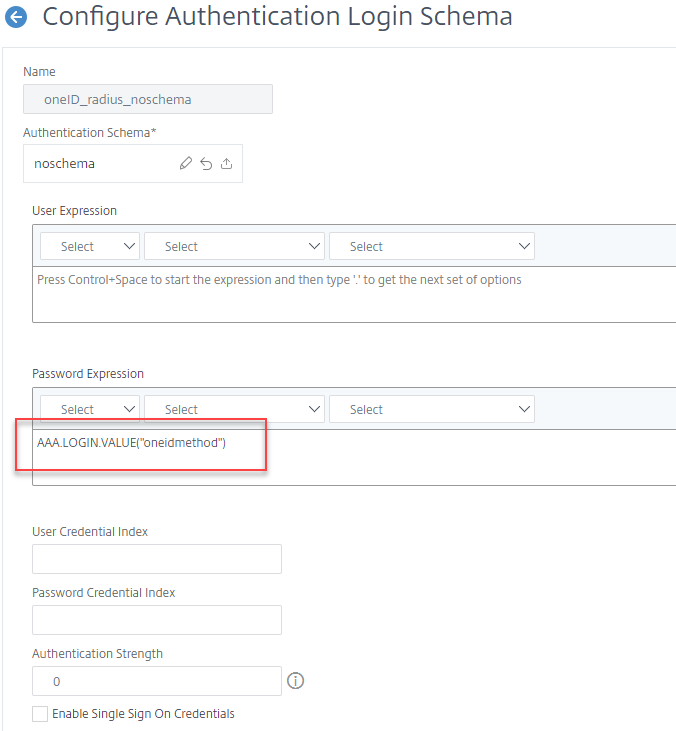
The next configuration is a noschema (meaning that nothing is displayed to the user for this step) Login Schema that will pull the value from the dropdown and pass the string to the RADIUS agent, by specifying the Password Expression:
Password Expression
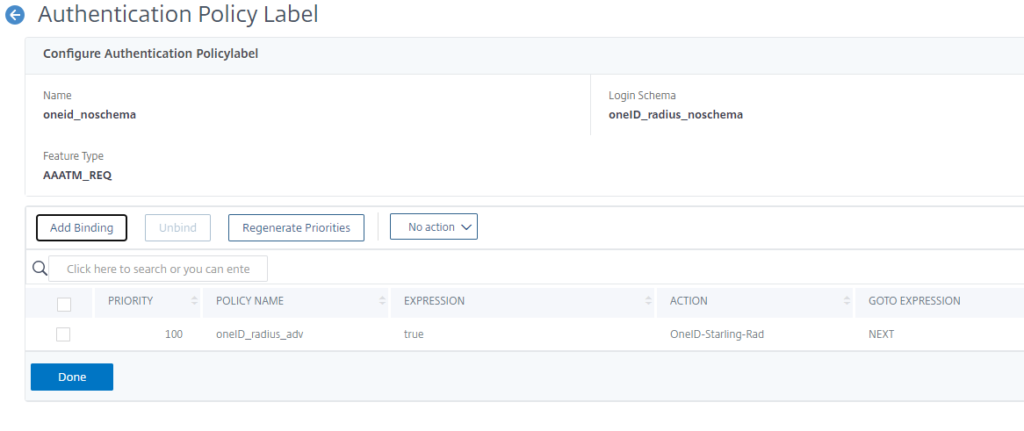
Next, create the Policy Label – it will have the previously created schema bound to it as well as the RADIUS policy:
One Identity Schema
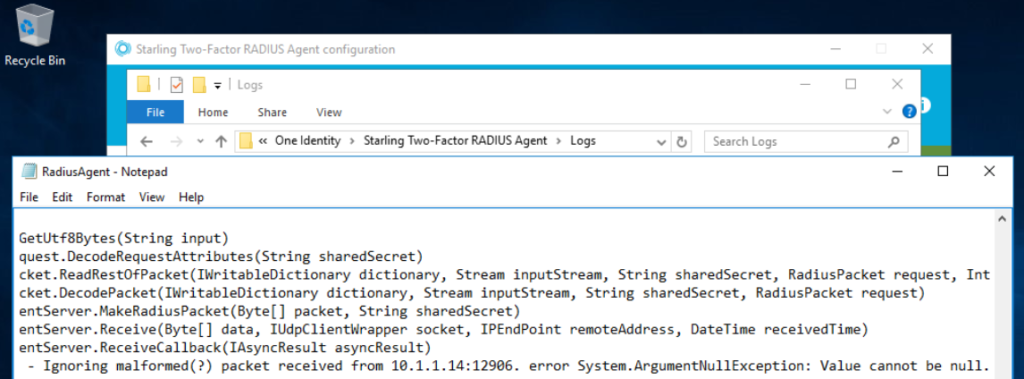
Troubleshooting
The RADIUS agent logs can help in troubleshooting, they are located at C:\Program Files\One Identity\Starling Two-Factor RADIUS Agent\Logs Initially, I had misspelled the <ID> between the schema and the password expression, so NULL was sent to the agent.
Oh, were you expecting a tech article? Nope. For the first article of 2022, I’m shifting gears (pun intended) and starting off with an automotive entry, specifically why we decided to trade in our Honda Odyssey for a Volvo XC90.
Some Background
At the time, there were two kids running around and one of them was still in a full-sized car seat, so it made sense for us to buy a minivan – especially when our previous SUV started having issues. Back in school, both my wife and I both had Hondas (or Acuras in my case, same difference) and we decided between the convenience, size, and perceived reliability, that the 2018 Honda Odyssey was the best choice.
So it was, a new 2018 Odyssey.
The dogs also approve.
The Pros of a Honda Odyssey
There is a cult following of minivans, they’re big and built for people that continually haul lots of people and stuff…you probably already know these, but I’ll just go through them:
Seating and Space for kids, the whole reason you have a vehicle designed to haul lots of people, fairly comfortably; 3rd row access is simple, LATCH everywhere – including 3rd row and middle seats. Tons of storage space and cup holders too – throughout the car. This is really the primary reason to get one of these vehicles.
Sliding Doors ease the stress with children that like to open doors violently. Plus, you can open and close them from the drivers seat.
Built for a Family with little features like the middle row camera (cabin talk), rear seat entertainment (with HDMI inputs and tons of USB charging), and the ability to talk into the headsets (cabin talk) of said entertainment set
The Cons of [our] Honda Odyssey
The problems started quickly for us, with the first problem being a blank infotainment screen. Granted it came back after some time, but this was within the first 1,000 miles of owning a new car. NOT a good sign. Here are the problems we ran into during ownership of the car, in roughly the order they happened:
Minor Issues
Blank infotainment screen or a mostly blank screen with a power failure error; this occurred frequently, but was really only a nuisance. (not fixed)
Driver door handle and lock malfunction – this happened when the car unlocked the doors via the door handle unlock request was used (basically grabbing the door handle with the key in your pocket). The problem seemed to arise when the unlock occurred at exactly (or very close to) the same time as the door handle was pulled, and the door handle would simply not open the door. After several door lock\unlock cycles and frantic pulling on the handle, eventually the door would open. (the dealer fixed this once, though it was starting to happen again)
Sticky power sliding doors – from time to time, the power sliding doors would stop and reverse as though something was in the way of closing. We had to either try to close them again or push-assist them closed by hand. (not fixed)
Major Issues
Car ECM\power failure\limp mode – I’m not sure exactly what happened here. Essentially, the car went into limp mode due to some major fault, and lit up the dashboard (Christmas tree). Additionally, all of the safety systems (blind spot monitoring, lane departure warning, adaptive cruise control, etc) were disabled, and several major ‘System Problems’ were reported. (The dealer had to contact the Honda tech line and eventually replaced a part under warrantee. This did not happen again after the fix)
*Note there are 2,110 miles on the odometer(!)
Transmission TCU recall\Stall – the car stalled and would not shift from neutral while sitting at a stop light, plain and simple. (this is actually a recall, and the dealer repaired\re-programmed at a later time)
WHAT IS HAPPENING?!
Severe transmission fault\auto start-stop fault – this was the last straw. This was the first car that was equipped with an auto idle start-stop system. It’s a bit odd and took some getting used to. The problem was the car would shut off the engine during a start-stop event, then fail to restart it. The car stalled, requiring several attempts to power off and on. This happened once or twice in a neighborhood which were not too big of a deal. The big deal happened at a stop light when this happened again, this time showing a warning on the dash for ‘Transmission fault’. On a road with a 45mph speed limit. Around a slight curve with low visibility. We decided to trade in the vehicle at this point, you know, while on the side of the road. Hoping that people would slow down and not slam into us. (the dealer did not see any stored faults in any control module and was not able to replicate the issue. I suggested a battery replacement, which appeared to resolve the issue. I had to pay out of pocket since it is a consumable, and we didn’t own the vehicle for much longer after this)
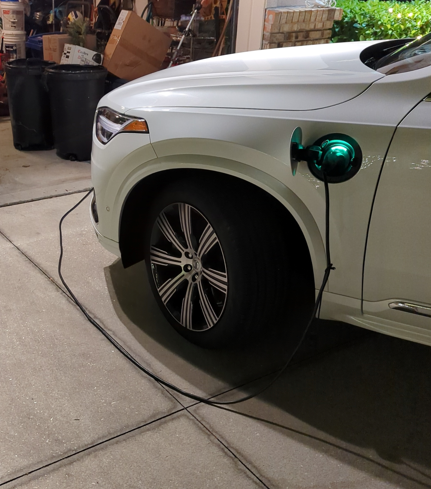
Our Choice – a Volvo XC90
I won’t discuss all of the different vehicles we looked at, you know what your needs are, I will only say that my Wife test drove a Volvo, and it was pretty much a done deal. Safety is a major concern for us, so the Swedish car makes sense. We were also pleased to find out that the T8 model is a plug-in hybrid electric vehicle (PHEV). Put this together with our 5KW solar array, and we found a very efficient and comfortable option.
Also, if you haven’t seen the review by Jakub and Yuri over on The Straight Pipes, it’s worth taking a look:
Things You Might “Miss”
To be clear, we are exceedingly happy with this new vehicle, especially in favor of the Honda Odyssey. However, there are some cons when coming from a large minivan so lets get them out of the way first:
Storage Space is not as abundant in the XC90. It’s a good sized SUV, but it’s not anywhere near as large as the odyssey. The other odd issue is that the storage under the drivers arm rest is TINY! This is caused by the EV battery location, this is likely not an issue on T5/T6 models.
2nd Row Amenities don’t match those of the Odyssey, but this was something that we knew going in. It was a conscious choice to not have a rear entertainment system for the kids. There are only a few cupholders when the middle seat is occupied.
Accessing the 3rd Row is no where near as easy in the Volvo. As you would expect, the minivan was far superior in the area of 3rd row access and getting in and out of the vehicle. That said, considering the issues we had with the sliding doors, this doesn’t really matter.
That’s honestly it.
Why the XC90 is a Great 3-row PHEV SUV
There are other 3-row options out there, but for the most part, they are hybrids. The one notable exception is the Lincoln Aviator GT, but we found the Volvo to be a much smoother drive. The Volvo was also smoother when alternating between the electric motor and gasoline engine. You might think that the 18 miles of pure EV is silly and you will use the gas engine anyway. That may be true in your case – but not for us. Unless we are getting on the highway for an extended drive, or going on a long trip, we almost exclusively use the electric motor. We don’t use any gas on the trips to school, the grocery, or daily shopping.
Overall, the XC90 is a pleasure to drive and has been a flawless experience for us. The seats are vastly more comfortable than the seats in the Odyssey, and the overall ride comfort is exceptional. Charging is easy and quick with level 2 in our garage. If your in-laws happen to have a spare 20A 240V receptacle near where you park, then level 2 charging makes trips to their house that much easier (ours do). Be aware that this is a relatively small battery pack, not meant for long trips. In order to keep the battery fully charged between trips, you will need to get used to plugging in at home.
There is a bit of a learning curve with the electric motor, most obvious is the fact that it isn’t the fastest thing in the world. Becoming comfortable with the pedal position in hybrid mode may take some time. When in pure mode, you need to make sure you are not pulling out to close in front of anyone. If you do, you will need to use the kickdown pedal and fire up the gas engine. When the car switches from electric motor to gas engine (and back), it is completely seamless. We find that it frequently goes unnoticed.
Final Thoughts
I know better than to buy the first model year after a major refresh, but I never expected to have so many problems given our history with Honda. And I know what you are thinking, “You’re less than 10,000 miles into this new car, you WILL have problems later!!”. I am inclined to agree, but given how many issues we had almost immediately with the previous car, we’re already in better shape.
If anyone from Volvo is reading this, please make the upcoming long-range battery packs and electric motors backwards compatible with older models. I would happily pay for them when our current battery reaches its end of life.